How to save a document in Excel. Excel program - saving methods and its parameters. Method 1: Use a special insert
In this tutorial you will learn how to use the Save and Save As commands, and you will also learn how to save a workbook in compatibility mode. Excel 97-2003, and how to save the book in the format PDF.
Whenever you create a new document in Excel, you need to know how to save it for later access and editing. Excel allows you to save documents in several ways.
To use the Save As command:
To use the Save command:

If you are saving a workbook for the first time and select Save, the Save As dialog box appears.
To use AutoSave:
Excel automatically saves your workbooks as you work to a temporary folder. If you forget to save changes or Excel experiences some kind of malfunction, you can restore the autosaved file.
- Open a workbook that was previously closed without saving.
- Click the File tab and select Details from the pop-up menu.
- If autosaved versions of your book exist, they will be shown in the Versions. Click on the file to open it.
- A yellow warning will appear under the book's ribbon. To restore this version of the book, click Restore and then OK.
By default, Excel automatically saves the workbook every 10 minutes. If you worked with the table for less than 10 minutes and closed it without saving or there was a crash, then Excel will not have time to autosave.
If you don't see the file you're looking for, or you're looking for a file that doesn't have previous versions, then you can view all autosaved files by clicking the Manage Versions button and selecting Recover Unsaved Workbooks from the drop-down menu.

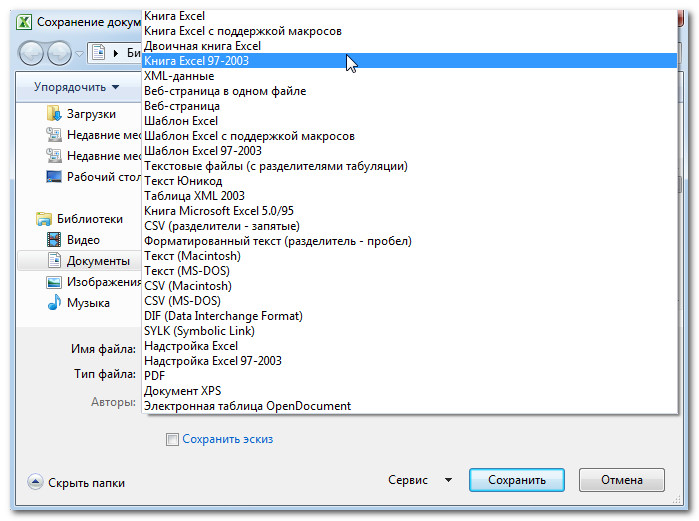
To save a workbook in Excel 97-2003 Workbook format:
To save a file as a PDF:
Saving your book as Adobe Acrobat The document, called PDF, can be especially useful if recipients don't have or use Excel. Saving as a PDF allows recipients to see the contents of the book, although they will not be able to edit it.

By default, Excel saves only the active worksheet. If you have several sheets in a book, and you want to save them all in one PDF file, then click on the Settings button. The Options dialog box appears. Select Entire Book and press OK.
XLSX and XLS formats- main toolbar Save in other formats... File>Save Document As>Workbook Microsoft Excel 97-2003 .
Advice. Save>XLSX dialogue Settings(menu Service>Settings…).
Document preparation
The choice of the design saving mode depends on how you will use the created document in the future:
- Rich text
The resulting document will retain the font style and size, the division into paragraphs, but the location of objects on the page and line spacing will not be preserved. This will produce solid left-aligned text. For text in which the reading order is from right to left, the alignment will be right.
Comment. Any text with vertical orientation in this mode will be displayed horizontally.
- Simple text
In this mode, text formatting will not be preserved.
Text
- Save numeric data in "Numbers" format
Specifies that when saving recognized text in XLS format, numbers will be saved in the "Numbers" format. This format in Excel is used to perform arithmetic operations on cells containing numbers.
- Save headers and footers
Check this option if you want the header and footer text to be preserved. If this option disabled, header and footer text will not be saved.
- Create a separate table for each page (XLSX only)
Picture quality
When saving to XLSX format, you can also save illustrations. If the recognized text contains a large number of illustrations, then the size of the final file can be very large. The quality of pictures and the size of the resulting file depend on the selected value in the drop-down list Picture quality.
Advice:
- To set parameters for saving pictures, select Custom…. In the dialog box that opens Custom Settings select the required values and click the button OK.
- If you do not want to save illustrations in the recognized text, make sure that the option Save images (XLSX only) not marked.
CSV format
- Click on the arrow next to the save results button on the main toolbar and select a saving format from the list. If required format not in the list, select item Save in other formats..., and in the saving dialog that opens, select the required format. You can also save documents using the menu command File>Save Document As>CSV document.
Advice. If necessary, you can configure additional saving options on the bookmark Save>CSV dialogue Settings(menu Service>Settings…).
This bookmark contains the following groups settings:
Text saving options
- Ignore text outside table
Specifies that only tables will be saved to the file.
- Separate pages with end-of-page character (#12)
Specifies that when saving recognized text in CSV format, the pagination will be the same as in the original document.
- Delimiter
Specifies the character that will separate columns of data in a CSV file.
Encoding
ABBYY FineReader automatically selects the code page. If you want to change the code page, select the desired value in the drop-down list in the section Encoding.
Those who constantly work with Microsoft Excel often have to wonder how to correctly copy table data while preserving formatting, formulas, or their values.
How to insert a formula into an Excel table and preserve the table format? After all, when solving this problem, you can save a lot of time. To do this, we will use the “Paste Special” function - this is a simple tool that allows you to quickly solve complex problems and master the general principles of its use. Using this simple tool allows you to quickly bring all tables into a uniform format and get the result you need.
How to copy a table with column width and row height
Let's say we have a table like this, the format of which needs to be preserved when copied:
When copying to another sheet using the usual Ctrl+C – Ctrl+V method. We get an undesirable result:

Therefore, you have to manually “expand” it to bring it into a convenient form. If the table is large, then you will have to “tinker” for a long time. But there is a way to significantly reduce temporary losses.
Method 1: Use a special insert


She received the original parameters and looks perfectly accurate.
Method 2: Select columns before copying
Secret this method The point is that if you select its columns along with their headers before copying a table, then when pasting, the width of each column will also be copied.

For each case it is rational to use your own method. But it is worth noting that the second method allows us not only to quickly transfer the table along with the format, but also copy the height of the rows. After all, there is no “line height” option in the Paste Special menu. Therefore, to solve this problem you should act like this:


Inserting formula values while maintaining table format
Although the special insert is not perfect, you should not underestimate its capabilities. For example, how to insert a formula value into an Excel table and preserve the cell format.
To solve this problem, you need to perform 2 operations using Paste Special in Excel.
Operation I:
 Operation II:
 Since the copied range is still on the clipboard after copying, we immediately call the paste special again and select the “formats” option. Click OK.

We have inserted the formula values into the table and saved the cell formats. As you guessed, you can also do a third operation to copy the width of the columns, as described above.
Helpful advice! To avoid performing the second operation, you can use the “Format by Sample” tool.
Microsoft Excel provides users with virtually unlimited possibilities for calculating simple functions and performing a number of other procedures. Using the program allows you to set formats, save cell values, work with formulas, transfer and change them in a way that is convenient for users.
Calling the command:
-group Books/Sheets -Books -Save all
The command saves all open books in the current session with one click.
What is it for? By default, there is no way to save all open books. It is only possible to close all books and save (to do this, you need to press the close application button while holding down the key Shift and when prompted to save, select Save All). But there is no need to close books often - you just need to save them. For example, when you simultaneously have to work with several open reports that are interconnected. And in such cases, as a standard, you have to switch separately to each book and press Ctrl+S or an icon on the panel.
With the team Save all This problem will no longer exist - just go to the menu - group Books/Sheets -Books and press Save all. All open books will be saved.
Please note that new books (which have not yet been saved to the computer) will be saved to the default folder (usually My Documents).
Note: in some cases, books are opened in such a way that each book belongs to a separate session (process). In this case this command will not be able to save all the workbooks and will only save those that belong to the process from which the command was launched. You can check how many Excel processes are running by pressing Cltr+Alt+Delete -Launch the task manager and in the window that appears, go to the Processes tab. If there is more than one process named EXCEL.EXE in the list, then several processes are running.
Writing Excel tables to a computer is called saving. This is a process in which we make a file from a table and add it to Local Disk. Then the file with the table can be opened on a computer, transferred to a flash drive, and sent over the Internet.
How to save an Excel table
1 . Click on “File” in the upper left corner of the program.
If there is no such inscription, click on the round button with colored squares. It is also located in the upper left corner of Excel.
2. From the list, select "Save As".
![]()
3. A small window will open. Through it you need to select a location on the computer where you want to write the table. This can be done through the left side.

Then I open the “Reports” folder.

If the required folder does not exist, you can create it directly in the window. To do this, click on the button “ new folder"at the top.
I'm checking to see if the save location is correct. It will be written at the top of the window.
4 . Type a name for your file or leave it as your computer suggests. The name can be changed at the bottom, in the “File name” line.

The window will disappear - this will mean that the file with the table has been written to the specified location.
Now you can close Excel and try to find the recorded file on your computer. To do this, open the location you selected when saving. There should be a file with the specified name or the standard name “Book 1”.
Important! When compiling a table better time save it from time to time. To do this, use this button in the upper left corner of the program:
Clicking on it will overwrite the table. That is, the previously recorded option will be replaced by a new one. This is necessary to avoid accidentally losing data. After all, if the computer crashes (freezes, power outage), then there is a high probability of losing the table.


