How to disable auto-update on meise. How to disable updates on Android? Disabling automatic updates using the Play Market
Despite all the usefulness, root access is considered a potentially dangerous tool. This is due to the fact that with its help, Meizu smartphone owners have the ability to edit data from system partition Android. And if you accidentally delete the wrong file operating system can simply fly off, and the gadget itself. Therefore, if the unlocked Superuser rights on the mobile device are no longer needed, it is better to close them. Let's see how to disable root access on Meizu phone.
Ways to delete a superuser profile on Meise
In many cases Account superuser's main administrator is truly an indispensable tool. It allows you to erase pre-installed applications, open the hidden features of a particular program, install a custom one, and much more.
Root rights often lead to OS malfunctions and can block the next update of the Flyme shell over a Wi-Fi network. Another disadvantage of root is the cancellation of the current warranty on the device. So if you need to take your phone to service center, it is better to remove extended access.
Complete removal of root on Meizu can be done in several ways:
- through special software;
- manually;
- through to factory ( hard reset);
- by flashing the device.
Let's take a closer look at each of the proposed options.
Erasing root access through special software
There are many programs on the Internet designed specifically for managing root rights mi on mobile devices. Some utilities can only open or close the Superuser profile, while others are endowed with both functions at the same time. The most effective means to disable rooting on Meizu M5, U10 or another smartphone are:
- Universal Unroot;
- SuperSU.
The first program closes root like this:
After the reboot, all traces of previously set rights will disappear on Meizu.
The only drawback of Universal Unroot is that it is paid. Therefore, instead of this program, many use a free analogue for erasing root - the SuperSU utility.
To remove root rights on Meizu M3 Note, just install and open SuperSU, then go to the "Settings" tab and start the cleaning procedure by tapping on the appropriate button. 
If the superuser profile on Meise was opened through a laptop or PC and the Kingo Root program, you can get rid of it in the same way.
Manually erasing root access
You can also turn off Superuser rights on your phone manually. The only thing required for this is file manager able to work with system memory. Root Explorer is perfect as such a tool:

Removing the Superuser profile via hard reset or flashing
Considering how to remove root rights on Meizu, it is necessary to note the method that involves full formatting mobile device. In this case, not only extended access will be erased on it, but also all user data, applications and settings.
To perform a hard reset you need:

You can also remove the rights of the main administrator by flashing the device. This procedure performed on Meizu in that order.
Many smartphone users download too many apps and then complain about constant updates. Also, new smartphones receive notifications about system updates that cannot be closed just like that. Today we will find out how to disable updates android applications and system updates.
In spite of positive sides automatic android updates applications, given function has its drawbacks, for example, updates often require more free memory on the smartphone; during the next update, the battery is discharged much faster than you planned; the user can choose to upgrade via the 3G network, resulting in spending a huge amount of money on mobile data.
If one of these problems is familiar to you, don't worry, you can disable Android app updates.
How to disable Android app updates
operating room android system offers several options for dealing with app updates. You can disable all updates or limit updates to only WiFi networks. You can also leave automatic updates for certain applications.
To turn off Android updates (or turn it back on), follow these steps: 
- open Google Play.
- Click on the hamburger icon (three horizontal lines) in the top left corner.
- Click "Settings".
- Click "Auto-update apps".
- To disable app updates, select the option "Never".
- If you want apps to automatically update only when you're connected to a Wi-Fi network, then select "Only via WiFi".
How to disable Android system updates
If you are interested in the question of how to disable system updates on Android, then you need to follow these steps: 
- Open the Settings menu and go to Applications - All.
- Find the Software Update application and open it.
- Next, click "Disable" and confirm your choice with the OK button.
Ready! Now you know how to disable Android updates.
You have a smartphone with android and suddenly displays a system update notification. Not all updates are good - some can negatively affect your phone and you choose to ignore them.
However, the phone haunts you and still displays updates. How to disable it?
While for high-end smartphones, system updates are pretty well thought out (although updates like Lollipop for the Galaxy S5 aren't very warmly received there either), in the case of low or mid-range phones, updates to new version can lead to large slowdowns of the device.
Not surprisingly, some people want to ignore updates and use the current version of android. How to remove it?
Method one - disable update notification without interfering with the system kernel
As a rule, in most cases, intervention in the kernel is likely to be required to disable the android system update notifications.
However, some smartphone users confirm that they disable these messages on a non-rooted phone (eg LG G3).
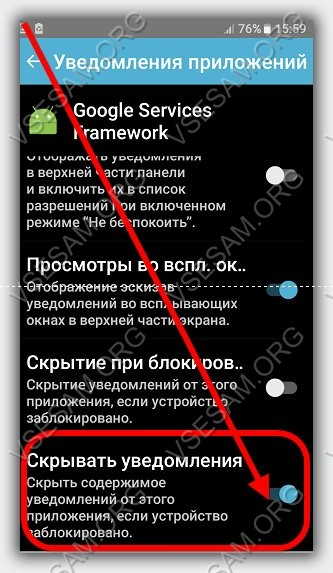
The solution is to turn off the display for the two system applications- "Google Play Services" and "Google Services Framework".
To do this, go to "Settings" and select "Applications". Now move your finger to the side to view all applications or click "application manager" (top first in the list) - depends on the version of android.
If you chose the second item, then click "Options" in the upper right and select the line "show system applications"
Let's start with "Google Services Framework". Find it and click on it.
Now click on the "Notifications" section.

After going into it, move the slider to the left or uncheck the checkbox opposite the "notification permission" parameter

That's not all. Scroll to the bottom of the screen and move the slider to the right, or check the box next to the “Hide notifications” option or turn it off (also depends on the version of android).
Now we return to the list of applications and do the same for “Software Update” and “Google Play Services” - turn off notifications in both.
- WARNING: You can also turn off app updates, not just app notifications.
Now restart your device. If the message still remains, then the device needs to be rooted.
Method Two - Disable Update Notifications
The second solution is to disable the system service that runs in the background and is responsible for updating the android system.
To do this, you need to get root rights and install the "Disable Service" application. We launch the application and go to "System" (on the right) to display system applications.
In the list, look for the application "Google Services Framework" and select it. Now, at the top left, select Show all services running within the application.
At the bottom, we must find the "SystemUpdateService" service. To turn it off, simply uncheck the checkbox next to it in the list. Update messages should no longer appear. Good luck.
In the Flyme 6 system, the work of applications in the background and the settings for receiving notifications have been slightly changed. The Smart Sleep feature has appeared in the security center, which saves the battery of the smartphone. When it is enabled, applications in the background are not active and notifications do not come until the smartphone screen is turned on. Each application individually can be allowed to work in the background or prohibited, then after turning off the screen, the application will work for 5-15 minutes and will automatically close. If you do not receive notifications from Viber, WhatsApp, Vkontakte, Messenger and others, then follow next instruction.
Setting up notifications on Flyme 6
1. Launch the application Security->Power Management->Settings (gear icon in the upper right corner) and switch the "Smart sleep" slider


2. Next, go to the item Manage permissions-> Manage background processes, here we select applications associated with Google and applications from which you want to receive notifications and switch to the "Continues to work in the background" mode.


If after installing Flyme 6 you restored applications from a backup through Flyme backups, then this instruction will not help, you should reinstall all applications.
update 29.03
If notifications (vk, viber, messenger and others) continue not to arrive, do the following:
Go to Security -> Data -> Network Access -> scroll to " Background mode» and choose desired applications"Allow background data transfer" setting
In anticipation of the release of the final Flyme versions 6 we would like to tell you in detail how to correctly update the firmware on MEIZU smartphone. Today we will consider the option of data cleaning and subsequent recovery. backup, since this method is quite fast and recommended by the Flyme community. I note that updating the software without clearing the data is only possible within one version of Flyme, while the stable operation of the device is still not guaranteed. When you change the version of Flyme, for example, from Flyme 5 to Flyme 6, cleaning is required, and a backup copy with its subsequent restoration will help you not to install or configure the device again, since all data will be saved in its original form.
Let's get started!
Firmware download
You can download the current firmware version on our website in the section or on the official Russian MEIZU website at this link. In both cases, we need to select our smartphone and download the firmware specifically for it.
You can download the update either directly to your smartphone through the built-in browser, or to a computer, followed by copying the firmware file to the device.
Personally, it’s more convenient for me to download the update directly to my smartphone so as not to spend a few extra minutes copying the archive to the device.


As soon as the firmware download is completed, we need to transfer the update archive, which has the name "update.zip", to the root folder of the smartphone's memory. To do this, let's go to standard application"Explorer", in it we click on "Local Files", select the folder "Download". Depending on the version of Flyme and the built-in browser, the firmware file can be either here or in the "Browser" folder, which is located in the "Download" folder. In our case, "update.zip" was downloaded to the "Download" folder.


We make a long tap on the "update.zip" file so that it is highlighted with a tick and press the "Move" button, then press " Inner memory" and "Move ...". That's it, now our update file is in the right place. Leave it here for now and move on to the backup.


Back up SMS and call history
The first thing I recommend to start creating a backup is this backup of messages and call history. For this I suggest using free program SMS Backup & Restore. You can download it on Google Play using this link.
Download the application and go to it.
Before us will be a simple and intuitively understandable interface. We are interested in the "Make a backup" item. The program will prompt you to create a backup in Google Drive, Dropbox or in the smartphone's memory itself. The shortest way is to save the SMS backup on your smartphone in the default folder. This is what we will do by clicking on "Local Backup" and "Default Application Folder".


I recommend leaving the checkboxes on the next screen as they are. Unless, if you use MMS, you can additionally save MMS messages. Now click on "Archive now", wait for the end of the process and see how many SMS and calls have been copied.


At the end, the program will offer to set up automatic saving of backups. We press no, since we only need a backup copy to update the firmware.

It is important to make a copy using SMS Backup & Restore before the main backup, so that both the program and our backup are saved along with a full backup of the smartphone.
Backing up settings and programs
To create a backup copy of settings, programs (with settings), contacts, calendar and photos, we will use the backup utility built into Flyme. To do this, let's go along the path: Settings - About phone - Memory - Copy and restore.


Let's press big button BACKUP COPY and tick everything except SMS, MMS and Call Logs, since we created a copy of them earlier.


The backup process will begin and take some time. As soon as copying is completed, the utility will notify you of the success of this operation. Click DONE and proceed directly to the flashing.


Firmware update
The firmware of the device can be started through the "Explorer", so we go into it, press " local files"and scroll down to the file with the firmware.


Tap on the file name, be sure to check the box next to "Clear data" and click "Update now".

The flashing process will begin, which will last about 10-15 minutes. I recommend keeping the smartphone on charge all this time so that it does not suddenly turn off during the flashing.

Restoring backups
After flashing with data cleaning, we got virgin clean smartphone as after the bidding successfully. We need to carry out the initial setup, and then restore our backups.
If you do not know how to perform the initial setup, then I described this process in detail in this article:
As soon as we are on the desktop of a freshly flashed smartphone, we go along the path Settings - Storage and backup(in Flyme 6 this item is made separately) - Copying and restoring.


Select our backup and click "Restore".


The restore process will begin and will take slightly longer than the backup. During the restoration, the Google Installer window will pop up, which will automatically begin to restore Google services. To understand when the restoration of all data is over, you need to return through the multitasking menu (swipe from the bottom edge of the display up) to the built-in backup utility.
As soon as we see the cherished 100% and the "done" button, we need to necessarily restart your smartphone so that the desktop icons return to their places.


After the reboot, we will only have to restore the history of calls and SMS. To do this, open SMS Backup & Restore, click "Restore", select " Local storage backup" and click "Restore".


