A program for remembering Windows 10 passwords. An easy way to reset an account password for any version of Windows! Resetting Hard Reset
Due to numerous requests from readers, I decided to write a detailed and simple instructions, how to reset the password for a user account in any Windows versions: 10, 8.1, 8, 7, XP.
So, you turned on the computer, and the system asks you to enter a password to log in. You enter the user's password, but it does not match: the “invalid password” error appears. What to do if no password is suitable, but you need to log in? There is a solution - you can reset your password using special program, recorded on a bootable USB flash drive. Now I’ll tell you how to create such a flash drive. 
You will need to briefly use any others computer. To do this, you can contact a relative, friend, neighbor, maybe you have a computer at work - I think this is not a problem now.
So, we sit down at another computer or laptop. Insert any flash drive into it:
Download free program to reset Windows passwords – . You can download it from the official website (or from my Yandex.Disk): 
Run the downloaded file lsrmphdsetup.exe:Install the program as usual: i.e. We agree with everything and press the ““ button in all windows. Next" In the last installation window, click the “ Finish” – the program will start automatically and its shortcut will be created on the desktop: 
In the start window, click the button Burn Bootable CD/USB Disk Now!(“Burn bootable CD/ USB disk right now"): 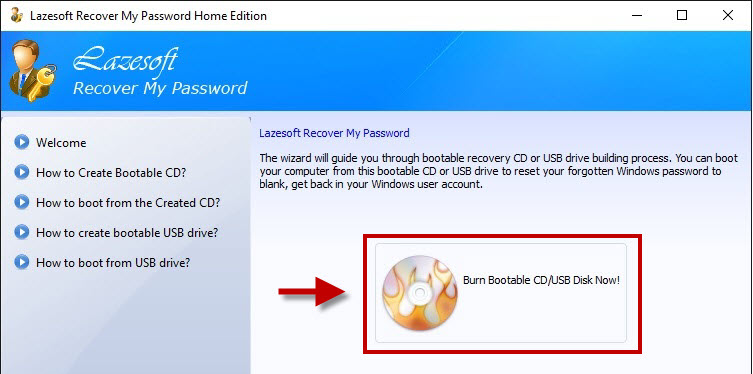
In the next window select Windows version, which is installed on the computer where we will then reset the password. Not on the list Windows 10, but it’s not scary: if you have a “ten”, then choose here Windows 8.1 with your bit depth.
By the way, on one of the forums I saw a message that you can create a bootable USB flash drive with Windows 8.1 64-bit, and it will be suitable for resetting the password on any version of Windows (I checked on Windows 10 64-bit and on Windows 7 64-bit - so and is): 
After you have selected the desired version of Windows, click the “ Next”:

In the next window, place a marker on the item USB Flash
and select the letter of our flash drive (it is already inserted into the computer). In my case, the letter of the flash drive: F.
Then press the button “ Start”:
The program will take some time to load necessary components from the Microsoft website:

After this the program will ask: “ Should you format your USB drive now?“All files, if they are on the flash drive, will be deleted. Press the button “ Yes”:
Now we wait until the bootable USB flash drive is created:


At the end of the process, press the button “ Finish”:
 All! The bootable USB flash drive with the password reset program is ready. We take it out and take it to our computer.
Insert the bootable USB flash drive into your computer. And now comes the most important, and at the same time, the most difficult moment for those who will be doing this for the first time. We need configure the computer to boot from our flash drive .
Those who know how to boot a computer from a flash drive can go straight to the end of this article. For those who don’t know how to boot from a flash drive, I’ll try to explain as clearly as possible:
============================================================================================
In order to “force” the computer to boot differently than usual (i.e. with hard drive), and from the device we need (in our case - from a flash drive) - we need to enable a certain setting in Bios computer.
To get into this very Bios, we must immediately after turning on the computer press a certain key on the keyboard (and press not just once, but many, many times until we see the BIOS on the screen).
On different computers On laptops this key is different:
- The most commonly used key is Delete(or Del ).
- You can also often call up the BIOS using the key F2(and on some laptops Fn+F2 ).
- Keys are used less frequently Esc, F1, F6 and others.
In general, immediately after you press the Power button on your computer or laptop, do not wait until it starts Windows boot, and immediately start pressing the key many times Delete on keyboard. After a few seconds (5-10) you should see Bios.
If nothing like this appears, and your Windows starts loading as usual, then we don’t wait for anything else: we reboot our computer again (you can directly Reset button) and try to press another key many times - F2.
If you don’t get into the BIOS again, reboot the computer again and try pressing the next key - Esc. After F6 etc. But hopefully you won't have to experiment for so long: in the vast majority of cases, either the Delete or F2 key works.
By the way, a hint about which key to load the BIOS usually flashes at the bottom of the screen immediately after turning on the computer. But for some reason no one looks at her, or does not have time to look at her.
On different computers Bios different, and it looks different for everyone.
For example, on my computer it looks like this: 
On another computer it will be like this: 
On the third computer it’s like this:  That is, I say this because it is almost impossible to write separate instructions for each Bios.
The main thing that anyone who needs to configure booting from a flash drive should know: in the BIOS (no matter how it looks like for you) you need to find the section where the word is present Boot(from English “Loading”). By using the arrows on the keyboard to navigate to this section, we put it in first place in the list boot devices flash drive.
In Bios, the flash drive may be displayed with its own name (for example, Transcend), or as USB-HDD; There are other options. One thing is important: it must be selected as the first device from which the computer will boot.
Usually the flash drive is “raised” to first place using the arrows on the keyboard, or the keys +/- , or F5/F6.
Having set the setting we need in the BIOS, we must leave it, not forgetting to save changes made. To do this you need to go to the section Exit(it’s usually the last one) – and there select the item “ Save and Exit” (“Save and Exit”). And then confirm once again that we are leaving by clicking “ Yes”.
That's all: if you did everything correctly, the computer will reboot and boot from the flash drive (press the Delete key again, or F2, or something else - no need!).
Many people don’t even want to get involved with the creation bootable flash drive with any software, because They are afraid that they still won’t be able to configure the computer to boot from it. I tried to describe this entire process of booting from a flash drive in as much detail as possible. If you have mastered this text, I hope it has become at least a little clearer and now all that remains is to practice.
===============================================================================================================
So, I created a bootable USB flash drive with a password reset program on another computer. I insert this flash drive into my computer and turn it on.
Immediately I press the key many, many times Delete on keyboard. After a few seconds I get into Bios.
Using the arrows on the keyboard, I go to the section Boot(although in my Bios you can work with the mouse - in older versions of Bios this will not work).
Here my first device now is HDD
(ACHI PO: WDC WD50...):  I select this line using the arrow on the keyboard and press the key Enter. A list of devices from which you can boot opens. In my case, this is a hard drive and my flash drive (it is listed here twice). We raise to the first place in the list - flash drive(if there is a choice: USB or UEFI, then choose UEFI). We do this using the arrows on the keyboard or keys +/-
, or F5/F6:
I select this line using the arrow on the keyboard and press the key Enter. A list of devices from which you can boot opens. In my case, this is a hard drive and my flash drive (it is listed here twice). We raise to the first place in the list - flash drive(if there is a choice: USB or UEFI, then choose UEFI). We do this using the arrows on the keyboard or keys +/-
, or F5/F6:
Now the flash drive is in first place in the list of boot devices: 
Now we exit here, saving the changes. To do this, move the arrow on the keyboard to last section Exit. Select the line Save Changes and Exit- press the key Enter:
Then select Yes:
After a while, a menu opens in which, using the key Enter we select an item Lazesoft Live CD:
Wait while it downloads: 
In the next window, check that the item is selected Reset Windows Password(“Reset Windows Password”) and press the button Next:
A window will pop up with a message about non-commercial use of the program - click Yes:
Click again Next:
In the next window highlight the username, whose password will be reset and click Next:
Click on the button RESET/UNLOCK:
The password has been successfully reset - click OK. Then Finish:
We go to “ Start” and press Reboot Computer("To restart a computer"): 
Click OK:
After the computer restarts, we can login to windows without password!

Each of us sooner or later has problems with passwords! A familiar picture. You sit down in front of your computer, hoping to finish some urgent work, try to enter your Windows 10 login credentials, and then realize to your horror that you absolutely do not remember your password!
The first thing that comes to mind is that you need to work less at night... You go through dozens of options and nothing, there was no access, and there is no access!!! And then an idea comes - you need to reset your Windows 10 password! I think many people remember how to do this in older versions of "windows", but how to do this in the new one?
Fortunately, the reset procedure in Windows 10 is largely similar to the same procedure in Windows 8 and older versions of this OS. Although with some minor reservations. In this review article, I will introduce you to the basic methods for resetting your password. They are suitable for both Microsoft Live accounts and local accounts.
1. Use the Password Reset Tool to recover your Microsoft Live account password
The first and most obvious solution is to use the standard reset function available on a special recovery service Microsoft passwords. A window opens on the service page asking why you can’t log into Windows 10? You will be asked to choose one of three options. In our case, the very first one is suitable - “I don’t remember my password.” But this is only if, when installing the system, you linked your account to network service authorization of Microsoft accounts.

I won't go into detail about this reset option. I will only note that the official password reset procedure in Windows 10 is standard and you must be prepared to undergo verification. To do this, you will need to provide your personal data, such as E-mail and phone number.
If this option doesn't suit you, no problem. In our area, registration Microsoft records still not popular. Fortunately, there are other ways that will help you regain control of your computer. Alternative ways to restore access in Windows 10 are not so obvious and use different workarounds. Let's look at them one by one.
2. Reset Windows 10 password via password reset disk
Using a Password Reset Disk is another standard way Microsoft has implemented to regain control. The only disadvantage of this method is that the disk must be created in Windows 10 in advance, even before access is lost.

By creating a Password Reset Disk, you can easily regain access to Windows 10. In the near future I will devote a separate article to this method.
3. Use alternative authorization methods to reset the main password
Perhaps you still have access to the operating system through alternate authentication? Using a PIN code, graphic code or through a second account? If so, then you have a chance to log in in a roundabout way and reset your Windows 10 password through the command line.
- Log in to the system using one of the alternative ways, press the Windows logo key and the X key simultaneously. Find “Windows PowerShell (Admin)” in the list of available system tools and launch it. PowerShell is an updated edition of the shell command line, but with expanded capabilities.
- Type the following in the utility window:
net user "account_name" "new_password";
Instead of "account_name" enter the name of your account,
Instead of "new_password" enter New Password(quotes should be removed).
- Success will be indicated by the message “Command completed successfully”
4. How to reset your password on Windows 10 via MSDaRT
The DaRT (Microsoft Diagnostics and Recovery Toolset) toolkit has been released by Microsoft for quite some time and helps IT specialists restore computer functionality. DaRT functionality also includes the ability to reset your password. To do this, you need to boot your computer with boot disk DaRT Recovery CD and run the built-in Locksmith Wizard utility. It is in this utility that you can restore the login for any account Windows entries 10.

Unfortunately, the DaRT toolset is not free. This utility is only available for corporate clients Microsoft, TechNet Plus and MSDN subscribers.
5. Reset the Windows 10 password using the PCUnlocker utility
The PCUnlocker utility allows you to unlock Windows computer, which would be blocked due to forgotten password. She represents boot image, which must be written to a CD or flash drive using one of the appropriate programs. For example, UltraISO or Rufus. After loading from such a disk, you will see full list local accounts used in the current Windows installation 10.
- Select the required account from the list and click on the “Reset Password” button.
- The program will check the status of the selected account and offer you one of the options to solve the problem:
Remove the password if the Windows account was protected by it,
Connect the associated Microsoft account to the local account,
Raise the rights of a standard or limited user to administrator level,
Activate your account if it has been disabled,
Unblock a blocked account and so on...
- Once you reset your password and sign in to Windows 10, be sure to set a new one and make sure you don't forget it in the future.

6. Reset your password by rolling back Windows 10
If you do not want to use any additional software or if your hard drive is encrypted with BitLocker, you can use another technology. Simply roll back Windows 10 to a previous state that stores old data. Select the appropriate restore point and follow the standard rollback steps system files Windows 10 to older versions. But remember that you will then have to reinstall software installed after the date the restore point was created.
So what did we get in this article? I quickly walked you through how to reset a Windows 10 password that you forgot or lost the hint for. In the future, I will try to take a deeper look at each of the mentioned methods so that you do not have problems accessing the new OS.
Good afternoon Today I will tell you, how to make a USB flash drive to reset your password. It's no secret that your Windows login password can be easily forgotten or lost. What to do in such a situation? It is precisely for such cases that you need a flash drive to reset your Windows password. Below we will look at two options for creating such USB flash drives, the first is simple, the second is more complex, but more effective than the first.
First way. Creating a flash drive for password reset using Windows OS tools.
I'll say right away that this method has some disadvantages. It is suitable if you create a flash drive in advance, that is, in advance. I also want to note that this method involves resetting the local account password. This means that if you use a Microsoft account, then you can safely skip the first method and go to the second.
So let's get over it. This method Suitable for Windows 7, 8 and 10.
Let's go to Control Panel - Accounts user records,


On the left we find the item “Create a password reset disk” and click on it. If you are using a non-local account, then this item will not be available.

The Forgotten Password Wizard will open. Now just follow what is written and in literally three steps the flash drive will be ready. At the end of the operation, a special file called userkey.psw will be written to your flash drive, which will help you reset your operating system password.
Now there's just a little bit left to do. All you have to do is plug the flash drive into your computer and enter the wrong password when logging into Windows (since you don’t know it, it won’t be correct). In this field, a password reset button will appear at the bottom, clicking on which will open the password recovery wizard, just follow the instructions. In principle, nothing complicated.
Second way. Using the Online NT Password & Registry Editor tool
I can say that it's quite powerful tool to reset passwords and more. I used this utility for a long time, and even now it has not lost its relevance. The main thing is to update on time.
The free Online NT Password & Registry Editor can reset local account passwords for Windows 2000, Me, XP, Vista, 7, 8, 8.1 and 10. The image of this utility can be easily written to either a disk or a flash drive. Moreover, if you use a Microsoft account, then using Online NT Password & Registry Editor you can bypass the protection and get full access to PC.
Let's look at how to create a bootable USB flash drive to reset system passwords. Let's go to the official website of the developer Online NT Password & Registry Editor http://pogostick.net/~pnh/ntpasswd/bootdisk.html, then go down until we see the Download section. We are interested in the latest release for USB, and we will need to download it. You can burn an ISO image for CDs.

We have downloaded the archive, now let’s unzip its contents onto a flash drive. The flash drive should preferably be empty. If it is bootable, then format it. I already wrote.
Next, launch the command line (Start - enter cmd in the search) and enter the command f:syslinux.exe -ma f:
Where f is the letter of the flash drive. You can find out the letter of your flash drive by going to “Computer”. If you get an error, enter the same command only without the –ma parameter.
If suddenly this method does not work, then you can download the Online NT Password & Registry Editor image for disk using the WinSetupFromUSB program and write it to a USB flash drive. I wrote about how to use this program.
So our flash drive is ready, so we can start. Connecting USB drive to the computer. Now we need to boot from the flash drive; to do this, when you turn on the computer, call Boot menu and select the required drive. Or you can set the BIOS to boot from a flash drive.
will be highlighted home screen, where you will be prompted to select options. As practice shows, you can simply press the Enter button. However, there are situations that make it necessary to use one of the listed commands.

Next we see a list of partitions on which Windows is installed. At this stage, you need to indicate the number of such a section. There are also various options here, however to a simple user you don't have to use them.


Afterwards, select the user data and passwords option again. This is the section for editing user data and password,

Next, the program will display a list of users, where you can see who is the admin and who is just a guest. You can also see whether a particular user is blocked. Please note that on the left side of the list there is a RID column, which is unique to each user. You need to select the desired user by entering their RID and pressing Enter,
Hello friends! I've been wanting to tell you for a long time, Howhack admin password in windows 10 using one cool program called Active Password Changer.
How to Crack the Administrator Password on Windows 10 Using Active Password Changer
Laptops are often brought to me at work, the owners of which simply forgot their password to enter the operating system and now do not know what to do. In this case, the problem can be solved in several ways, for example: use a bootable USB flash drive with the program Lazesoft Recovery Suite Home, or boot laptop from installation disk Windows 10 and using the boot environment and command line to create another user with administrator rights and log in, there are several more ways, if interested, read ours, but today I will offer you an even simpler method.
The Active Password Changer program itself paid, but the author is a kind person,"sewed up" to the installer image BootDiskDOS.ISO, with which you can reset a forgotten administrator password in operating systems Windows systems 7, 8.1, 10, you just need to create a bootable USB flash drive, I will also show you how to do this.
In short, you can do this, follow the link to the official website of the Active Password Changer program
http://www.password-changer.com/
download it and install it,

and then take the image in the program’s personal folder BootDiskDOS.ISO and make a bootable USB flash drive from it, but I wouldn’t download and install the program just because of this, since The demo version will not crack your password for free, but will only demonstrate hacking.

You can do it easier, download BootDiskDOS.ISO on my o black
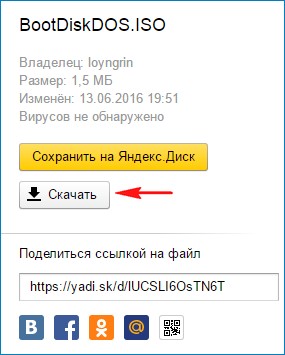
The ISO image itself weighs only 1.53 MB.

We create a bootable USB flash drive from it using the program.
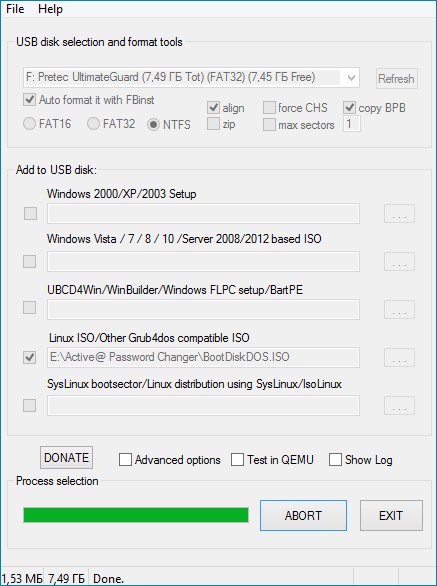
Let's launch the program. At the very top, in the list, select our flash drive.
Put a tick on the item Auto format it with FBinst and mark the item NTFS.
Check the box Linux ISO/Other Grub4dos compatible ISO and click on the button on the right,

An explorer window opens, in which you need to find the BootDiskDOS.ISO image, select it with the left mouse and click “OK”.

"OK"

We are warned that all files on the flash drive will be deleted (if you want to create a bootable flash drive without deleting files on it, then read this).
We agree “Yes”


The bootable USB flash drive is ready.

We boot our computer from this flash drive with installed Windows 10, on which we forgot the administrator password.

In the boot menu, select our flash drive.

Press “Enter” on the keyboard.

If we want to reset the password, then press “ 0 »

All Windows passwords stores in LM hash or NTLM hash format special file with title SAM(Security Accounts Manager (SAM).
We start searching for the SAM file - click on the “ 2 " and then "Enter".

Active Password Changer begins searching for a SAM file with password hashes on your hard drive.

SAM file found, click"Enter" on the keyboard.

The program found in the SAM file under number “1” my account with the name"Alex".
Press “1” and “Enter” on the keyboard

In the next window, the program by default offers to remove the password from the account we have selected.
Click "Y".

Password reset.

And we enter the operating system without a password.
Good afternoon, dear blog readers, today I would like to tell you how to create a bootable USB flash drive to reset the Administrator password in Windows. Previously, I told you How to create a floppy disk for resetting a forgotten Administrator password in Windows. Now let’s talk about creating a special bootable flash drive. We will create it using the Rufus utility and the Passware Windows KeyEnterprise 11 program.
To create a bootable USB flash drive, download the Rufus utility link above, the Passware WindowsKey Enterprise11 program can be . The program itself is packaged in iso image. Using this program you can reset your password on operating systems Windows since 2000, except Windows 8 .
By launching the Rufus utility, select removable drive(flash drive),


We launch the Passware Windows Key Enterprise password reset program; for this you need to go into the BIOS , using the F2 or Delete key and in the BOOT section select the “Boot from USB” option, press the F10 key and ENTER. When you first launch the program, it will detect the disk on which the operating system is installed.

To continue, click 1 at the bottom of the window. At the next step, you need to specify the user who needs to reset the password.

Having selected the user at the bottom of the window, press the Y key (agree) to reset the password. Confirm password reset Y and press the N key at the bottom of the window

We remove the flash drive, reboot the PC and log in.

If you need to immediately set a new password, then click on the “My Computer” icon and select the “Manage” item. In the window that opens, select “ Local users" - "Users",

select the one you need, right-click on it and click on “Set password”


