Create a private key container. Correct installation of the key in CryptoPro and installation of the CryptoPro EDS Browser plug-in. Adding a Registry Reader to CryptoPro CSP
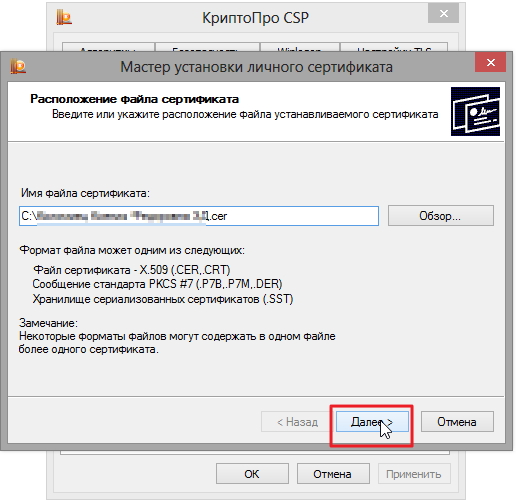
For installation, you will need a certificate file (a file with the .cer extension). To install a certificate, just follow these steps: Select "Start" / "Control Panel" / "CryptoPro CSP". In the window "Properties of CryptoPro CSP" go to tab "Service" and click on the button "Install Personal Certificate"(see fig. 1). Rice. 1. “CryptoPro CSP Properties” window In the window "Certificate Import Wizard" click on the button "Further". In the next window, click on the button "Overview" to select a certificate file (see Figure 2).  Rice. 2. Certificate file selection window Specify the path to the certificate and click the button "Open"(See Fig. 3).
  Rice. 3. Selecting a certificate file In the next window, click the button "Further", in the window "View Certificate" click on the button "Further". Select "Overview" to point to the corresponding private key container (see Figure 4).
  Rice. 4. Private key container selection window Specify the container corresponding to the certificate and confirm the selection using the button "OK"(See Fig. 5).
  Rice. 5. Key container selection window After selecting the container, click the button "Further", check the box next to "Install certificate in container"(See Fig. 6). In the window "Certificate Store Selection" click on the button "Overview"(See Fig. 6).
  Rice. 6. Selecting a certificate store You must select a store "Personal" and
Hello everyone! Since I work in the state. institution, I could not avoid using the CryptoPro program for working with crypto keys. Now everything seems simple and quite logical to me, but at the dawn of my career I had many questions in using this program.
Read about how to copy key container Crypto Pro and install personal user certificate
I think many people know about the well-known sites zakupki.gov and bus.gov ... the first one serves to post applications for holding electronic trading, and the second for posting information about the organization, however, both require the user's electronic signature, and it can only work if Crypto Pro is available.
When you generate an electronic signature, it is MANDATORY! must be saved to external media, but this may not always be convenient and not always reliable. Unfortunately, many organizations refuse to keep up with the times and still use a floppy disk as a digital signature carrier. I think it is not necessary to explain that a floppy disk is a very unreliable option for storing information. Therefore, it is better to have a copy of the key so that in the event of a media failure, you can recover, and not generate a new one, because if you generate a new one, you will have to wait for the certificate (At least one day).
When else might it be needed? For example, your heads. boo heap electronic signatures (ours already has 4 of them) and constantly sticking in turn is not always convenient, and the confusion is constant, so all these keys can be copied to the registry of your computer, and the real keys can be hidden away in a safe. Of course, you need to understand that having keys in the registry, in order to sign a document, the key itself is not needed - you only need access to the computer where they are installed, so be sure! when copying, set the password of the key container
Let's start. Launch CryptoPros CSP (issued by your local treasury) and go to the "Service" tab, click the "Copy ..." button

In the next window, we should click "Browse" and select the location of our key container, in my case it is a USB flash drive that has the letter F in the system (Drive F)

Now that the container is selected, we proceed to the process of copying it, make sure that you have selected the correct key and click "Next"

Give him a name

And indicate where to copy it, in my case, I copied it to the registry so as not to insert it every time ...

If you copied the key to the registry like I did, be sure to create a password!

That's all, a copy of the key container has been created on the media you specified 😉 now let's move on to the next step...
Unlike ordinary certificates, our certificate must be mapped to a private key, so simply clicking the "Install Certificate" button will not work, installing a certificate in cryptopro is different from the usual procedure.
Open the program, go to the "Service" tab and click "Install personal certificate ..."

Click "Browse" and select the user certificate


... and indicate where our key is located (in my case, I chose the key copied to the registry)

Checking that everything is correct

Select the certificate store "Personal"

We check whether we did everything correctly and click "Finish", this completes the installation of the cryptopro certificate.

If a flash drive or floppy disk is used for work, copying can be performed Windows tools(this method is suitable for CryptoPro CSP versions not lower than 3.0). The folder with the private key (and the certificate file, if any) must be placed in the root of the flash drive (floppy disk). It is recommended not to change the name of the folder when copying.
The folder with the private key must contain 6 files with the .key extension. Below is an example of the contents of such a folder.
Copying a container can also be done using the CryptoPro CSP. To do this, follow these steps:
1. Select Start / Control Panel / CryptoPro CSP.
2. Go to the Service tab and click the Copy button. (see fig. 1).

Rice. 1. “CryptoPro CSP Properties” window
3. In the window Copying the private key container click on the button Overview(see Fig. 2).

Rice. 2. Copying the private key container
4. Select a container from the list, click on the button OK, then Further.

Rice. 3. Key container name
6. In the "Insert and select media to store the private key container" window, select the media on which the new container will be placed (see Figure 4).

Rice. 4. Choosing a clean key carrier
7. You will be prompted to set a password for the new container. Setting a password is optional, you can leave the field blank and click on the button OK(See Fig. 5).

Rice. 5. Setting a password on the container
If copying to media Rutoken, the message will sound different (see Fig. 6)

Rice. 6. Pin code for the container
Please note that if you lose your password/pin code, you will no longer be able to use the container.
8. After copying, the system will return to the tab Service in the window CryptoPro CSP. Copying completed. If you plan to use it to work in the Kontur-Extern system new key container, you need to install a personal certificate (see How do I install a personal certificate?).
For bulk copy, download and run the Certfix utility.

We are often asked the question how to install a certificate through CryptoPro CSP. There are different situations: a director or chief accountant has changed, a new certificate has been received from a certification center, etc. Everything used to work, but now it doesn't. We tell you what you need to do to install a personal digital certificate on a computer.
You can install a personal certificate in two ways:
1. Through the CryptoPro CSP menu "View certificates in the container"
2. Through the CryptoPro CSP menu "Install personal certificate"
If used in the workplace operating system Windows 7 without SP1, then you should install the certificate according to the recommendations of option No. 2.
Option number 1. Install through the menu "View certificates in the container"
To install a certificate:
1. Select Start -> Control Panel -> CryptoPro CSP -> Tools tab and click the “View Certificates in Container” button.
2. In the window that opens, click the "Browse" button. Select a container and confirm your choice with the OK button.

If the message “There is no encryption public key in the private key container” appears, proceed to install the digital certificate according to option #2.
4. If you have “CryptoPro CSP” version 3.6 R2 (product version 3.6.6497) or higher installed on your computer, click the “Install” button in the window that opens. After that, agree to the suggestion to replace the certificate.
If there is no "Install" button, in the "View Certificate" window, click the "Properties" button.

5. In the “Certificate” window -> “General” tab, click on the “Install certificate” button.

6. In the "Certificate Import Wizard" window, select "Next".
7. If you have “CryptoPro CSP” version 3.6 installed, then in the next window, just leave the switch on the item “Automatically select a storage based on the type of certificate” and click “Next”. The certificate will be automatically installed in the "Personal" store.


Option 2. Install through the menu "Install personal certificate"
To install, you will need, in fact, the certificate file itself (with the .cer extension). It can be located, for example, on a floppy disk, on a token, or on a computer hard drive.
To install a certificate:
1. Select Start -> Control Panel -> CryptoPro CSP -> Service tab and click the “Install personal certificate” button.

2. In the “Installation Wizard” window personal certificate” Click on the “Next” button. In the next window, to select a certificate file, click "Browse".

3. Specify the path to the certificate and click the "Open" button, then "Next".
4. In the next window, you can view information about the certificate. Click "Next".

5. In the next step, enter or specify the private key container that corresponds to the selected certificate. To do this, use the "Browse" button.


If you have CryptoPro CSP 3.6 R2 (product version 3.6.6497) or higher installed, check the “Install certificate in container” box.

8. Select the "Personal" storage and press OK.

9. The storage you have chosen. Now click "Next", then - "Finish". After that, a message may appear:

In this case, click "Yes".
10. Wait for a message about the successful installation of a personal certificate on the computer.
That's it, you can sign documents using the new certificate.
Electronic document management more and more integrated into our lives.
Today this question concerns not only office employees of enterprises and individual entrepreneurs, working with electronic documents increasingly facilitates the solution of everyday problems for ordinary citizens and at home. Of course, with the expansion of the applicability of electronic documents, the distribution of electronic digital signature, for short - EDS.
It is about increasing the convenience in working with EDS that we will discuss further, namely, we will consider how to add EDS key to the CryptoPro registry
on the computer.
What is a digital signature and a private key certificate
Electronic digital signature used in many software products: 1C: Enterprise (and other programs for conducting business or accounting), VLSI++ , Contour.Extern (and other solutions for working with accounting and tax reporting) and others. EDS has also found application in servicing individuals in resolving issues with government agencies.
EDS- this is a kind of guarantor in the world of electronic document management, similar to a regular signature and seals on paper
As with the signing of paper documents, the process of signing electronic media is associated with " editing"primary source.
Electronic digital signature of documents carried out by transforming electronic document using the owner's private key, this process is called document signing
To date private key certificates most often distributed either on ordinary USB flash drives or on special secure media with the same USB interface (Rutoken
, eToken etc).
At the same time, every time when it becomes necessary to sign documents (or identify a user), we need to insert the key carrier into the computer, and then manipulate the certificate. Accordingly, after completing the work, it is enough for us to simply remove the media from the computer so that no one else can use our signature. This method is quite safe, but not always convenient.
If you use the digital signature at home, then every time enable/disable token gets bored quickly. In addition, the carrier will occupy one USB port, which is not always enough to connect all the necessary peripherals.
If you use an EDS at work, then it happens that the key is issued by the certification center alone, and different people have to sign documents. Carrying a container back and forth is also not convenient, and there are also cases when several specialists work with the certificate at the same time.
In addition, both at home and, especially, at work, it happens that on one computer it is necessary to perform actions using immediately multiple digital signature keys.
It is in those cases where the use of a physical certificate carrier is inconvenient, you can register the EDS key in the CryptoPro registry(more about the Windows registry in general terms can be found in the corresponding article: Changing Windows Registry Settings) and use the certificate without attaching the media to the computer's USB port.
Adding a Registry Reader to CryptoPro CSP
First of all, in order for our CryptoPro to be able to work with keys registered locally, it is required to add the variant of such a reader itself.
In order to install a new media type in the CSP utility, run the program as administrator right click mouse or from the menu of the utility itself on the General tab

Now go to the Equipment tab and click on the button Set up readers...
If there is no option in the window that opens Registry, then to display it here, click on the Add...

- Click the Next button in the first window.
- From the list of readers from all manufacturers, select the option Registry and click Next again.
- Enter an arbitrary reader name, you can leave the default name. Click Next.
- In the last window, we see a notification that after completing the reader settings, it is recommended to restart the computer. Click the Done button and reboot the machine yourself.

The first stage has been completed. Reader Registry added , as evidenced by the corresponding item in the window Reader Management (We remind you that this window is called along the path CryptoPro - Hardware - Configure readers...)

Copying the key to the CryptoPro CSP Registry
To write the key container in local storage , connect physical media with the key to the computer.
Now run the CryptoPro utility again, open the Service tab and click on the Copy... button.
Next in the window Private Key Container Copy Wizards click the Browse button (or By certificate...) and choose our key carrier, confirming the choice with the OK button, after which we proceed to the next window with the Next button.

In the new window, set an arbitrary friendly name for the created key container and click the button Done. Then, to write the key, select the type of reader we created earlier Registry, confirming the selection with the OK button.
After confirmation, we need to set a Password on the created key container, by default, most often, a password is used 12345678
, but for more secure work, the password can be set more difficult. After entering the password, click on the OK button.

Everything, key container added to the CryptoPro Registry .
Installing the CryptoPro CSP private key certificate
At the end of setting up the signing of documents without connecting the key carrier to the computer, we only have to install private key certificate from the created media container.
To install a certificate in CryptoPro, you must do the following:
- In the CSP utility, on the Service tab, click on the button View certificates in container...
- In the window that opens, click on the button Browse, where we select the desired media by the name we specified, confirming the selection with the OK button. Click Next.
- In the final window, we check the correctness of the certificate selection and confirm the decision with the Install button.

Now we have installed Private key certificate from local media Registry .
CryptoPro setup is complete, but you should remember that many software products will also require rewrite the new key in the system settings.
After we have done this, we can sign documents without connecting a key, be it Rutoken, eToken or some other physical medium.


