Windows 8 computer turns on. Computer help. Boot in Safe Mode with USB for System Recovery
What to do if Windows 8 won't start, which has gained a reputation as a fairly reliable operating system?
No matter how high-quality the product is, nothing is safe from all sorts of problems. Problems sometimes occur when starting this version of Windows. What if the OS suddenly stopped starting?
Is it possible to solve the problem on my own, or is the intervention of a specialist necessary? It depends on what caused this behavior of the operating system. These could be crashes caused by improper logoff, or something else.

In any case, if Windows does not start, you can try to provide the computer with first aid. In this article, we will talk about some actions that will definitely not harm, but can help.
What can you do in this case?
There are three steps that can be consistently taken to resolve the problem:
- Try to recover in safe mode.
- Take advantage of integrated tools to Windows recovery.
- Recover the system using bootable media (flash drive, disk).
Safe is the operating mode of the OS, in which you can take some measures to restore the normal functioning of Windows.
Almost no program is available in safe mode, only those components that are most necessary work. In safe mode, you can only activate system files and drivers, without which the OS does not work at all.
Special inscriptions in the corners of the screen will notify you if the computer is put into safe mode.
Safe mode makes it easier to scan for viruses. You can also restore Windows Boot Services in this state.
Be that as it may, you need to understand that in safe mode, no system files are protected from deletion. There are no administrator rights here, and due to inexperience, you can harm the OS if you remove anything necessary for its normal functioning.
How to put your computer into Safe Mode
If Windows has stopped starting, you can enable Safe Mode and try to restore the operating system to work. This should be done like this.
When turning on, press the F8 button on your laptop frequently. Before the system starts to boot automatically, a list of possible startup modes will open.
In this list, in addition to the three types of starting the system in safe mode, you can choose to restore the last correctly working Windows configuration, as it was before the failure.
This will not undo any of the saves you have made or destroy any recently created files. None of the programs will be removed.
- With access to the main components and the necessary drivers.
- With access to network drivers. This option should be selected if you need to access the Internet in a safe mode.
- With the command line.
All these modes are not much different. The most significant difference is access to the Internet in the appropriate mode.
Advice: If you don't have enough experience with a PC, it is best to try to restore the damaged system through the first type of mode.
How to restore Windows 8 operating system through Safe Mode
- Select the first option and enable system management by pressing the Windows + X key combination and selecting the "System" line in the menu that opens after this.
- After that, you need to select the line "Additional parameters". Go to the "System Protection" tab and find the "Restore" option. After that, prompts will appear to follow. None of them should escape your attention.
- In addition, in safe mode, you can try to find the error that caused Windows to crash. To do this, you need to view the event log.
In the same menu in which you selected the "System" item, find the "Management" line, then select "Service Components", "Event Viewer", "Logs", "System".
This is where all the OS records are located. Once you know the problem code, you can easily fix it.
Start Windows 8 using recovery service
If, for some reason, the OS on the laptop does not start, windows will offer to use the startup recovery service. In this case, you need to act in accordance with the prompts that appear on the screen.
Another option is to choose the built-in return to the last normally working system configuration instead of Safe Mode.
As already mentioned, this method is quite safe, neither your files nor your save will be harmed. But the problem, however, will not be finally solved, which means that it may repeat itself.
Recovering your system using installation media
If you have tried all of the above measures, and Windows still does not start, then you need to restore the system using a USB flash drive or disk. This option can no longer fail to work.
The bootable media has everything you need to restore your lost files and fix any errors. The system gains integrity.
To restore the operating system from a USB flash drive, enter the BIOS and select which disk to boot from.
How to do it?
- When turning on, press the "Esc" key on the laptop frequently until you enter the BIOS. Sometimes you need to press F12 or F10 to enter. If it is a stationary computer, you need to press the "Delete" button.
- Then open the section Boot device and select the desired storage medium. Secondary assign HDD.
- These settings need to be saved.
- Reboot your laptop.
Sooner or later, this happens to all users. Yes, yes, we like it or not, but everyone will have to face the launch of the operating system in safe mode, regardless of whether the latter is installed on the computer. Windows version 8 or old Vista. However, if everything seems to be clear with the time-tested OS, then many users can tinker with a brand new gift from Microsoft. Let's take a look at how easy and at the same time fast it is to run on Windows computer 8 in safe mode.
Method # 1: Launch from the Options panel
In order to use this method and enter safe mode, press the power button in the "Options" panel, and then, while holding SHIFT on the keyboard, select the "Restart" option on the screen:

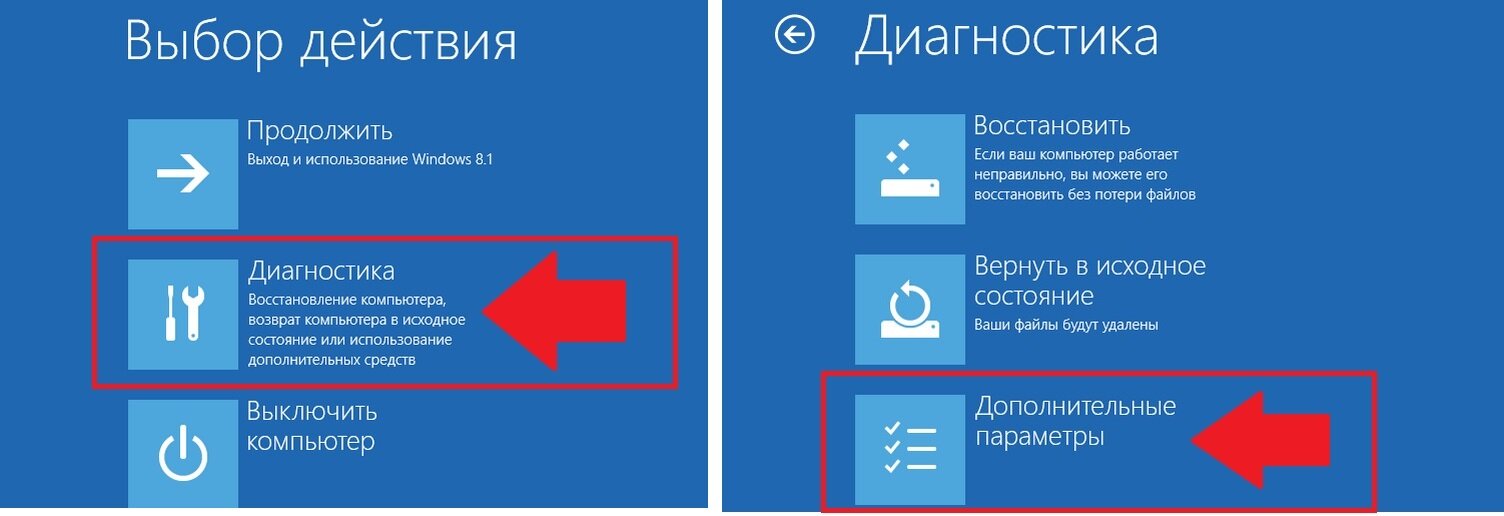
After that, in the "Select options" window, we find and select the "Diagnostics" tab by clicking the left mouse button, and then - "Additional parameters":
Our next step is to select the Boot Options tab in the new system window:

As a result, Windows 8 will offer, in particular, to run Safe Mode on the PC. We use this offer and immediately press the "Restart" button on the screen:

As a result, the PC will reboot. When you turn it on again, the system will display a number of options for turning on, among which there is also a safe mode. However, it will be presented in 3 versions:
- standard (enable by pressing the F4 button on the keyboard);
- with launch network drivers(activate with the F5 key);
- with a working command line (select by pressing F6).
We select the parameter we need and press the corresponding button on the keyboard. As a result, Windows 8 will restart in Safe Mode.
Method # 2: Starting from the command line
Those who have downloaded Windows 7 or any other OS from Microsoft at least once know that this task can be performed through the command line. You can use it in Windows 8, however, given the peculiarities of its work.
The first thing, of course, is. In this case, you can use different methods. In 8-ke, this is easiest to achieve if you press the hotkeys and X on the keyboard, and then select the option to enter the command line with administrator rights in the menu that opens. After the command line is loaded, we drive the value bcdedit / deletevalue (current) bootmenupolicy into it:

Note, if the parameter is entered incorrectly, the system will write a corresponding message in the command line. If it does not appear, then everything is in order and you can restart your computer. As a result, during the next launch of Windows 8, press F8 and select the required option in the familiar system window:

Please note that if you no longer need safe mode in the future, do not forget to turn it off by entering the bcdedit / set (current) bootmenupolicy standard parameter on the command line.
Method # 3: Boot using the System Configuration setting
To start Safe Mode on computers running Windows 8 using this method, you first need to do one of the following:
Use the "Run" program:
To do this, press the keys and R on the keyboard. Next, it's easy - enter the msconfig parameter in the "Open" line and click OK:

Use command line:
We launch the command line (see method number 2), drive the msconfig parameter into it and press Enter on the keyboard:

Whichever option you choose, as a result, the system window "System Configuration" should open. In it, in the "Boot Options" section, select "Safe Mode" and click OK:

As a result, Windows 8 will prompt you to reboot. We, of course, do not refuse (why should we try so hard) and send the PC to reboot. The result of such actions is simple - the OS will start in safe mode without unnecessary settings. Note that if you need a normal boot of the operating system, you will have to go to the "System Configuration" again. In this case, it will be enough to uncheck the Safe Mode item and save the setting with the OK button.
Method # 4: Launch using a bootable disk or USB flash-card with Windows 8
If for some reason you were unable to start Safe Mode on your computer using the previous methods, but you still have an installation CD / DVD or a USB flash drive with this OS, you can solve the problem with their help. Note that in both cases, you will have to act in a similar way. Let's offer for example Windows startup 8 on a PC in safe mode using boot disk.
To do this, insert it into the drive and restart the PC. Then we go into BIOS, select boot from CD / DVD and run the OS installer. Next, enter the settings (language, date, time, etc.) and wait until such a window appears on the screen:

Now, to open Safe Mode on your computer, click "System Restore" and perform the following actions one by one:
- In the "Select action" window, mark "Diagnostics";
- We select "Additional parameters";
- Click the "Command Line" tab;
- Enter bcdedit / set (globalsettings) advancedoptions true on the command line for execution, press Enter and close the tab;
- In the new window, click "Continue".
As a result, the system will restart in safe mode. To return the operating system to its original state, enter the value bcdedit / deletevalue (globalsettings) advancedoptions into the command line.
Method # 5: Launch with hotkeys
Why didn't we start with this method? Because it is not possible to use it to boot Safe Mode on all computers with Windows 8. In particular, if the PC has a UEFI BIOS or SSD installed, it will not work, but if standard mode BIOS works with this method without interruption.
If your situation is exactly like this, let's say that safe mode can be launched simultaneously with the OS boot by simply pressing F8 on the keyboard or by combining this button with with the Shift key... If you did it on time, a standard window will appear on the screen, as in method No. 2, in which you can select the appropriate option for loading the system.
As you can see, there are different ways to start Safe Mode in Windows 8. Just choose the way you like and go from dream to reality!
If your operating system does not load, then your the main task- identify the cause and, if possible, eliminate it. There are two possible scenarios for the development of events: damage to the computer hardware and the need to replace any component, or simply a system failure, which is solved by a simple rollback. Let's look at how to determine what caused the error, as well as how to fix the problem.
Attention!
All of the following actions are strongly recommended to be carried out only if you fully understand all of the above, so as not to harm your computer.
If after turning on the computer nothing happens and you do not see the OS boot process, then most likely the problem is a malfunction of some components of the device. The first step is to check if all the components of the computer are connected. To do this, unplug the computer from the mains and turn off the power supply using the toggle switch on the back. Open the case.
Reason 1: Hard drive failure
If, after performing the above steps, the problem persists, then proceed to check hard disk... A very common cause of the problem is a media malfunction. You can check its performance only by connecting the component to another computer. There are three possible scenarios for the development of events.

Option 1: HDD is detected by another computer and Windows boots
All perfectly! Your hard drive is working and the problem is not with it.
In this case, you need to check the disk for bad sectors. You can do this with special program Crystal Disk Info. It is completely free and will help you complete hard drive diagnostics. Run it and pay attention to items such as Reassigned sectors, Unstable sectors, Fatal errors sectors... If at least one of these items is highlighted in yellow, then broken sectors are there and need to be corrected.

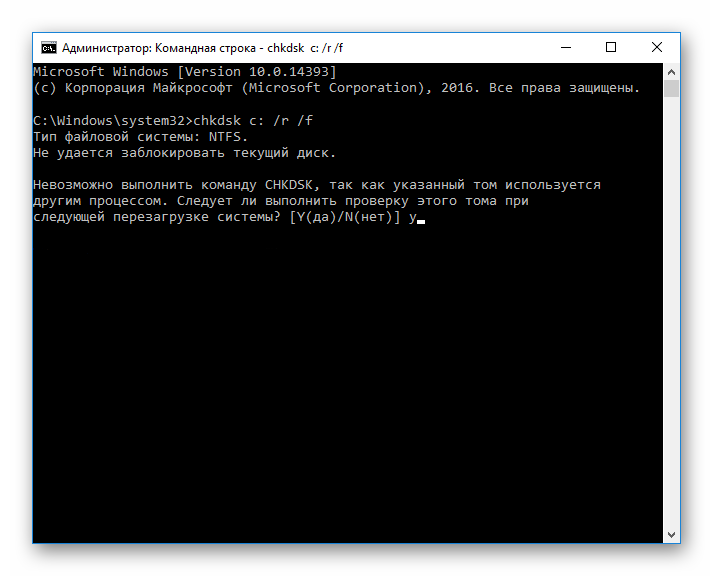
To restore bad blocks, run Command line as administrator. To do this, using the key combination Win + X open up context menu and select the appropriate item.

Then enter the following command:
Click on Enter... You will be prompted to perform a recovery after the system reboot. Enter Y and press again Enter... Then restart your computer.
Option 3: HDD not detected by another computer
This is the worst case scenario. In this case, you will have to purchase a new hard drive, since the old one, most likely, cannot be restored. But before doing anything, consult with service center... Perhaps your hard drive can still be restored to working condition. Otherwise, they will recommend you which drive is better to take and offer replacement services.
Reason 2: Some components are not connected
If your hard drive is working properly, then check the following components:
- Hard disk power cable;
- Flex cable that connects the hard drive and the motherboard;
- Are the memory modules seated tightly in the slots?

Reason 3: Faulty motherboard
If the above steps did not have any result, then the matter is not in the cables and the hard disk, but in motherboard... It is better to entrust such a problem to specialists and take the computer to a service center.

The system tries to boot, but nothing comes out
If you've turned on your PC and you see any signs that the system is trying to boot, then that's a great sign. In this case, you can avoid costs and solve the problem yourself.
Reason 1: Failed to launch explorer.exe
If the system boots, but you see only a black screen and a cursor, then the problem arose when the explorer.exe process was launched, which is responsible for loading the graphical shell. Here you can either start the process manually, or roll back the system - at your discretion.
Windows 8 System Restore may be required when critical errors appear in the PC. So that the user does not have to completely reinstall the OS, special tools are provided that allow you to restore your computer even without deleting files and changing general system settings. In this article, you will learn how to start recovering a computer or laptop on Win 8 in different ways.
Below are two options for the development of events: with a working operating system and with a faulty one. In the first case, you can perform recovery from the Windows 8 interface without a disk or flash drive, and in the second, you will need bootable media to copy system files... All methods are presented below:
- rollback from a restore point;
- using Refresh your PC;
- factory reset on a laptop;
- recovery using a bootable disk or flash drive.
Let's take a closer look at each of the methods. All instructions are fully functional and suitable for any Windows assemblies 8 32/64 Bit.
System restore point
This method allows you to roll back the OS to a certain state. You must do the following:
- Open "File Explorer" using the icon on the taskbar.
- In the left directory, find the item "This computer" and click on it right click mouse to select Properties from the menu.
- In the window that opens, click on the "System Protection" button.
- In the selected tab, click on the "Restore" button.
- On the first screen, click on "Next".
- From the list, select a checkpoint according to the date when the state of the computer was stable and working. Click "Next".
- To start the procedure, click the "Finish" button.
Now you know how to use a checkpoint to roll back the OS state.
Create a control point
If you do not have automatic checkpoints set up, you can do it manually. This option will come in handy if you encounter problems with the OS in the future:
- Open the Properties window again and click on System Protection.
- Next, go to the "Create" button marked in the screenshot.
- Enter a name and click "Create".
- Wait until the end of the procedure. After that, the current OS configuration will be saved as a checkpoint. You can easily restore this state in the event of a Windows 8 malfunction using the above instructions.
Rollback through "Options"
Windows 8 first introduced the Refresh Your PC tool. With its help, the user can roll back the OS state to the required one. You can save applications and settings, reset your PC to factory defaults, completely reinstall the system, or start a safe environment and perform the desired actions through it.
First you need to open "Computer Settings":
- Right-click on the "Start" icon and select "Find".
- V search bar enter the query "computer settings" and open the appropriate application.
- In the list of sections, select Update and Recovery.
- Go to the "Recovery" subsection. Here are the tools that allow you to return the OS to its original state or start safe mode.
The first option (1) allows you to restore the factory Windows options 8 without losing personal files, music, photos, etc. With the help of the second item (2), you can call the menu for a complete reinstallation of the OS and return it to the factory default settings. In this case, all personal files and installed applications will be deleted. By clicking on the button in the third paragraph (3), you can call the safe environment and continue the settings through it. The first two options allow you to roll back the system from the Windows 8 interface.
It is worth dwelling in more detail on the safe environment, because there you will find advanced functionality.
Click on the "Restart now" button and wait - on the screen you will see how the menu starts with the choice of action. Click on "Diagnostics".
As you can see, here you can perform all the same operations as in Windows interface 8. However, the diagnostics menu can come in handy in case the OS does not boot. Click on the "More Options" button to go to the advanced functionality. With it, you can:
- roll back the OS to a checkpoint;
- use a wim image for recovery;
- roll back the system via the command line.
Let's consider all the possibilities in more detail. We figured out the first point above - the procedure is no different from the execution in running Windows 8.
By clicking on "System Image Restore", you launch the program to automatically unpack the previously created wim archive. It should contain the entire OS with personal settings and programs. You can connect a disk or flash drive to your computer to unpack a third-party wim image. Thus, you will get a complete system.
The "Command Line" allows you to start the rollback procedure using simple commands. Click on the corresponding button to launch the application. Now enter the command "rstrui.exe" and press Enter to start. After that, you will have access to the menu with PC recovery via checkpoint.
You can run this menu through bootable media if the installed OS does not work correctly and does not start. Consider this situation.
Performing the procedure using a flash drive
Some preparation is required to complete the procedure in this manner. First, you need to create bootable media. To do this, you need to visit the official Microsoft website where the Windows 8 web installer is located and download it to another computer. The loader will download the OS files and create boot drive automatically.
Secondly, you need to configure the settings through the BIOS. To do this, when starting the PC, press the button responsible for entering the BIOS menu (it is indicated on home screen turn on the computer). Go to the "Boot" menu and install bootable USB drive in the first place in the download priority. To save the parameters, press F10 and restart the PC again.
Now, when turned on, you will see the installer menu. Here you will find the option to uninstall, reinstall the system, formatting hard disk. Also, the creators have highlighted the recovery function in a separate menu:
- Select the desired item and start the procedure.
Rollback on a laptop with a pre-installed operating system
Notebook manufacturers who sell devices with preinstalled software provide the ability to rollback using proprietary utilities and tools. Part of the hard disk space is allocated for recovery, so you can start the procedure for returning the PC to its original settings in a couple of steps.
It refers to Asus laptops, Lenovo, Acer, HP and more. Let's look at the procedure using Acer as an example. Iconia tab w5100. By default, this company uses the Alt + F10 key combination, which must be pressed on the initial boot screen with Acer logo.
You will see the “Acer eRecovery Management” menu. Select the checked item.
After that, wait until the end of the procedure. During the process, the laptop may reboot several times. You can only cancel the recovery process by restarting the PC. After the end of the rollback, you will receive the device with the factory parameters.
The names of the utilities and the way to access them differ depending on the laptop manufacturer, but using this example, you can easily restore Windows 8 on any device.
Conclusion
Using the methods described, you can return a working or original Windows state 8 in almost any situation. Use checkpoints to return your computer to a previous state. Refresh Your PC functionality comes in handy when rolling back your PC to factory settings. Safe Run will come in handy if Windows 8 won't start - you can open the necessary tools through a bootable USB flash drive.
Video
Below you can watch a training video, which clearly shows all the actions from this article. Together with the video tutorial, you will be able to understand the difficulties and restore your computer without assistance.
but this glitch also skips on windows 8.1. I recently upgraded the OS on a laptop. Before that, I had windows 8, so now, as you understand, it's windows 8.1. However, in this article I will not talk about all the delights of the OS, but I will tell you about the problem I had to face. And the problem is this: as soon as the update process came to an end, everything worked well, but the next time the laptop was turned on, I had to look at.
At first I thought I had to wait, maybe it hasn't loaded yet, but no. No matter how much I waited, no matter how much I moved the cursor across the screen, nothing changed. I immediately began to look for a solution to this problem. And, as you already understood, I found it!
Here I will try to clearly explain step by step all my actions that will help you fix a black screen in Windows 8.1 and not only. This is how the white cursor looks like, on a black background.
Remove black screen at boot
The first way
To begin with, the question arises: "How can you do something if there is nothing on the screen?" I got out of this situation in an interesting way. I put the laptop to sleep. Oddly enough, but upon waking up, everything was fine, there was no black screen. Since when I press the shutdown button, my default is to fall asleep, then it was enough to press it. If for some reason you cannot do this, or it does not work out, you will have to use alternative way.
Second way
You will have to run a program on your computer, which, when closed, displays dialog boxes such as "save" (paint, word, excel, etc.). After you have launched the program, turn off your computer (but not from the outlet). As a result, you will be given a warning that something has not been saved. Just at this moment, the screen should work.
Third way
On one forum, I read that if you turn on the computer with the Internet turned off, then everything will go off with a bang! I myself have not tried this method, so you should test it. Maybe someone will come in handy :).
Preventing the problem
When you were able to get rid of the black screen, you will need to make sure that the next time you start your computer, it will not be there. So, let's begin.
- Go to Control Panel.(Options -> Control Panel)


In the menu that opens, select "Power supply".

On the left, select the item "Prompt for password on wakeup"

Click on the inscription "Changing parameters that are currently unavailable"

Then we uncheck the box "Enable Fast Startup (Recommended)".

After the steps taken, everything should work fine.
4. Method
In order to stop constantly showing the black screen, you need to: boot into safe mode

addition: "just like that, Windows Activation Technologies cannot be found in drive C, you need to set a search (for example, I set a search on my computer for" wat.exe ") and then it will find"
Helped a lot! It remains only to activate
5. A way to remove the problem with a black screen and cursor
This method similar to the fourth, but here we will not use safe mode, but try to get out through the "Task Manager". And so you have a black screen with booting windows 8.1 and the cursor flashes. Press the magic key combination (Simultaneously) CTRL, ALT and Delete.

Select "Task Manager"

In the window that opens, click the menu "File - Run new task"

Let's start the process Windows explorer to do this, enter explorer.exe.

You will open "My Computer", then as in method 4, you must delete the C: \ Windows Activation Technologies folder and make sfc / scannow from powershell or command line under the administrator.
6. Method
If you have a laptop, then try connecting a monitor to it, this is done either through the VGA output or HDMI. There is a high probability (if the integrated adapter is not disabled in UEFI) that after enabling, you will see an image on the screen and be able to roll back the discrete video card drivers (through the device manager), install new ones, or use system restore.
7. A way to remove the black screen at the entrance
This method is based on the assumption that you have caught a computer virus somewhere. To fix black Windows screen 8.1 due computer virus do the following. As in the 4th method, boot into safe mode, preferably without a network, or simply unplug the Internet cord. If you immediately have a black screen, then, as in the 4th method, call the task manager, but for the place of the explorer.exe process, type regedit and press Enter.

You will open an editor windows registry... Go to the branch:
HKEY_LOCAL_MACHINE \ SOFTWARE \ Microsoft \ Windows NT \ CurrentVersion \ Winlogon \
Find a key named "Shell" here and make sure that it has explorer.exe in its value. If not, then change it to the desired one, insert a USB flash drive with some kind of dr web cureit, or Kaspersky free, and try to heal the system. Once you kill the virus, you will no longer appear in the operating room. Windows system 8.1, black screens.

8. Method
In the same safe mode, try uninstalling the video driver, this is done through the device manager, right-click on start and select the device manager item.

Select the item video adapters and right-click on the desired one, and select delete. After that, the system will load the standard drivers, reboot.

Black screen after installing updates
Very often Microsoft gives us a pig with updates, I agree that they are necessary and close gaps in the OS, but once a quarter I see situations when they break systems for nothing, here's an example of error 9c59 or 0x800705b4. If you become hostage to such a situation, and you have a black screen on your laptop, for this reason, then try to return to the restore checkpoint. These points are created whenever anything is installed on Windows. It helps 99% of the time.

Black screen on Windows 8.1 laptop due to Crypto PRO
I have caught problems many times with this encryption software product. For example, the Windows installer service could not be accessed, and here this thing puts a spoke in the wheel. For some reason, the HKLM \ Policy \ PolAdtEv registry branches are missing.

Here the actions are as follows, you need to uninstall Crypto PRO, then when the problem with the black screen is fixed, you will install the latest version. As in method 4, invoke the task manager, but in the run window, enter "appwiz.cpl". This will open the Programs and Features snap-in, where you will need to uninstall Crypto PRO.

Hope that thanks to these methods, you were able to fix the problem with black screens in operating system Windows 8.1 ..


