The BIOS does not start the USB flash drive. Methods for booting from a flash drive to UEFI. Correct BIOS setup
How is it happening? It's very simple friends! On Samsung laptops latest models, several new options have appeared in the BIOS ("Fast BIOS Mode" and "Secure Boot"), which are directly related to the ability to boot a laptop from a flash drive or disk. Samsung Corporation suddenly decided to protect the download of the new Windows 8 operating system from some kind of virus or from the laptop owners themselves, whichever you like. Naturally, many users immediately had questions.
One of my friends wanted to boot a Samsung laptop from a bootable flash drive containing a program Reserve copy Acronis to backup Windows 8, but it didn’t work out. Another one decided and also got stuck at the very beginning, he just couldn’t find his flash drive anywhere, neither in the BIOS, nor in the boot menu of the laptop. After he tried five flash drives, he flew to me with bulging eyes and said that his new laptop could not be booted from either the disk or the flash drive. In short, I had to figure it all out, and if you also found yourself in the same situation, read our article.
Booting a Samsung laptop from a flash drive
If you suddenly want boot samsung laptop from flash drive, then you will try to enter the boot menu of the laptop using the F10 key when booting and select your connected flash drive there, but you will not succeed, since first of all, you need to make small changes in the BIOS parameters of the laptop.We turn on the laptop and immediately press F2 when loading, enter the BIOS, go to the Advanced section and set the “Fast BIOS Mode” parameter to Disabled.

Then go to the Boot section, we are interested in the “Secure Boot” option,
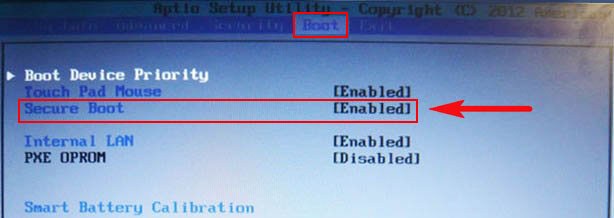
We also set it to the “Disabled” position and press “Enter”

A warning appears about the possibility of booting the laptop with an error.

We agree, press “Enter". Below appears additional parameter"OS Mode Selection",

We put it in the “CMS OS” or “UEFI and Legacy OS” position

And press “Enter”. Again a warning appears about the possibility of booting the laptop with an error, “Enter”.
We save the changes we made in the BIOS and press “F10” on the keyboard. To the question “Save the changes made and reboot?” press “Enter”. Yes.


The laptop reboots, press F10 and go to the boot menu, select the flash drive, boot occurs Samsung laptop from a flash drive.
If you cannot get into the laptop boot menu, then you need to change the boot device priority directly in the BIOS. We enter the BIOS, go to the Boot section, then the Boot device Priority option,

Our flash drive should be here, set it as the first boot device, then press F10 (save the changed settings) and reboot. After rebooting, your laptop will boot from the flash drive.
Hello dear readers and colleagues in computer science!
Why might this happen?
Let's look at the reasons. Imagine that you decided to install an operating system and found an old flash drive. It was detected on the laptop, you formatted it and rolled up the system for installation on it. And so you rebooted, but the PC simply did not see the flash drive. The most common case is that you simply did not change the BIOS to the boot from mobile hard drive setting.
It's done like this. To change these same settings, you need to restart the laptop and when you see a screen like this -

Then pay attention to which button is written in the line that I underlined. In the figure I also indicated which keys can also be used to call up the BIOS (it all depends on the model of the program itself). If you did everything correctly, you will see a screen like this.

Here you need to configure the boot parameters . Go to the section First Boot Device and in this line you select USB-HDD.


Now the computer should see the flash drive.
The second reason is a problem with the drivers. They either got lost and produce bugs, or were not installed initially. USB ports are on the motherboard. If they do not work, then the media will not be visible, or will be detected only once.
Need to download software from the manufacturer's website and install it. It is also advisable to scan the laptop for the presence of firewood in other devices. This can be done with this software.
Install, scan and reboot. In general, this procedure needs to be done after each demolition of the operating system and also after restoring it. The program is free, works quickly, and is entirely in Russian.
How to identify the problem?

If you insert a flash drive and the computer freezes, then the problem lies in the media itself. You need to do formatting at a low level. This is a complete reassembly of sectors with their cleaning.

Also, system brakes can be caused by a conflict with the hard drive. In this case, you need to check the hard drive itself standard program, built into the OS. Due to untimely defragmentation of the media, such problems appear.
If you have Windows 7 Ultimate, then it is quite possible that you downloaded a homemade assembly. In such cases, only reinstalling the licensed software from an image can help. Of course, there won’t be any additional features, but stability of operation in this case is guaranteed. You will have to format the disk, so be prepared to transfer the data to an external hard drive or online storage.

If you get an error that says that there is no connection to the portable device, this means that the device itself is faulty. Again, it is unlikely that you will be able to save the data, so just format it. Also check your entire computer for viruses, it is quite possible that malicious script block OS operations responsible for connecting via USB ports. It is advisable to do this with a powerful antivirus with updated databases, and not with free analogues that rarely find anything at all.
Universal solution

If you don’t know what to do and how to fix the problem, then just remove Windows, format HDD and the flash drive itself. It is better to do a major reinstallation of the OS rather than do it with half measures. In my case this was the only thing that helped. In addition, buy a new media, most likely this is the problem. The impact could have damaged it, or shorted out the circuit board inside the case.
Conclusion
This is where I will end the article. I hope you don't encounter any bugs when working on your laptops. Share the article on in social networks and subscribe to the blog to stay updated on new materials! All the best to you and see you, my dear readers!
If the computer does not see the flash drive after rebooting the computer, then the first thing to do is check - is the flash drive really bootable? In order to make a regular USB drive bootable USB flash drive It is not enough to simply copy data from your computer there.
Also, even if you have previously used this drive and can confirm that it can be used to install the operating system, this does not solve the problem. Today there is Various types downloads, so even if there is a flash drive and it worked on one computer, it is not at all a fact that it will work on another. For everything to be successful, the data needs to be rewritten according to a different principle, using different software.
Is there a function to support a bootable USB flash drive in the BIOS? Is it configured correctly?
In some cases, problems arise not with the flash drive, but with the BIOS system itself. There are different versions different types boot: USB_CDRom, USB_FDD, USB_HDD, etc.

After entering the BIOS, you need to go to the boot partition present in each version. The names of the section may vary, but one way or another the word “BOOT” will be present. The line that is important to us is: “Boot priotity order,” that is, the boot order.
You need to keep in mind that the hard drive is loaded first, that is, what is located after it no longer matters - in this case it is a USB HDD, which does not get a turn after loading the hard drive. So you just need to swap these values.

Interestingly, if you turn on the computer after a flash drive has been inserted, it will appear in the BIOS with a name.

When exiting the BIOS, be sure to save all changes made.
The note! on some outdated devices Initially there is no option to select USB. This only means that the BIOS simply does not support such technology. This issue is resolved by firmware.
How to create a bootable USB flash drive for installing Windows
First of all, in order to create an installation disk with operating system, you need to use a flash drive with overall size memory of 8 gigabytes and above. Why is this volume necessary for installation disk? Simply because today the volume of installation files for operating systems varies between two and four gigabytes.

- Windows Seven;
- Windows 8 (8.1);
- Windows 10;
- Ubuntu 15.
Windows 7

Properly preparing a USB drive for use as a Windows 7 installation source will take 15 to 30 minutes, depending on the speed of your computer.
First, download a licensed ISO image of the operating system.
After that, download the program Microsoft Windows USB/DVD Download Tool.

Once downloaded, execute the file and follow the installation wizard.
This free program from Microsoft that works on Windows 7, Winsows 8, Windows 10, Windows Vista and Windows XP. You will first need to format the USB drive and then copy the contents of your Windows ISO file 7 per flash drive.
Step 1. Run the program Windows boot 7 USB DVD Tool, which is most likely located in the Start menu or on the desktop. You will need to choose iso file: Click "Next". Find and select Windows file 7 ISO. Then open it.

Note! Download image Windows is better directly from the official Microsoft website.
Step 2. Click "Next" , returning to the first screen. After this you will be taken to the next window. Click on the "USB Device" button , after which you will be taken to the USB drive (flash drive) selection screen.

Step 3. When the device is selected, click on the “Begin copying” button. The installation files will start copying to the media. Confirm "Empty USB device" if the "Not enough free space" dialog box pops up ». After this, all files from the drive will be deleted permanently.

Step 4. Then confirm “Yes” to move to the next window.
Step 5. Having selected the required flash drive, click the “Begin copying” button. The process of copying the installation files to the USB flash drive will begin. Also be careful, since all previously stored files on USB drive will be erased. A notification that formatting has begun will appear for a few seconds, and then files will begin copying. This part can take up to 30 minutes, or even longer, depending on which version of Windows 7 the ISO file belongs to, as well as the power of the computer and the USB drive itself.

On this screen you will see Status: Backup completed, which means that the bootable USB device has been successfully created.

Windows 8 (8.1)

In the case of Windows 8, you will need another utility - it is called Media Creation Tool, and it can be downloaded from the official Microsoft website.
Step 1. When you launch this program, a window will open in which you will need to select the operating system, its language, version, and architecture.


Step 4. Moving on to the next window, you will come across loading screen and a notification that a file is being downloaded. Loading files onto a flash drive can take a long time, and of course the flash drive will be formatted.

Step 5. When the boot is complete, a screen will appear indicating that the bootable USB flash drive is ready. Close the window using the “Done” button.

Windows 10

If you are having problems with your drive in Windows system 10, then its solution will be similar to the solution with Windows 8/8.1: first download the Media Creation Tool program from the official Microsoft website and carry out the entire above sequence of actions. If you first run the program on Windows Seven or Eight, you will be offered two options: update or create bootable media. Choose the second one.

Create installation media using the same principles as for the G8.
Ubuntu 15

Unlike the same interface different versions Windows, Ubuntu 15 is a completely different operating system, so completely different methods for creating bootable flash drives are used for it.
In the case of Ubuntu, you need to download from Github free program UNetbootin.


Methods for booting from a flash drive to UEFI
Now let's see how to boot devices in the UEFI_BIOS system from a USB drive. The ordinary average will be used as the tested object motherboard MSI-A58M-E33, which has the latter existing version UEFI_BIOS.


After rebooting, the computer will automatically boot exactly the specified device. However, if the flash drive is not recognized by the computer even after this, then the problem may be as follows:
- the image was written to the flash drive with errors;
- mode works secure boot“Safe boot” (below we will show you how to disable this mode);
- there is also the possibility that the problem is in the flash drive itself - for example, that since the image was written to it, it has been somehow damaged.
Booting a flash drive on older BIOS versions
Users using older computers can boot from a flash drive in the same way, although the rules may differ.


Save and reboot your laptop. From now on, downloading will be carried out from the specified device. This model BIOS is installed on most older laptops, so it will fit 90% of models.
USB flash drive for UEFI computer
All the latest personal computers support latest versions UEFI_BIOS. This system has a huge number of advantages, so when buying a flash drive, make sure that it is UEFI compatible.
When you create a Windows Seven, 8, or 8.1 installation flash drive using the Media Creation Tool, you can be sure that it will be UEFI compatible. And here is the program Windows USB/DVD Download Tool, designed for the “seven”, no longer has such guarantees.
How to create a guaranteed boot drive option for Windows Seven


Rufus is universal program, so it is also applicable for older BIOS versions. Distinctive feature this utility is enough high speed copying and burning ISO files to storage devices.
This way you can create bootable disks for any operating system. Most of the problems will disappear as soon as you correctly load the image onto the USB flash drive.
To disable “Safe boot” you need to do the following:


Most often, the computer stops seeing the bootable USB flash drive due to a lack of synchronization between the flash drive and BIOS (UEFI), due to the specifics of their boot modes.
Almost all modern personal computers have basically two boot modes: UEFI (the mode that is usually the default on most machines) and Legacy.

If you try to create a bootable drive for Legacy mode (Windows Seven), when the BIOS only has UEFI boot— the resulting drive will not be detected by the computer and you will not be able to select it in the BIOS.
To solve this problem, you can enable the appropriate boot mode in the BIOS. In most cases, you need to enable Legacy mode. This can be done by entering the BIOS, the corresponding boot menu (Boot), and turning on/switching to “Enabled” mode one of the following items:

Also, if you are using an Only Legacy boot drive, you need to turn off “Secure Boot”.
Further, if the image that is written to the flash drive can be loaded in both UEFI and Legacy modes, then it makes sense to write it without changing the BIOS settings (although this does not mean that you will not need to disable “Secure Boot”).
The already mentioned Rufus program is the most convenient device to download in this case. In the settings, you can also select boot types: MBR for machines with BIOS or UEFI_CSM _Legacy, or GPT for machines with UEFI.

Video - BIOS does not see bootable USB flash drive
Manufacturers of laptops and computers are increasingly abandoning bulky CD drives. This is understandable, because it allows you to save a lot of space and make the device much more compact.
Due to this new trend, users need to install the operating system not from a CD, but from a USB drive, and, as usual, this entails certain problems. For example, sometimes the BIOS does not see a flash drive, which means that further work with it becomes impossible. You can read below about how to fix this.
Flash drive malfunction
The first thing to check is the functionality of the USB drive. It is quite possible that the BIOS does not see the bootable USB flash drive due to its malfunction. In this case, the device can safely work as a storage for files, but will cease to function if used as a Boot device.
It is best to check the serviceability of the flash drive on another computer or laptop. To do this, just try to use it like boot device, and if everything goes well, then your USB drive is not damaged.
If you don't have a second computer, you can use alternative ways checking the functionality of the flash drive. For example, you can simply connect it to a different port, or even write the operating system image to another drive and try to boot from it.
USB port problem
If the BIOS does not see a flash drive that you are completely sure is working, you should check the functionality of the USB port. This is much easier to do than with a USB drive, because you don’t need another computer or laptop for this operation.
So, you just need to connect the flash drive to different ports one by one and try to boot from it. Yes, this operation requires a lot of time, but thanks to it you will completely eliminate one of the possible reasons BIOS errors occur.

We should also highlight the USB ports located on the front wall system unit, on the keyboard, all kinds of extension cords and so on. It often happens that they begin to function only after the operating system is fully loaded. Simply put, when the computer starts, they do not work, and accordingly, the BIOS does not see the flash drive. What to do in such a situation? Use the ports located on the back of the system unit.
USB 3.0
Modern computers and laptops are equipped with new devices for working with flash drives - USB 3.0. They provide much greater speed of the drive, but at the same time they can cause certain problems. Including sometimes the BIOS does not see a bootable USB flash drive if it is connected to a version 3.0 port.
It’s worth saying here that the malfunction does not arise due to the inability of older versions of Windows to work with USB 3.0 during installation. For example, you will not be able to install Windows 7 from a flash drive connected to 3.0, but already in the “eight” and “ten” there is no such problem.
Fortunately, manufacturers have taken into account possible compatibility issues. They provide computers with both USB 2.0 and USB 3.0 ports. The latter, by the way, are painted blue. So, if your flash drive does not work in the 3.0 connector, you can try removing it and connecting it to USB 2.0.
"Broken" image
Another reason that the BIOS does not see the flash drive may be a “broken” image of the operating system recorded on it. Damage to OS installation files can occur either while downloading them from the Internet or during writing to a USB drive.

The problem is that you will not be able to repair a “broken” image. The only thing you can do is download it again setup files, and then install them again on the flash drive. In addition, following the advice of computer specialists, you can check the USB drive with the image recorded on it for errors and bad sectors.
It is also worth mentioning unlicensed versions of Windows OS. Pirates don’t bother much when creating them, so very often problems arise when trying to make a bootable USB flash drive from such files. In other words, you should try downloading a distribution from another team, or even better, use only licensed software.
The image is written incorrectly
Very often, the BIOS does not see the flash drive because the operating system image was written to it incorrectly. Some users simply copy the installation files to a USB drive and then try to boot from it. Yes, this option may work in some cases, but it is by no means correct.
In fact, you only need to create a bootable USB flash drive using special programs. Such applications are provided both by the creators of the operating system and by third-party developers. For example, very popular are UltraISO programs, Rufus, WintoFlash and so on. Each of them fully copes with its functions, so it’s difficult to single out a favorite.
Recording with Rufus
Since the most common cause The “invisibility” of a flash drive is an incorrectly recorded image; you should definitely figure out how to do it correctly. As an example, we will take the Rufus program, which is easy to learn. So, to create a bootable USB flash drive, follow this algorithm:
- Connect the USB drive to your PC and launch Rufus.
- In the main menu of the application, find the line “Device” and select your flash drive in it.
- Now click on the CD-ROM icon located opposite the “Create” option boot disk" Using the Explorer window, specify the path to the operating system image.
- If necessary, you can enable the function of checking the device for bad blocks by checking the box of the same name. But keep in mind that this operation will increase the image creation time by two or even three times.

Now all you have to do is click the “Start” button, confirm your decision and wait for the operation to complete. Remember that it is strictly not recommended to remove the flash drive while the program is running.
Incorrect BIOS setting
So that the PC starts from a USB drive, and not from hard drive, you need to set the download priority correctly. In Award BIOS, for example, this is done like this:
- Enter the BIOS by pressing the appropriate key while the computer boots. Most often this is F2 or Del, but sometimes there are other options.
- Open the Integrated Peripherals section and check if the USB Controller option is Enabled. As a rule, it is enabled by default, but it is still worth making sure of this.
- Now go back to the main menu (ESC key) and go to Advanced BIOS Features. Next, open the Hard Disk Boot Priority subsection.
- Find the HDD-USB parameter and move it to the first line using the Plus key.
- After that, return to the previous menu, open First Boot Device and put HDD-USB in first place.

- Press F10 to save your changes and then exit Settings.
Keep in mind that in other BIOS versions, the procedure for setting boot priority may differ slightly from the Award BIOS. You can find details about it in the manual on the official website of the motherboard manufacturer.
Secure Boot
On computers and laptops released after 2013, the Secure Boot function is quite common. Its purpose is to prevent malware from being installed before the operating system starts. However, this service can block the operation of the bootable USB flash drive, so you need to disable it. This can be done like this:
- Go to the BIOS and open the Boot section (sometimes called Advanced).
- Find the Boot List Option and change it to Legacy.

- Set the Fast Boot option to Disabled.
Now all you have to do is set the boot priority and start installing the operating system. Most importantly, do not forget to enable Secure Boot again after you no longer need to use the bootable USB flash drive.
Old BIOS versions
If you are the “lucky” owner of an outdated computer, there is a high probability that it does not know how to work with USB drives at all before loading the operating system. More precisely, it is the old BIOS that does not see the flash drive, since earlier, in the era of CDs and floppy disks, there was simply no such need.
This problem can be fixed by updating the BIOS to the latest version. The files and programs needed for this procedure can usually be found on the website of your PC or laptop manufacturer.
Keep in mind that the process of updating (firmware) BIOS is associated with great risks, and it is better not to start it without the proper skill. If you do something wrong, you can cause damage to your computer, which only specialists can fix.
Alternative options
So, you have tried all the methods outlined above, but the BIOS still completely refuses to work with the flash drive. In this case, you can use two alternative options.
The first one is installing the OS from a disk. If your computer has a CD-ROM, feel free to create a bootable CD and install the operating system from it. In addition, you can temporarily borrow a CD drive from friends and connect it to your PC.

The second option is to use the Plop Boot Manager utility. It is installed on the hard drive and allows you to select the boot priority without having to go into the BIOS.
Quite often, when working on a computer, it becomes necessary to use a bootable USB flash drive. The average user, as a rule, uses it to install the OS and run any programs from DOS.
Due to the prevalence of bootable flash drives, many users experience problems with them. A frequently encountered difficulty is that . This entails the inaccessibility of its functionality to the user.
You may find it useful:
Hardware faults
The problem of the absence of a bootable flash drive in the BIOS occurs when certain hardware malfunctions of the computer or flash drive occur. When faced with this problem, you need to check:
- Flash drive performance;
- The computer's USB port and card reader or extension cord are in good working order if the flash drive is connected through it.
If the flash drive is equipped with an indicator light, but it does not blink when connected, this may indicate a hardware failure. Errors at the hardware level of a flash drive are diagnosed using specialized software (for example, Victoria).
Victoria HDD - great program for diagnosing drive malfunctions
Troubleshooting hardware problems is often difficult to accomplish. In some cases, it is easier, faster and cheaper to simply replace the equipment. If the BIOS does not see the bootable USB flash drive due to hardware faults, it can help:
- Using another flash drive and/or another USB port;
- Connecting a flash drive to a computer directly without using adapters;
- Using the rear panel USB port;
- Connecting the USB port to power if it is not connected to it.
If the above methods solutions to the problem do not lead to positive result, the fault is software related.
Software problems
Due to problems at the software level, most situations arise with the absence of a bootable flash drive in the BIOS. Its software malfunctions almost always arise due to incorrect creation of the bootable USB flash drive.
User inattention during the creation process boot drive, errors in the operating system and BIOS microcode - all this leads to various software problems with the flash drive. In particular, the BIOS does not see the bootable USB flash drive. This problem can be solved in the following ways:
- By re-creating a bootable USB flash drive with strict adherence to the instructions and/or use for this special software. So, if a bootable USB flash drive is created manually, you need to format it in file system FAT32;
- Eliminating problems with the operating system or BIOS microcode by updating, reinstalling or flashing them;
- By enabling the parameter in the BIOS settings USB controller. To do this, you need to find the “USB Controller” function and move it to the “Enabled” position.


