How to create a disk image. How to make a disk image on Windows How to create a disk image
Despite the fact that most users have recently practically not used laser media, quite a large number of software and games are available either on them, or, if you use pirated versions, in disk image files. What it is? This is a regular archive file that can be stored on your computer’s hard drive, as well as mounted in a virtual drive using a special software. When you start it, the computer detects it as if you had inserted a regular disk into a laser drive.
This can be very convenient when you took a disc with a game or program from someone and want to copy its contents, since you need to return it soon; you have to use the media too often, which can cause it to be scratched and the drive laser to wear out; You want to burn data to a disk, but your drive doesn't work, so you send the archive over the Internet to a friend who can burn it. There can be many application options, and if you still don’t know how to create a disk image, this article is just for you. We will look at several of the most popular programs, both free and paid. After reading, you will be convinced that there is nothing complicated about it.
A free, but at the same time very advanced program that allows you to work with disks. You can make an image either by making a copy of the media inserted into the drive, or by assembling it from individual files and folders. The program works perfectly on all versions of Windows and has a user-friendly interface, a clear menu in Russian, and also contains absolutely no advertising, unlike some competitors. How to use the application and create a disk image?
- First of all, download installation file on the official website and install the program, then launch it.
- In the main window, all menu items are located in the left column. In our case, we will need the “Disk Image” item.
- If you want to create a copy optical media, select “Create an image”, and when you need to build it from separate files, click “Create an image from files”.

Select "Create Image"
Depending on which option you chose, the sequence of next steps will be slightly different. If you decide to create a copy of the disk:
- A window will open in front of you in which you can determine the active drive. If the program recognizes the media, the Next button will be active, which must be clicked to proceed to the next step.
- Select the folder where the finished result should be saved, as well as the desired format. We recommend choosing ISO, as it is the most common and is compatible with most equipment and operating systems. Click Next to start the file creation process.

- When finished, click the "Exit" button and check if the result is saved in your folder.
In case you need to make a virtual drive from individual data, the steps will be as follows:
- Select the folder to save the finished result, as well as its format. We recommend sticking with ISO. Click the “Save image” button.
- In the window that opens, you need to add the necessary files. To do this, click the Add button in the upper right corner. If you want to create several folders on future virtual media, click " new folder" A scale will be displayed at the bottom with the size and indication on which media you can record the resulting result.
- To begin creating the file, click Next.
- Finally, check if the image was created correctly.
A very convenient free program with a Russian menu that allows you not only to write blanks, but also provides the opportunity to create their images. Don't let the presence of XP in the name scare you, the application works successfully on even the most modern versions of Windows. Many users consider it one of the best solutions of a kind. How to use the software?
- Go to the official website, save the installation file and install.
- After launching the program, select “Data Disk” in the main menu.
- In the window that opens, add the necessary data. This can be done either by clicking the “Add file” button or by simply dragging them through Explorer into the program window.

Add the necessary data for the entry
- In the upper left corner, click the File menu - Save project as ISO image and specify the folder in which the finished result should be saved.
- Click the Start button and wait for the process to complete.
BurnAware Free
An equally simple and completely free program with which you can make a disk image. The program is small in size, does not load the system at all, and does not contain any advertising or virus elements at all. The developer presents three product options; we will use the simplest one - free. After you download the utility from the official website and install it, follow these steps:
- In the main menu of the utility, click the “Create ISO” button.

Click the "Create ISO" button
- Define file system, in which the image will be saved. ISO 9600 is the best choice.
- Add the necessary files by clicking the appropriate button in the menu.

- If desired, you can change the settings, for example, the name or date, otherwise the program will automatically determine the most suitable parameters.
- Click the "Create" button to start the process and wait until it finishes.
If you need to create a copy of laser media inserted into your computer drive, follow this guide:
- In the main menu, click the “Copy to image” button.
- In the next window, select your drive from the list of available ones.
- Specify the folder to save the finished file, and also change its name.
- Click the “Copy” button and wait until the procedure is completed.
Daemon Tools Lite
If previous decisions were completely free, without any restrictions, then to get all the features you will still have to buy this product or use a hacked version. The free version only allows you to copy the contents of the laser media. How can I do that?
- Right-click on the program icon. In the menu that opens, select - Create an image from disk.

- The next step is to select the active drive available on your computer, as well as select the file format and the folder in which it will be saved. Also, don't forget to insert the disc, otherwise nothing will work.
- Click the Start button to start the process and wait until it finishes.
Ultra ISO
A very popular program with extensive capabilities for working with disks. Unfortunately, the developers do not provide paid version, even with limited functionality. The cost of a full release is about $30. If you cannot afford or simply do not want to spend that amount, look for a hacked version on the Internet.
- The working window of the program has four windows, as well as a menu and toolbar. Click Tools - Create CD Image.

Click Create CD image
- In the window that opens, select the working drive, specify a folder to save the finished result and select the desired format.
- Click Finish and wait for the process to complete.
If you need to create an image from the data you have, then you need to do the following:
- In the main window of the program on the menu bar, find the button " Overall size", by clicking on it, click or determine the size of the future virtual drive.
- At the bottom of the window, select the required data, highlight it, click right click mouse - Add.
- Select the location where the finished result will be saved; to do this, click File - Save As.
- After confirming your choice, the process of creating a disk image will begin immediately.
Conclusion
In fact, there are many more utilities for creating virtual media than we listed in the article. Therefore, if you want to talk about another wonderful product, write about it in the comments.
Welcome to my blog!
After reading this article, you will learn how to create ISO image file or CD using different programs. In total, I decided to give an example of working with eight free programs that can create an ISO archive like regular file either a catalog or a CD so that you can choose the most optimal ones for yourself and work with them.
An ISO image is an image of a file or program that supports the ISO 9660 standard system and has a *.iso extension. This is a kind of archive, the contents of which can be viewed by any archiver or file manager that supports this feature, such as Total Commander.
How can I use an ISO disk image? There are several applications for using such images.
For example, you can create an ISO archive of your favorite game and mount it onto a virtual disk, and then use it rather than a real CD-ROM drive.
Such an archive can be posted online for downloading, and the person who downloads it can burn it onto a CD.
The ISO archive can also be used to install operating systems on virtual machine, for example VirtualBox, which is very convenient when working with it.
It is also convenient to store such archives on CDs if you burn several distributions onto one disk and, if necessary, take only the one you need.
There are a lot of uses for files in the ISO format and every computer user will find its use.
Check out the programs below and choose the ones you like. The list of programs is large; for ease of navigation, use the menu. All programs work perfectly in Windows 7 64bit, but if there are any problems with the installation, then run them in compatibility mode with Windows XP.
Cyberlink Power2Go program.
The program of Taiwanese developers Cyberlink Power2Go is designed for recording and copying discs various formats. This program is distributed free of charge, which makes it very popular among computer users.
You can download the Cyberlink Power2Go program from the link:
http://www.cyberlink.com/downloads/trials/power2go-platinum/download_en_US.html?affid=2581_1163_729_37307_0_ENU
Using Cyberlink Power2Go, you can quickly create an ISO disk image.
By default, when you start the program, a window appears asking you to select various actions when working with the program, which is very convenient, since you can immediately launch desired mode in a programme. If desired, this window can be disabled and operated using the application menu.
To save a disk image in this program, select “Disk Utilities” in the left menu window, and “Save disk image” in the right window.
If you have disabled this window, you can create a disk archive using the commands in the main program window.

To do this, open the menu in top line“Burn to disc” and select “Save disc image”.

In the next window, you will need to select the CD-ROM drive, if you have several of them, change the reading speed if you need it, and by clicking on the “Browse” button, select the path where you want to save the disk image.

When choosing a location to save the image, in the “File name” line, you will need to indicate its file, any one, you can come up with your own and in the “File type” section, indicate the extension in which you want to save the archive. The extension “*.p2i” is the format of the program itself, we need to select the extension “*.iso”.
Then click the “Save” button to begin saving the disk image.

A window will appear showing the progress of this operation, after the successful completion of which you will see another window where it will be reported that the operation was completed successfully.
Ashampoo Burning Studio 16 program.
German Ashampoo Developer Program Burning Studio 16 allows you to create an ISO image not only from a disk, but also from a file or directory, which is often necessary.
The program is distributed both on a paid basis and on a free basis, you can create an image archive in both versions of the program, I mean that in the paid version, during the test period, you can also create it without purchasing the program.
I recommend using first free version this program, perhaps its functions will be enough for your purposes.
You can download the Ashampoo Burning Studio program from the link:
https://www.ashampoo.com/ru/rub/fdl
How to create an ISO image from a disk

To create a disk archive image, launch Ashampoo Burning Studio 16 and select from the menu on the left side:
Disk image – Create image

In the next window, make sure that your drive is ready for use and follow the prompts, click on the “Next” button.

Now in the line: “Disk image path” you can specify its storage location or to select this location, click on the “Browse” button on the right. And in the “Image file format” line, you need to specify the ISO format, then click the “Next” button to save your image to your HDD.
How to create an ISO image from a file

To create an archive image from a file or directory, open the same menu and follow the path:
Disk image – Create an image from files

Then select one of the options for creating an image, “Data disk” or “Data disk with advanced settings”, the only difference here is that the settings window opens immediately, but you can open it later if you wish.

Now you will need to add the files that need to be added to the archive to the program window, for which click on the “Add” button or simply drag the files you need into this window, “hooking” them with the mouse. Then click “Next”.

In the next window you will need to specify the storage location of the image file, its name and extension, as in the case of saving an image from disk. Click the “Save Image” button to save it to your hard drive in ISO format.
CD Burner XP program.
The CD Burner XP program from Canneverbe Limited is distributed free of charge and its main task is to burn any data onto CD/DVD format discs. Regarding working with ISO file we, then using this program you can burn an ISO file, create an image of this format, convert bin and nrg format files to ISO format.
An archive image can be recorded as a disk, a directory or any file.
https://cdburnerxp.se/
For the program to work properly, the .NET Framework 2.0 package must be installed on your computer, which can be downloaded from the links on the program website.
https://cdburnerxp.se/help/Appendices/install-without-dotnet

To create a disk image, open the program and select “Copy disk”, then open it by clicking “OK” or double-clicking on it.

In the next window you need to specify the recording source if you have several drives, and in the “Receiver” section you need to select “Hard Disk”, specify the file name and its type. Then click the “Copy disc” button.

After this, a window will appear where the progress of the task will be displayed with a countdown.

After the disk has been copied successfully, you will see a message about this.

To create an image archive in CD Burner XP from a file or directory, double-click the “Data Disc” item.

In a new window you will see a hint on what to do. Select in the upper part of the program window those files whose image you need and, “hooking” them with the mouse, drag them to the lower part of the program window.
Or click the “Add” button and specify the files you need in the window that appears.


Then indicate the location where your image and its name will be recorded and by clicking the “Save” button, save the image of your files.
BurnAware Free program.
The BurnAware Free program is distributed freely and is designed for burning discs of various formats, including creating ISO images of files, and you can create both a disk image and an image of a directory or file.
You can download the BurnAware Free program from the link:
http://www.burnaware.com/download.html
How to create an ISO image from a disk.

To create an ISO disk archive using this program, launch it and in the “Project” tab, click on the “Copy to image” icon.

In the next window, select the drive, if you have several of them, you can change the disk reading speed if desired, and in the “Destination” section, indicate the storage location of the archive, its name and file extensions. Then click the “Copy” button.
How to create an ISO image from a file.
Creating an ISO archive from a file in BurnAware Free is as easy as creating a disk archive.

Launch the program and in the “Project” tab, click on the “Create ISO” icon.

In the next window, select the ISO-9660 file system and click “OK”.

Now click on the “Add files” button and indicate to the program those files whose archive you need to create or simply drag them into this window by “hooking” with the mouse.

Then click on the “Create” button and after a while an ISO archive of your files will be created.
ISODisk program.
The main task of the ISODisk program is to create a disk image and connect virtual drives to the system. In this article we will look at creating an ISO file using this program.
http://www.isodisk.com/
Creating a disk image using this program is too simple, since the program has practically no settings.

To create a disk image, run the ISODisk program and go to the tab:
Create ISO Image from CD-ROM
Specify the drive you need and click on the floppy disk icon.

In the next window you will need to specify the storage location of the image, its name and file type, then click on the “Save” button.

The process of creating a disk image will begin, filling the bars with blue. True, there is no countdown of the time it takes to create it, everything happens blindly, you just have to wait.
Once the image is created, you will see a message about it.
ImgBurn program.
The ImgBurn program is distributed free of charge, so you can use it completely without any restrictions. With its help, you can create an archive of an image, both a disk and a file or folder.
http://www.imgburn.com/
How to create an ISO image from a CD.

To create a disk image archive, run the program and click on the icon:
Create images file from disc

In the next window, in the “Destination” section, click on the folder icon to change the location where the image is saved, its name and file type. If desired, you can change the disk reading speed.
To save an archive image, click on the disk icon at the bottom of the window.

In the next window you will see information about the progress of creating the archive and upon completion, you will see a message about this.
How to create an ISO image from a file.

To create an archive image from a file or folder, run the program and click on the icon:
Create images file from files/folders

In the next window, in the “Sourse” section, you need to click on the folder icon and select the source for creating an image archive. You can also add files by simply dragging them with the mouse into the program window. Please note that you can add multiple files or directories.
In the “Destination” section, by clicking on the folder icon, you need to indicate the location where the archive will be saved, its name and extension.
Then click on the disk folder icon at the bottom of the window to start the image saving procedure.

After which several more windows will appear with additional questions that depend, for example, on how many files you have selected. How to answer them, decide for yourself, it all depends on your desires.
After saving the image, you will also see a message about this, as in the case of creating an image from a disk.
Over time, fewer and fewer users use disks, and more and more laptop manufacturers deprive their devices of having a physical drive. But it is not at all necessary to part with your valuable collection of disks, because all you need to do is transfer it to your computer. Today we will take a closer look at how a disk image is created.
In this article we'll talk about how you can create a disk image using the DAEMON Tools program. This tool has several versions that differ in cost and number of available features, but specifically for our purpose, the most budget version of the software - DAEMON Tools Lite - will be sufficient.
Steps to create a disk image
1. If you do not have the DAEMON Tools program, install it on your computer.
2. Insert the disk from which the image will be extracted into your computer's drive, and then launch the DAEMON Tools program.
3. In the left area of the program window, open the second tab "New Image" . In the window that appears, click on the item "Create an image from disk" .

4. A new window will appear in which you will need to fill in the following parameters:
- In the column "Drive unit" select a drive that has this moment disk;
- In the column "Save as" you will need to specify the folder in which the image will be saved;
- In the column "Format" select one of the three available image formats (MDX, MDS, ISO). If you don't know which format to choose, check ISO, because... this is the most popular image format supported by most programs;
- If you want to protect your image with a password, then check the box next to the item "Protect" , and in the two lines below enter the new password twice.

5. When all the settings are set, you can begin the image creation process. To do this, you just have to click on the button "Start" .

Good afternoon.
Let me make a reservation right away that this article is in no way aimed at distributing illegal copies of disks.
I think that every experienced user has dozens, or even hundreds of CDs and DVDs. Now storing all of them next to a computer or laptop is not so important - after all, one HDD, the size of a small notepad, can accommodate hundreds of such disks! Therefore, it’s not a bad idea to create images from your disk collections and transfer them to a hard drive (for example, to an external HDD).
The topic of creating images when Windows installation(for example, to copy the installation Windows disk to an ISO image and then create from it bootable USB flash drive). Especially if you don’t have a disk drive on your laptop or netbook!
Creating images can also often be useful for game lovers: discs become scratched over time and become difficult to read. As a result of intensive use, the disc with your favorite game may simply become unreadable, and the disc will need to be purchased again. To avoid this, it’s easier to read the game into the image once, and then launch the game from this image. In addition, the disk in the drive makes a lot of noise during operation, which annoys many users.
And so, let’s get down to the main thing...
1) How to create an ISO disk image
An image of such a disk is usually created from disks that are not copy-protected. For example, discs with MP3 files, discs with documents, etc. To do this, there is no need to copy the “structure” of the disc’s tracks and any service information, which means the image of such a disc will take up less space than the image of a protected disc. Usually an ISO image is used for such purposes...
CDBurnerXP
A very simple and multifunctional program. Allows you to create data discs (MP3, document discs, audio and video discs), in addition, it can create images and burn ISO images. This is what we will do...
1) First, in the main program window, you need to select the “Copy disk” option.
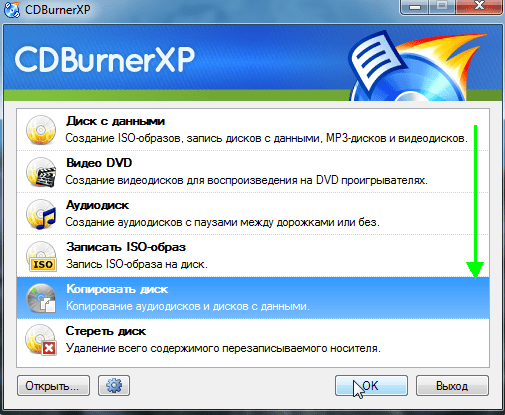
The main window of the CDBurnerXP program.
Drive: CD-Rom where the CD/DVD disc was inserted;
A place to save the image;
Image type (in our case ISO).

Configure copy settings.
3) Actually, all that remains is to wait until the ISO image is created. The copying time depends on the speed of your drive, the size of the copied disc and its quality (if the disc is scratched, the copying speed will be lower).

Disc copying process...
Alcohol 120%
This is one of best programs for creating and emulating images. By the way, it supports all the most popular disk images: iso, mds/mdf, ccd, bin, etc. The program supports the Russian language, and its only drawback, perhaps, is that it is not free.
1) To create an ISO image in Alcohol 120%, in the main program window, click on the “ Creating images«.

Alcohol 120% - creating an image.
2) Then you need to specify the CD/DVD drive (where the disc to be copied is inserted) and click the “next” button.

Select drive and copy settings.
3) And the last step... Select the location where the image will be saved, as well as indicate the type of image itself (in our case - ISO).

Alcohol 120% is a place to save your image.
After clicking the “Start” button, the program will begin creating the image. Copy times can vary greatly. For a CD, this time is approximately 5-10 minutes, for a DVD - 10-20 minutes.
Ultra ISO
I couldn’t help but mention this program, because it is one of the most popular programs for working with ISO images. As a rule, one cannot do without it when:
Installing Windows and creating bootable flash drives and disks;
When editing ISO images (and it can do this quite easily and quickly).
In addition, UltraISO allows you to create an image of any disk in 2 mouse clicks!
1) After starting the program, you need to go to the “Tools” section and select the option “ Create CD image...«.

2) Then all that remains is to select the CD/DVD drive, the location where the image will be saved and the type of the image itself. What is noteworthy, in addition to creating an ISO image, the program can create: bin, nrg, compressed iso, mdf, ccd images.

2) Creating an image from a protected disk
Such images are usually created from game discs. The fact is that many game manufacturers, protecting their products from pirates, do so without original disc you won’t play... I.e. To start the game, the disc must be inserted into the drive. If you don't have a real disk, then you won't run the game...
Now imagine a situation: several people are working at a computer and each has their own favorite game. Disks are constantly rearranged and over time they wear out: scratches appear on them, reading speed deteriorates, and then they may no longer be readable at all. To do this, you can create an image and use it. Just to create such an image, you will need to enable some options (if you create a regular ISO image, then when you start the game, it will simply give an error that there is no real disk...).
Alcohol 120%
1) As in the first part of the article, first of all, launch the option to create a disk image (in the menu on the left, first tab).

2) Then you need to select the disk drive and set the copy settings:
Ignores read errors;
Advanced Sector Scanning (A.S.S.) factor 100;
Read subchannel data from the current disk.

3) In this case, the image format will be MDS - the Alcohol 120% program will read the subchannel data of the disk into it, which will subsequently help launch a protected game without a real disk.

By the way, the size of the image during such copying will be larger than the actual disk space. For example, based on a game CD of 700 MB in size, an image of ~800 MB in size will be created.
Nero
Nero is not just one program for burning discs, it is a whole range of programs for working with discs. At help Nero you can: create any discs (audio and video, with documents, etc.), convert videos, create covers for discs, edit audio and video, etc.
Using NERO 2015 as an example, I’ll show you how an image is created in this program. By the way, for images it uses its own format: nrg (all popular programs for working with images read it).
1) Launch Nero Express and select the “Image, project ...” section, then the “Copy disk” function.

2) In the settings window, pay attention to the following:
On the left of the window there is an arrow with additional settings- turn on the checkbox “ Read subchannel data«;
Then select the drive from which the data will be read (in this case, the drive into which a real CD/DVD disc is inserted);
And the last thing you need to specify is the drive source. If you are copying a disc to an image, then you need to select Image Recorder.
Setting up copying of a protected disc in Nero Express.
3) When you start copying, Nero will prompt you to select a location to save the image, as well as its type: ISO or NRG (for protected disks, select the NRG format).

Hello! In this tutorial I will teach you how to create ISO disk images. This feature can be useful in cases where a game or program does not start without inserting it into DVD drive or CD disc.
I will also show you how you can create an image ISO disk from various files that are just lying on the computer. We can pack music, films, programs and much more into the image.
In general, if you find yourself on this page, then most likely you know for what purposes you need create a disk image, so let's get straight to it. To create the image we will use UltraISO program, which can be downloaded from the official website.
And run it. Don't forget to insert the disc into your computer. Now we need to select the Tools menu in UltraISO and the item “Create CD image”. You can also use hotkey F8.

A window opens where we need to configure something. First of all, in the CD/DVD drive section you need select drive letter, which you can find out by going to the section Computer. If you have only one drive installed, then the desired letter will be selected by default.

Just below you need to indicate the location on your computer where you want to save the ISO image, and also give it a name.

A little lower is the section for selecting the format. Except ISO there are MDF, BIN and some other less popular formats. Perhaps in some cases they will be useful to you.

To start creating the image, all we have to do is click the Make button.

This is how the process goes:

Here we once again see where the image will be saved, as well as the approximate time remaining until the process is completed. When finished, we can open the folder and check the result.

Now this ISO image can be opened in special programs, For example, . After opening the image, in the section Computer this file will be displayed as a disc, and we can work with it like regular CD and DVD discs.
Creating an image from various files
(movies, music, programs, etc.)
Now I've shown how create ISO image from a real CD that is inserted into optical drive. But other than that UltraISO program can pack absolutely any files into a disk image. This is done very simply.


