How to make a page frame in Word. How to make a frame around text and around a page in Word. Place a frame on one or more sheets in a document
The frame intended for text in Word is a kind of decoration for all written characters. Moreover, looking at it, you can say a lot about who drew up the document. For example, such elements for the text will clearly say that the person had an interest in the original execution of his creation, and this is already commendable in absolutely any business. In addition, Word is extremely interesting program, the functions of which you can learn on your own. For example, many of those who probably do not know all its capabilities. But the Word tool gives its owner many advantages when working with text. It’s not for nothing that Word is so popular.
Where can I find design tools?
To insert the frame, you just need to follow some short and clear instructions:
- Select the “Home” tab, which can be found in the main window.
- Find in it.
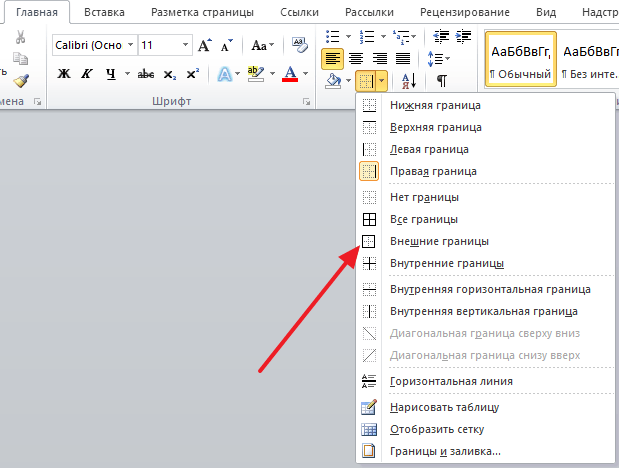
- Here you can find the “Bottom Border” button, which is located in the lower right corner.
- Here you can already find the line “Borders and Filling”.
- After entering this area, three tabs will appear: “Border”, “Page”, “Fill”.
This algorithm of actions will allow you to find the tools that are necessary to create such a component. Next, you need to start designing the element itself.
How to make a frame for a paragraph or a page?
You should deal with the question that worries many users, namely: how to make this kind of element in Word. In order to insert frames for text, you need to select the part of it where this element should be located. Next, you should select the “Borders” item, and then decide on the type of frame, its thickness, type and color of the border. There are quite a lot of types, so for those who want to get an original and unique design, there will always be elements you like. After this, the question of how to make such an element in Word can be considered closed. 
In order to make a frame on the entire page in Word, you need to go to the Page tab in the “Page Borders” window, select the “Frame” item there and configure it. When setting up, you can select a frame not only from different lines
The choice of frameworks for Word is truly huge. There are completely different elements here, differing from each other both in form and in less important parameters. That is why choosing an original idea for text design will be an excellent idea for decorating the latter.
Speaking about the choice of this kind of component, one cannot fail to note the fact that each of the users can call up such an opportunity. Anyone can find this point and significantly embellish their creation, and it does not matter for what purpose the final document will be used. It should also be noted that the choice of an element of this kind for the text expresses one’s attitude towards the person to whom the printed characters will be transferred. Agree, it’s one thing to read a document drawn up in the usual way, and completely different - when the creation is in a unique and interesting design. It is immediately clear that the person did his best when forming this document, therefore, he is not indifferent to the opinion of the person for whom it was intended. In other words, in this way an employee can express respect to his boss or please people close to him with original congratulations.
People have always wanted to decorate and transform their work. The same applies to the Word program. Some users need (or just want) to make their document more presentable by putting a frame around it. And Word can do this.
Word 2003 is already old version this program, which differs in functionality from its followers. But still, it is still used among a number of users. Therefore, let’s first consider how you can make a frame in Word 2003.
Frame in Word 2003
- Open the program and the file we need.
- We look at the toolbar and go to the “Format” tab. Click on it and open the “Borders and Fill” item.
- Then we will need to go to the page tab, where we select the frame we need, the line type, and its width. Select, click “OK” and you’re done.
Select all changes made You can follow the same path, but only in the “Borders and Fill” tab we just need to check the “No” checkbox. That's all.
Frame in Word 2007 and higher
- Open Word and open the file we need. Look at the toolbar at the top and go to the “Page Layout” tab.
- Go further to “Page Background” and go to the “Page Borders” tab.
- The “Borders and Fills” window will open, there go to the “Pages” tab and here we already select the type of frame we need, its width, color. There you can also specify in which part of the document to use the frame.
- Click "OK" and you're done.
In a wide variety of situations, there are times when it is extremely important to make a frame on an A4 sheet. Of course, drawing by hand is no longer relevant in the 21st century. After all, there are so many available tools, in addition to a PC, thanks to which these problems can be solved in a few minutes. All you have to do is open Word, take a few consecutive steps and print. It would seem that so many actions need to be done, but laziness, because the engine of progress.
Frame in Word 2007 and 2010
Let's look at how to make a frame in Word for versions such as 2007 and 2010. The following steps should be followed:
- Open tab to top panel menu called “Page Layout”;
- Go to the “Page Background” subsection and click on the button called “Page Borders”;

- In the “Borders and Fill” window that opens, select the “Page” sub-item;

- In the “Type” area on the left side of the window, you should specify the appropriate “Frame” option.

- Next, you need to find the desired variation of the line edging for the frame. It can be a solid line, a small dotted line, a double line, a large dotted line, a hyphen with a dot, and other types of lines. This function is located slightly to the right of the previous one, also with the name “Type”. And with the possibility of a scrolling list of possible line types for frames.

- After selection the right type line, you can set the color and width of the frame in the boxes below. The frame can be colored and of absolutely any size.

- In case you need to insert a beautiful frame only on one specific page, you need to set subsequent settings. Before saving general settings for a frame, you need to indicate “this section, (1st page only)” in the “Sample” subsection in the “Apply to” window.

Accordingly, if you want to apply a frame on all pages, you need to set “apply to” to “entire document”.
Create a frame using a table
IN text editor Microsoft Word has many advantages. One of them is the ability to draw a frame yourself. What actions are needed for this, we will consider below.
It doesn’t matter what the frame is for, let it be the title page of an essay or report. After all, the design depends on your hand. This decision is not an example for GOST design, since it is necessary to take into account the indents on each side of the sheet. The settings of which must be specified separately.
- On the main top menu, you need to select the button called “Bottom Border” in the “Paragraph” subsection.

- From the list presented, click on the line “Draw table”.

- The cursor will change from a cursor to a pencil. Place the pencil in the desired location and pull until required size and let go. It will turn out to be kind of big table cell. Creating a frame for text around any size is not difficult.
Frame with patterns
For creating greeting cards It will take a little time and a creative approach to design. You can make a beautiful frame in Word using the “Shapes” button. The following steps need to be taken:
- Go to the “Insert” tab in the “Illustrations” subsection;
- Click on the “Shapes” button and select the most suitable shape;

- Place the cursor on a blank sheet and hold down right button mouse, start drawing the shape to a size that is acceptable;
Attention!
To make the curly frame proportionally even, hold down the Shift key.
- Next, to add a verse or congratulation, you need to right-click on the shape and select the line “Add text”;

- By clicking on the curly frame, you can apply the “Format” in the “Drawing Tools” tab different styles. From outline, glow, shadow to filling a shape with a gradient, pattern or texture.
Thanks to the extensive capabilities of this editor, you can make any kind of postcard or congratulatory letter. Add small patterns around the text, add several types of frames, and a new mood for congratulations has already been created. In such simple ways you can surprise your loved ones. For educational purposes, you can choose an easy option for completing your coursework.
Gone are the days when people only read textual information. Today, every computer user can independently type texts, edit them and print them. There are helper programs for this, for example Microsoft Word 2010. But special skills are required to work with this program. Our article will tell you how to make a frame in Worde.
So, for work you will need simple program, included in the complex Microsoft Office. The text editing utility is called Microsoft Word 2010.
What is a frame and what is it for? A frame is a beautiful frame for text or blank page, which creates a certain volume of the page. Most often, frames are used by designers. Thanks to the instructions in our article, you will also learn how to make frames of various shapes and colors. So, let's begin.
Create a beautiful frame in Word
To begin, open Word document 2013. It is advisable to have a ready-made text fragment of the page in which you want to make the appropriate changes. Next, go to the “ Page layout».

In the center, in the upper corner, click on the icon " Page Borders" A window will open in front of you “ Borders and Shading" There are many different settings here. In this case, we only need those that are associated with the frames. Therefore, we will tell you how to make a frame for the entire text of the page.
Select the "Frame" type and then set " Apply to entire document" To confirm the actions performed, click " OK"at the bottom of the window.

Thus, we received the simplest stroke for the entire page of the document. By the same analogy, instead of a regular frame, you can make a frame in the form of drawings.

The following operations will complicate the shape of the frames. To do this, let's try to create a colored paragraph outline. The initial steps are the same: open the document, go to the “ Page layout" Place the cursor on the paragraph you want to format. In the window that opens, go to the “ Border».

Notice the bottom right corner, which shows that any changes will be applied to the paragraph. On this tab you can select.
- No – means that there will be no frame;
- frame;
- shadow;
- volumetric;
- another.
Note that in Word program the window is very conveniently located preview. All changes you make to the document are immediately visible in the small diagram on the right.
Select " Frame"(to do this, left-click on the corresponding icon).
Choose a color. To do this, in the section " Color", click on the small triangle. In the menu that opens, select the color you need (for example blue), and click on it with the mouse.

In chapter " Width» select size in points. To do this, in the section " Width» Click on the appropriate item (for example, 3 pt). Notice the changes on the right. If the thickness and color of the frame suits you, then click the " OK", located at the bottom of the window.

All! The paragraph that you selected with the cursor will be transformed into a beautiful stroke of the color and thickness you need.

If you want to frame a large piece of text in the same way, then simply select the text you need with the mouse.
Then, on the tab " Page layout", click the icon " Page Borders" Go to the " Border", and then specify the type - " Frame».
Select any color and width, then click the " OK».
Thus, there will be another option. Experiment with colors and frame thickness. As a result, any of your pages or individual paragraphs will have beautiful design in the form of a frame.
If there is a need to make a frame in Word, most users follow the most obvious path - they create a huge table that spans the entire page, inside which they place the text. But, despite its simplicity, this method of creating a frame is not very convenient. Especially if there are other tables in the text.
Instead, it's better to use a tool called Page Borders. With its help, you can make a frame in Word for all pages of a document, only for individual pages, or even for individual paragraphs of text. You can find out how this is done in this article.
How to make a frame in Word 2007 and 2010
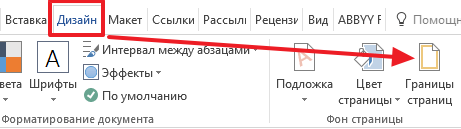
If you are using Word 2007 and 2010, then to make a frame you need to open the “Page Layout” tab and click on the “Page Borders” button. If you have Word 2016, then the “Page Borders” button must be found on the “Design” tab.
The Borders and Shading window will then appear. Here you need to select a frame and click on the “Ok” button. After this, each page of the document will be framed.

If necessary, you can make the frame the way you need. In the Borders and Shading window, you can select the border type, color, and thickness.

If you only need to add a border on certain pages, you can split your Word document into multiple sections and then apply the border only to the pages you need.

How to make a frame around text in Word
If you don't need to make a border around the entire page, you can make one around a paragraph of text you select. For this Place the cursor on the paragraph around which you want to make a frame, click on the “Page Borders” button and go to the “Border” tab.

A quick way to create a frame around text
There are also more quick way make a frame around the text in Word. There is a button on the Home tab that users usually don't notice.
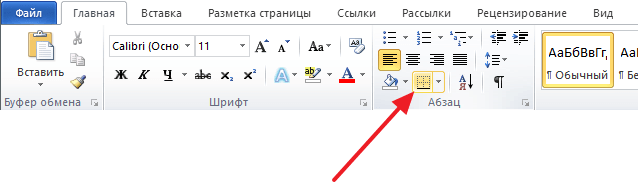
This button allows you to quickly create frames around text. To do this, just place the cursor on the desired paragraph of text, click on this button and select the appropriate frame.
How to make a frame in Word 2013 and 2016
If you have Word 2013 and 2016, then the frame is added in exactly the same way as described above. The only exception is the “Page Borders” button will not be on the “Page Layout” tab, but on the “Design” tab.
Otherwise, the process of creating a frame is exactly the same as in Word 2007 and 2010.


