Create a new system restore point. Create a system restore point manually. How to configure restore points
How to create a restore point in Windows 7.10 or 8 often arises after the bitter experience of data loss, but we will tell you how to make a restore point!
This happens automatically. Windows also does this when it detects major changes in its operation - for example, when you install updates for the OS, drivers or some other software.
These dots represent the saved state of all files and registry settings - with their help you can launch . If at some point you need to undo some changes, you can quickly return the OS to the time period when these changes had not yet been made.
System Restore uses Windows feature called "System Protection". This function Regularly creates and stores information about your computer's system files, registry settings, and previous versions of files. Reverting the OS to an earlier state affects system Windows files, installed programs, registry settings, changes to scripts, batch files and other types of executable files - but does not affect the user's personal files.
Creating a Wimdows System Restore Point
To create it manually, click right click mouse on the “Computer” icon on your desktop, select “Properties” in the context menu, and in the “System” window click on the “System Protection” link.

In the Properties window, click New. The “Protection” window will open.

Enter any title (name) and click on the “Create” button.

The process you start will take less than a minute.

When the process completes, you will see a message indicating that the process completed successfully.

Click Close. Now at any time you can return the computer to this or any other time point.
Restoring Windows to a previous state
If problems arise with the operation of your computer, you can return your PC to the “normal” period of its state, and this is done as follows. In the Properties window, click the "Restore" button.

Alternatively, you can open the recovery window using the Run dialog. Press Win + R on your keyboard, enter the command rstrui.exe and press Enter.

The "Recovery" window will open. Click Next.

Select the point to which you want to return your computer and select “Next”.

Now you need to click on the “Finish” button and then confirm the start of the process by clicking on the “Yes” button.

The process also includes restarting the computer. After rebooting, you will see a message confirming that your computer was successfully restored.
More details in critical situations.
Have a great day!
Restore points allow you to restore settings operating system and previous versions of files in case of software failure. IN this material we will talk about how to create a restore point in Windows 7 and how to then use this point to restore the system.
In order to create a restore point in Windows 7, you must first open the system properties window. This can be done in several ways. For example, if you have a “Computer” icon on your desktop, then you can simply right-click on it and select the “Properties” menu item.
You can also open System Properties through the Control Panel. To do this, go to “Start – Control Panel – System and Security – System”.

Well, or you can use the most in a simple way, namely press the key combination Windows + Pause/Break.

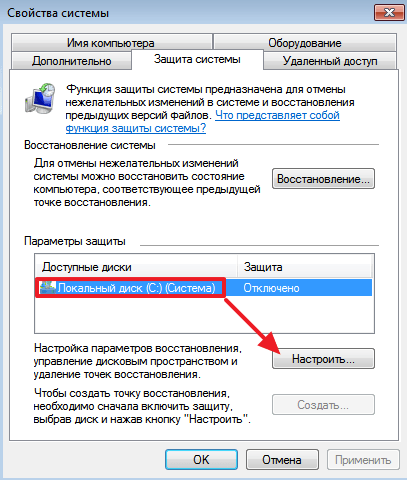
After you have opened the System Properties window, you need to go to the “System Protection” section. To do this, click on the appropriate link on the left side of the window.

As a result, a small window with system protection settings will appear in front of you. There will be a list of disks, opposite which it will be indicated which disks have protection enabled and which do not. If for your system disk(usually this is drive C:) protection is enabled, then you need to select it and click on the “Create” button

After that you just need to enter a name for created point recovery and click on the “Create” button again. After which the Windows 7 operating system will begin the process of creating a restore point.

If system disk protection is disabled, you must first enable it. To do this, select the disk and click on the “Configure” button.
After that, activate the “Restore system parameters and previous versions files" and indicate what percentage of the disk you want to allocate for creating points Windows recovery 7. After making these settings, close the window by clicking on the “Ok” button and you can begin creating a restore point.

Please note that in the same window you can delete previously created restore points. There is a separate “Delete” button for this.

Restoring a Windows 7 system from a previously created point
In order to restore Windows system 7, using the previously created restore point, you need to open the Control Panel and use the search to find the “Recovery” section.

In the “Recovery” section, click on the “Run System Restore” button.


If Windows 7 does not boot, then you can start recovery using installation disk. To do this, boot from the installation Windows disk 7, Select your language and go to System Restore.

After that, select the Windows 7 operating system and click on the “Next” button.


And follow the instructions that will appear on the screen.

This way, you can restore your Windows 7 system from a previously created restore point, even if Windows 7 refuses to start.
What should I do if my PC has problems that interfere with its work? Don't rush to reinstall the OS. “Roll back” it to its previous working state. How to do it? Let's look at how to create a restore point in Windows 7.
What it is
Write any name, the main thing is that you can later figure out when the changes occurred.
We use specialized software
The built-in capabilities of the OS are sufficient for operation, but some actions are not available for full operation:
- one point, and not all at once;
- obtaining information about the space on the HDD that the created files occupy;
- setting automatic deletion old files, creating new ones.
What to do? Download and install the Point Creator utility. 
Problem solving
What to do if the files are not created? Let's look at common causes and solutions.
Shadow copy
Check if the Shadow Copy service is enabled. In the "Administration" section, open "Services", then: 
Can't create
When you turn on the PC, press the "F8" key, boot into " Safe Mode" Further: 
Open the directory: 
Further: 
Will begin system files OS for damage and replacing them with working ones.
How much space is required
If the partition size is 64 gigabytes, three percent is allocated for recovery. With a larger disk capacity - five. As the space becomes full, old data is deleted to make room for new data.
Conclusion
We looked at how to create a point Windows recovery(Windows) 7. Use the recommendations described above to quickly return the OS to working condition. Create points manually before changing OS files or cleaning the registry.
There are many situations when we would like to fix a problem and return everything to its original state without loss.
In our article today we will talk about backup operating system settings by creating a restore point (RBP).
This function will be appreciated by users who like to experiment with computer settings and install all kinds of programs.
Because in case of unexpected situations, it allows you to return to the previous, correct OS settings.
We recommend that all users create a CTV from time to time, regardless of the settings made in the OS, because in the event of an operating system failure, a restore point will allow you to return all the settings that were at the time of its creation.
Note! The OS reincarnation tool automatically creates a CTV every week, and also when the tool detects that changes are being made to the settings.
You can restore OS settings either from restore points that were created automatically or manually by the user.
Although backups contain both system and user files.
In the event of an OS rebirth, user files will not be affected.
Creating a restore point in Windows 7
Let's move on from theory to practice and create a CATV in Windows 7 manually.
“Start”, right-click on the “Computer” menu item, select “Properties” from the context menu.

Go to the “System Protection” menu, which is located in the left column of the window.

In the “System Protection” tab, click the “Create” button. In the window that appears, enter the name of the cable TV and click the “Create” button.

The operation of creating a CATV takes place.

After some time, you will see a message indicating the successful completion of the operation.

Also in the “System Protection” tab you can change the settings for creating cable TV.
Click the “Configure” button, and in the settings window you can select objects for which you need to provide the ability to recover or completely disable system protection by checking the appropriate box.
You can also specify the amount of disk space that will be allocated for creating backup copies. To do this, just pull the slider to the right.
Advice! We recommend setting the maximum volume within 10-15% of the total volume of the section. If there is not enough space available for storing backups, old TVs are deleted and replaced with newly created ones. In order to delete all previously created CTVs, you can use the “Delete” button.

How to restore the system using a restore point in Windows 7?
Before resuming Windows, we recommend closing all programs and applications.
You must repeat all the steps given at the beginning of the previous section (Start - Computer - Properties - System Protection), but in the “System Protection” tab, click on the “Recovery” button.

In the next window, you should select a recovery point, based on the creation date and TV name. Click “Next”.

We confirm the seriousness of our intentions.

Please note that the process cannot be canceled while it is running. We confirm once again that we want to resume the system, click “Finish” and “Yes”.

A window will appear informing you that preparations are being made for system recovery, after which all programs will be forcibly closed, and a message will appear on the display indicating that files are being restored.

Once the recovery is complete, the computer will automatically restart. Now you can log into the OS by entering your credentials. This completes the process.

Features of working with restore points in Windows 7
To conclude the article, let’s talk about some of the features of working with CATV and provide solutions to problems that may arise:
CTVs that were previously created by you or the system can be deleted by some OS optimization utilities.
To solve this problem, we recommend that when using such utilities, you configure them manually and add the System Volume Information folder to exceptions.
CATV cannot be created on a laptop running on batteries. Connect your laptop to a power outlet.
CTV cannot be created for partitions formatted in file system FAT and FAT32. Format the partition to NTFS. Do not forget that formatting will delete all data contained on the disk.
If you have 2 operating systems installed: Windows XP and Windows 7, when Windows startup XP, all CTVs created in Windows 7 will be deleted.
To avoid this problem, you should make the partition on which Windows 7 is installed and make it inaccessible to Windows XP.
System Restore is a critical feature of the Windows operating system that allows you to return the system to a working state by rolling back to a previously saved backup copy. It is called a rollback or restore point and is a snapshot of the system registry, some system files and installed/removed programs before uninstalling or installing them, respectively.
Rollback points are created automatically by Windows 7 itself before making changes to the system registry (installation of software, updates, unsigned drivers) or manually by the user at a convenient time. Rollback is the replacement of current system files, registry files and applications with the original ones stored in a backup copy. Many people wonder where these backups are stored. Physically, they are located in subdirectories of the System Volume Information folder at the root of the partition for which the protection function is activated.
To access this directory, administrator privileges are required, although there is nothing interesting for the user in it.
Before we look at how to create a restore point in Windows 7, let's learn how to activate the system protection function, because in many Windows builds 7 (and most users prefer to use them instead of original copies of the OS), it is turned off in order to save disk space and other resources.
Creating a rollback point is not possible if system protection is turned off for a specific volume. Usually it is enabled only for system partition, because backups do not affect user data (games, multimedia and text files, archives). Yes, rollback points should be created for each partition separately. Basically, they are done only for the system drive, but if applications are installed on another volume, it is worth enabling system protection for it as well.
- Opening context menu directory “My Computer” and click “Properties” in the drop-down menu.
- In the “System” window, click on the “System Protection” link, which is located in vertical menu left.
The second way to call this interface element is through the control panel, which takes a little longer.
- Call it and go to the “System and Security” section if the view of panel elements is switched to “Category”.
- We click on the icon or inscription shown in the screenshot and find ourselves in a well-known window.
- In the tab that opens, select required disk(usually this is the system volume) and click “Configure”.
- Move the checkbox to the desired position:
- Restore system settings and previous versions of files;
- Restore previous versions of files - system settings will not be affected.
- Below, using the “Currently in use” slider, we set the maximum amount of disk memory of the selected volume that will be used to store backup copies.
Once the specified volume limit is reached, the oldest points will be overwritten.
The “Delete” button will delete all previously added backups for the current disk.
- Click “OK”.
How to create a checkpoint
To take a photo system settings manually is no more difficult than activating the function of creating resuscitation points. There are three ways to manage resume points in Windows 7.
- Through Start - go to “Standard”, then to the “Service” directory.
- Through system properties, as shown in the previous section.
- Through the search menu "Start".
- In the window that opens, click “Create”.
- In the text field you should specify the name of the rollback point, by which you can understand the reason and conditions for its creation, then press Enter.
- We are waiting for the process of copying registry files to complete.
- In the dialog box with information about the successful completion of the operation, click “Close”.
System state rollback
Did a crash occur or did errors appear after installing something? It's time to use the function of returning Windows 7 to a previously saved state.
- Call up the “System Protection” window in any convenient way.
The fastest way to do this is through the Run dialog.
- Open it using the combination Win + R or a link in Start.
- Enter and execute the command “rstrui” to call the control dialog.
- In the first window, get acquainted with the program information and click “Next”.
- Select a rollback point.


