USB does not work on the computer. Use of third party programs. Video solution to a situation where the USB port does not see the device
There are different types of problems associated with the operation of the front USB ports on personal computer. Sometimes a problem occurs when all the front ports do not function. In other cases, when only one does not work or works poorly. We will try to talk about each of the situations when USB ports do not work.
Simultaneous failure of all front ports
First, it is necessary to clarify that the front ports differ from the rear ones in that they are connected to the “motherboard” through a special cable, while the latter are part of the motherboard.
First probable cause The solution to which USB ports on the front panel of the computer often do not work is to disable the USB port controller. It is located on motherboard. You can enable it using BIOS menu. You can get here by restarting your computer and pressing one of the keys. This is usually the F2 or Delete key.
In the BIOS you will need to go to the Integrated Peripherals section. There is a USB Configuration menu here. You need to find out what position the USBController is in. If it says Disabled next to it, it means the controller is not working. Switch to the Enabled position. Save the changes and restart the computer.
You can check all USB ports by going to Device Manager. It contains the “Controllers” section serial bus USB connectors" Some of the items may be marked with a yellow exclamation mark. Why? This indicates a malfunction or bad work one of the ports. detailed information is in context menu, called by right-clicking on the device name. It is worth deleting all controllers in the “Manager” and then restarting the computer. Windows OS is capable of restoring all controllers at boot time on its own.
The Windows operating system sometimes disables one or all front ports specifically to save power. We can control the power supply ourselves, so our task at this stage is to prevent the system from doing this. We will again need "Device Manager" and "Controller" universal bus USB". Next, click on the line “USB Root Hub” with the left button. Here we go to the “Power Management” menu. Uncheck the “Allow shutdown to save energy” checkbox. We do this procedure with each USB.
There is another reason why they do not work, it lies in failures or incorrect operation of the Windows system. Most often this happens if operating system Constant updates are disabled. It is highly desirable to restore lost system files or reinstall Windows completely. Problems with the front ports arise due to incorrect OS assembly. Therefore, it is important to use only proven Windows builds.
What to do if only one front USB input does not work
One of possible reasons The reason why this happens is that the cable connecting the front ports to the motherboard. Then the problem with the operation of one of the ports is solved by replacing this cable yourself or with the help of specialists.
The malfunction may occur if we connect several devices to the front USB ports, for example, at once external drive and a phone or something else. There may not be enough electricity for one of them. This situation leads to both port shutdown and intermittent operation. This happens because the front port interface may not have an additional power source, that is, an adapter. Sometimes we don't notice that the front USB ports are faulty. Problems arise only when the main adapter is not sufficient for our immediate needs. And they can be solved by purchasing a USB hub that has additional source nutrition. After replacement, we are able to connect any peripheral devices.
Before starting any of the operations listed in the article to correct deficiencies, you need to check the contacts connecting the cable to the motherboard. A lot of problems with front USB ports can be solved this way.
First, you need to figure out why you might need to disable USB port s on the computer. Everything is quite simple here. With the advent of miniature data storage devices operating via USB, a need arose to prevent data leakage from computers. Using a regular flash drive or portable hard drive, you can easily steal any information. To prevent such incidents, it is necessary to completely disable USB ports. Of course, everyone may have their own reasons for disabling ports, but this is not so important. Below are several ways to disable USB ports on your computer.
Disable USB ports in BIOS settings
In fact, everything is quite simple: go to BIOS settings and disable all ports, or those that are necessary. The nuance is that on this moment There are several BIOS versions, and port disabling is sometimes different in each.
BIOS Award. Go to the BIOS settings and select the item Integrated Peripherals. Let's go to this menu. Next, we simply find the points: USB EHCI Controller, USB Keyboard Support, USB Mouse Support and Legacy USB storage detect and disable them by selecting the option Disabled. Then we simply save the settings and restart the computer;
Phoenix Award And AMI BIOS. Go to settings and select the item Advanced (sometimes some versions may have a Peripherals item) or Advanced BIOS Features. Next we go to the menu USB Configuration. Next, turn off all USB items, save the settings and restart the computer;
UEFI. More modern panel. Go to the menu Peripherals or Advanced. Selecting items Legacy USB Support And USB 3.0 Support and turn them off. Next, save the settings and restart the PC.
Note! In some versions, the menu items may have slightly different names, but that's okay, just go through all the menus and find the USB settings.
Disable USB using the registry
It's more suitable way. In the registry you can disable access of USB ports to specific devices, not the ports themselves. At a time when almost everything is connected via USB, including a mouse and keyboard, this method will be preferable. You can simply disable port access specifically to flash drives, but at the same time computer mouse will work fine.
Open the registry editor: keyboard shortcut Win+R, enter the command regedit and click OK. Next, move on to the next section:
HKEY_LOCAL_MACHINE\SYSTEM\CurrentControlSet\Services\USBSTOR
Find an item Start. Open it and enter the value 4 . Save the settings and restart your computer. This section blocks access of external drives to the port.
Note! If you do not have them installed on your computer USB drivers controller, then the value Start will automatically change to the value 3 as soon as the device is connected to the port.
Disable USB via Device Manager
Open device Manager: right click mouse on My computer, open Properties, Further device Manager. Open the menu USB controllers. Right-click and select the item from the context menu Disable.
Important! The option of removing drivers for USB controllers will not work, since the first time you connect the device to the port, Windows will begin installing the drivers.
Disable USB using Windows files

Denying access using the Local Group Policy Editor

You can also ban reading and writing.
Additionally
It is also worth mentioning that there are two more ways to restrict access to ports: restrict access using third party programs and physically disabling ports.
There is plenty of third-party software on the Internet, and each one is configured differently, so there is no point in describing this method in the article. All you need to do is find the desired program and instructions for it.
As for physically disabling ports, this method will only work with ports on the front panel of the system unit. Open system unit and carefully disconnect the wires going to the ports.
Bottom line
Whatever the reason for the need to disable USB ports, now you know how to do it.
It is recommended to disable USB ports as a precaution, namely when connecting flash drives, external drives or other USB devices in order to infect the computer with all kinds of viruses or steal data. It is for these reasons that many IT workers in offices and companies block access to them. Without bothering with any programs for these purposes or other settings, they simply disconnect it from the motherboard.
Below I will give some examples with descriptions, how to disable USB ports on a computer.
Disable USB in Bios
We go into Bios, to do this, when turning on or restarting the PC, press the Delete key on the keyboard. Let's go to the Advanced section (Advanced BIOS features), where we are interested in the next option, Legacy USB Support. By default, it has the Enabled position, change it to Disabled.

Save the changed values by pressing the F10 hotkey and exit.
Via the registry
Using +R, open the Run window and enter the Windows command “regedit” (without quotes). In the editor we go along the branch
Microsoft Registry
HKEY_LOCAL_MACHINE\SYSTEM\CurrentControlSet\Services\USBSTOR
HKEY_LOCAL_MACHINE\SYSTEM\CurrentControlSet\Services\USBSTOR |
Find the DWORD parameter “Start” and change its value to “4”.

We reboot by first clicking the “OK” button.
PS: How to enable USB ports? Change the value back to "3".
device Manager
Open the “Start” menu, right-click on “Computer” and go to “Properties”. On the left side of the screen, click on the “Device Manager” link. In the displayed list, look for the “USB Controllers” item, open it and use the mouse to deactivate it.

Going to "Properties".

Then “Drivers” and then click the button shown in the screenshot below.

Removing USB controller drivers
An option that also has a place to be. Simply use a program, for example, CCleaner, to remove drivers from your computer. The downside is that when you restart the PC it will check for the presence of these and install them. Which will again open up access to the ports.
Fix It utility
You can download and at the same time find out how you can use it to deny access by following this link //support.microsoft.com/ru-ru/kb/823732.
Using programs
There are quite a lot of applications, it’s impossible to list them all, but I would like to use one. Its name is USB Ports Disabler. Download from the link. We launch and then everything is intuitive.
First, click the button highlighted in the figure below

Hi all! Today we will look at several questions on the topic, how to connect usb to the computer. First, we will learn how to connect any devices to a PC or laptop. And secondly, I will tell you how you can connect to computer additional USB ports if you don’t have enough for all devices. So, let's go!
A USB port is by far the most common type of connecting devices to a computer or laptop. There are three types of connectors: 1.0, 2.0 and 3.0. If the first one can now be found only on the oldest computers, then the second and third ones are used today. At their core, they differ in data transfer speed. And according to appearance, what is more important for us now is color. USB 2.0 has a black connector and plug, USB 3.0 has a blue color. You can read more about the specifications and differences between standards.
Before connecting the USB cable to the computer, look at the plug of your gadget - if the blue connector is connected to the black port, the device will not use all its speed characteristics to the maximum. If you plug the black plug into the blue one, then absolutely nothing will happen - the USB 3.0 port will simply operate at the speed that is maximum for 2.0.

So let's look at back panel of your computer, find a USB port of the same color as the plug and connect it.

After this, the device will either be detected by itself in the system, if it is a keyboard, mouse, webcam, or some other simple and common device for which Windows already has a driver. Or to work you will need to install software, which is included with the device on CD.
How to connect additional USB ports to a computer?
Any modern motherboard already has built-in USB ports - both 2.0 and 3.0. However, we usually connect so many different peripherals that there may simply not be enough of them, for example, to connect a flash drive or external drive and transfer fresh photos to it.

Connecting a USB stick to the rear panel
What to do? There are two ways. The first, preferable one, is to buy a separate bracket with USB ports and insert it into the additional slots available on the back panel of the case - the same ones where we attach video or sound card, wireless adapter, and other components connected directly to the board. It looks like this:

In order to accomplish this task, the motherboard must support the connection of additional USB ports. This can be determined by the presence on system board connectors labeled USB or USB 3.
Connectors for USB 3.0 are large, have many contacts and are designed to connect two ports at once in one plug.


USB 2.0 is smaller and each of them can be connected to 2 ports separately.

Accordingly, we look at the presence of such connectors on the motherboard, buy the corresponding brackets, fix them in the back of the case and connect them to our connectors.
Connecting a unit with USB ports instead of a flop
Another variation of this method of increasing the number of ports is a special unit with USB, which is inserted into the front of the case instead of the old floppy disk 3.5
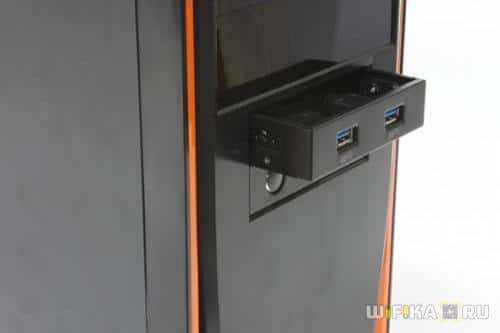
There are many options for designing such a block. For example, combined for USB connections 2.0 and 3.0

And in following example USB 2.0 ports combined with microphone and headphone jacks

Connecting such a block occurs in exactly the same way as the bracket described above - to the corresponding connectors on the motherboard.
External USB hub
Finally, another option for increasing the number of ports is to buy an external USB hub. However, there are a number of disadvantages, because of which I would not connect any serious equipment through it, but would only use it for flash drives or, as a last resort, a mouse.

Since this is a hub, all the load from its several ports goes to one single computer to which it is connected. Due to this overload, certain devices may periodically fall off, which is not good. If you connect to USB hub HDD, then the electricity supplied through it may not be enough to operate it. Therefore, we reserve this method only for light fast food - flash drives.
A number of laptop users may encounter a situation where USB ports on laptop not working, and devices connected through them are not recognized Windows system. This problem occurs quite often, and can have many reasons, making it difficult for the user to work with the USB devices he needs on his computer. In this article I will tell you why USB ports on a laptop do not work, what are the reasons for this phenomenon and how to fix it.

Causes of the problem when USB ports on a laptop do not work
So, why did the USB ports on the laptop stop working? The reasons for this dysfunction may be the following:
How to fix non-working USB ports
In order to fix non-working USB ports on a laptop, you need to do the following:
- Restart your laptop. It is recommended to turn it off completely, remove battery for a few minutes, then return it back and boot the operating system again;
- Inspect the USB connectors of your laptop, if necessary, clean them from dust using a regular wooden toothpick;
- Try connecting your device to another USB connector; perhaps the first connector is no longer functioning;
- If you are connecting your USB device via a cable, try changing the latter, this may help the problem when the USB ports on the laptop do not work;
- Make sure that the connected USB device works; to do this, connect it to another computer;
- Go to BIOS and make sure that the USB functions are enabled;

- Manually recognize USB devices using the system. Click on the Start button, type devmgmt.msc in the search bar and press enter. Device Manager will appear in front of you, click on the name of the list of devices at the top (usually the name of your computer), click on the “Action” tab, and select “Update hardware configuration” there. If the system finds USB controllers during this procedure, then your problem can be solved;

- Remove and then reinstall the USB controllers. Go back to Device Manager as described above, find “USB Controllers” there, and double-click on this entry. A list of USB controllers will open in front of you, right-click on the first one and select “Delete”.

- Similarly, delete all controllers in the list. Then restart your PC, these controllers will be automatically installed by the system again, this can help fix the problem when the USB ports on the PC do not work;
- Reinstall the drivers for the USB. Usually, the laptop comes with a disk with drivers, including a USB driver; you just need to install it on the computer and the problem will be solved. If your USB connection is highlighted with a question mark or has the status “unidentified device”, then you need to find out the ID of your device, and use this ID to search for drivers on the network;
- If you have several USB devices connected, then try disconnecting them and leaving only what you need at this moment;
- Download and run a special utility from Microsoft, it can help fix problems with USB if the USB ports on the laptop are not functioning;
- Perform a system rollback to a previous working restore point. Click Start, type rstrui in the search bar and press enter. Find a restore point at which the system worked correctly and perform a rollback;

- If everything doesn't work for you USB ports, and the above methods did not help, then perhaps your south bridge has burned out. Its replacement (or warming up) is carried out in service center on special equipment, contact them for advice and assistance.
Video solution to a situation where the USB port does not see the device
IN this material I examined a situation in which the USB ports on a laptop do not work, listed a list of reasons for this dysfunction and provided a number of tips for solving it. If you do not know what exactly caused these problems with USB ports, then consistently follow the entire set of tips I have listed, this will help to effectively solve the problem with malfunctioning USB ports on your PC.


