Preview in windows 10 explorer. Bringing back the photo viewer with Winaero Tweaker
You probably know that Windows 10 Explorer has a built-in feature so you can do preview file being opened. To preview, and also to view the contents of a file without opening this file in the program, you need to enable the preview panel using the Alt + P hotkeys on your keyboard and select a supported file in Explorer to view files in the preview panel. Built-in file browsing is very handy tool and can save you valuable time, especially if you don't use thumbnails in File Explorer.
The only problem with the built-in file preview feature is that it takes up a significant amount of screen space. While you can quickly turn the preview pane on or off with the Alt + P hotkeys, turning on the preview pane just to view the file doesn't make any sense. But wouldn't it be nice if we could preview files in File Explorer, without being turned on in the preview pane?
QuickLook App to Quickly View Files in Windows 10
QuickLook is free app available in the Windows Store so you can quickly preview files in Windows 10 Explorer. The main difference between QuickLook and Explorer's built-in file preview feature is that QuickLook does not add or require a dedicated preview pane.
To preview a document or image, you just need to select the file and then press the space bar on your keyboard. A preview of the file will appear on the screen. To close the preview window, simply press the space bar or press the ESC key.

Preview audio, video, and images in Windows 10
QuickLook supports several file types, including popular image, document, audio and video formats.
After installing the QuickLook app from the store, you just need to launch the QuickLook app to be able to view files in File Explorer.

As you can see in the photo, when you view a file, you can open the file and its associated applications or programs. For example, if you're viewing an image file and the default image viewer is the photo app, QuickLook shows open with the photo app in the top right corner of the preview. Also, if you like to do it with the keyboard, just press the Enter key to preview the file, or to close the preview window and open the file with your default application.
With default settings, QuickLook does not load immediately when Windows startup 10, but you can change this by pressing right click mouse over the "QuickLook" icon in the system tray and select run at startup.
To install the application you need to visit windows store, and download the app to install the QuickLook app on your Windows 10 PC.
To make it easier to work with graphic files or other objects operating system Windows has the ability to customize image previews. Finding the desired object is much easier if you can see its content. These system features are available to everyone and are installed in 1 click when choosing a way to display files in a folder, but they do not always work correctly. If you experience these issues, you should use other Windows 10 resources to fix the errors.
Many change the display of files and folders from a table or list to large, medium and small icons. Default preview option in OS Windows 10 included. However, it happens that you need to disable it to improve system performance or it is disabled. Before you take any action, you need to figure out how the elements should be displayed correctly when file preview is enabled.
The thumbnail display looks like this:
Disabling preview will make the images look like this:

There are several ways to enable or disable image previews in Top Ten:
- Changing the settings in Visual Effects.
- By changing the connection status of the thumbnail preview in Explorer.
- Through Group Policy.
- With a REG file.
- By using the BAT file.
Using these methods requires certain skills and knowledge of system administration. Below is a detailed review of the methods and instructions for their use.
Preview images in Windows 10 through the "Visual Effects" setting
To open the settings, you must first launch the command line. This can be done by selecting the "Run ..." sub-item in the "Start" menu, located in the lower right part of the list, or by pressing the "Win" key combination while pressing "R". The launched dialog box should look like this:

In the free area opposite "Open:" you must enter SystemPropertiesPerformance.exe and click on "OK" with the mouse or send to run with the "Enter" key. It should look like the picture below:

In the explorer launched as a result of the actions taken, you must enable preview for thumbnails of all files.
IMPORTANT: In most cases, thumbnail preview is enabled as an option after system installation. If the thumbnails are not displayed, you should look for an issue to debug or make sure the setting is set.
This is done by activating the list item "Display thumbnails instead of icons" with a tick. You can apply changes to the system after clicking the "OK" button.

To save system resources and make it faster, you can uncheck "Output instead of thumbnail icons", confirm the action by clicking on the "OK" button.
How to enable file preview in Windows 10 in Explorer by changing the connection status
To change the settings for displaying pictures in thumbnail view when using your own account, you can change File Explorer Options.
IMPORTANT: This method is only suitable for resolving the issue of displaying images within a specific account. After you exit it, other users or the administrator will not see the changes.
First you need to open "Explorer Options", find the "File" tab in the window that opens, select "Change Search and Folder Options" from the menu that opens. The screenshot below shows all the necessary steps.

As a result of the previous operation, the "Folder Options" window will open, where you need to find the "View" tab and go to it. Preview is enabled by default.
Thumbnail preview must be enabled in File Explorer. Find on the "View" tab the item "Always show icons, not thumbnails", uncheck the box set there, confirm the action by clicking the "OK" button. In the figure below, the desired item is highlighted with a red rectangle.

To disable thumbnail previews in the same way, you need to activate the "Always show icons, not thumbnails" command by checking the box next to it. The following figure shows what the correct actions should look like.

Preview in Windows 10 File Explorer via Group Policy
To make changes to the system through Group Policy, you must have administrator rights.
IMPORTANT: When using this method the settings of all accounts available on a particular machine will be predefined.
Open the Group Policy Editor window.
A menu will open on the left panel of the window that starts up, where you need to find the "User Configuration" item. Next, in the "Administrative Templates" sub-item, you need to go to "Windows Components", activating it by pressing the left mouse button. The contents of this folder with which we are interested in "Explorer" will appear in the right field. The figure below shows the location of the Explorer object on the Advanced tab.

IMPORTANT: In the editor of the operating system version Home setting group policy not available.
After opening the "Explorer" folder, you must deactivate the option to display only icons by turning off the display of thumbnails. In the screenshot below, this item is highlighted with a red rectangle.

To do this, open the specified option and select "Disabled" or "Not configured". Be sure to click the "OK" confirmation button.

Now, from the user profile, you can independently disable or enable the preview of graphic files.
How to disable preview in Windows 10 File Explorer
To disable image previews through Group Policy in File Explorer, you must follow the same steps as described in the previous section. In the window that opens the option to display only icons, select the “Enabled” value by turning off the display of thumbnails.
Preview in Windows 10 File Explorer using a .reg file
Usage this method requires administrator rights. Otherwise, it will be impossible to access the registry and perform any actions there. The main difference between this method and changing the mode through Group Policy is the ability to apply only to the current user. If the machine had thumbnail display settings set via a BAT file, Visual Effects settings, or Explorer settings, then changes to the REG file will override the previous values.
The use of the reg file in the registry keys are modified and added to the DWORD values:

DisableThumbnails DWORD
- Delete or 0 = Inactive
- 1 = Active
By default, image preview for all users is enabled in File Explorer. If this is not the case, then the following steps must be performed to connect:
Download file to your PC Enable_Thumbnails_for_All_Users.zip .
Double-click to run the .reg file. As a result of this, a dialog box should appear asking you to allow the merge, which must be confirmed by clicking on the "OK" button.
After that, be sure to restart the machine or at least log out of the system.
If the preview is enabled, then the ability to change the visibility of the file thumbnail is available to users. More file reg is not needed, so you can remove it if you wish.
To disable preview in the operating system using registry changes, you need to download another file - Disable_ Thumbnails_ for_ All_ Users. zip . After saving it on the "Desktop", you need to unpack it and run it. Similar to the enable procedure, you need to merge and restart the computer or leave the current account. This file is also not needed in the future and can not be stored.
How to enable file preview in Windows 10 using BAT file
This method of setting the preview is relevant only for a specific account. This must be taken into account when using it.
In the registry key using bat files, the DWORD parameter is changed:
IconsOnly DWORD
- 0 = Disabled - display icons
- 1 = Enabled - display thumbnails
Operating room default Windows system 10 File preview is enabled in Explorer. If it is disabled, then you must perform the following steps to connect:
Download file turn_ on_ thumbnail_ previews_ in_ explorer. zip and save it to your desktop. After extracting from the archive double click left mouse button run for the command line to appear. The screen will flicker and command line will close by restarting explorer. This allows the registry to apply changes made. Since this file will not be useful in the future, it can be deleted from the "Desktop".
To disable file preview in Explorer using a .bat file, you need to download turn_ off_ thumbnail_ previews_ in_ explorer. zip archive, save to the "Desktop", unpack and run the .bat file for execution. The actions will be the same as when you turn on the preview.
Conclusion
Presented 5 possible ways enabling and disabling the preview of graphics and other files in Explorer. These methods work on the Windows 10 operating system, which must be taken into account when guided by the tips provided. You also need to pay attention to the presence of administrator rights, since not all methods are available to the user from the account.
On Windows 10, you use the Photos app to view images, not Windows Photo Viewer. After clicking on the pictures, photos saved in popular formats will be opened in the Photos application.
Probably many will use on their computers this application, others liked the Windows Photo Viewer more. The most interesting thing is that the old Windows Photo Viewer in Windows 10 has not gone anywhere, it has remained in the operating system. By default, Windows Photo Viewer in Windows 10 opens "TIF" and "TIFF" files.
Therefore, you can restore "Windows Photo Viewer" in the Windows 10 operating system in order to open image files of popular formats with this viewer. How you get Windows Photo Viewer back on your PC will differ depending on how your PC got the Windows 10 operating system: Update from previous version operating system, or a fresh clean install of Windows 10.
How to restore Windows Photo View when upgrading to Windows 10
If your computer has Windows 10 operating system after upgrading from Windows 7 or Windows 8.1, then there will be no problems using the old photo viewer. In this case, Windows Photo View is present in GUI operating system.
To select a photo viewer as the application to open a supported file graphic format(.bmp, .dib, .jpe, .jpg, .jpeg, .gif, .jfif, .jpeg, .jxr, .png, .wdp), right-click on the image, and then from the context menu "Open with help", select the context menu item "Select another application" from the list of available applications.
After that, the "How do you want to open this file?" window will open. In the "Other options" section, among the list of applications, you will see "Windows Photo Viewer". Scroll Viewer Windows images, then check the box next to "Always use this application to open (.file extension) files", and then click on the "OK" button.
After that, files of this graphic format will be opened by default using the Windows Photo Viewer application.
How to bring back the photo viewer in Windows 10
On a clean install of Windows 10, Windows Photo Viewer will be missing from the operating system GUI, so it cannot be selected to open certain types of files.
In this case, the problem with the old tool Windows browsing, it will be possible to solve in several ways, in which the ability to select an application for the corresponding file types will be restored. This is done by changing the Windows registry 10.
Before making changes to the Windows registry, or before making other major changes to your computer, be sure to create a system restore point. In this case, if problems arise, you can return Windows 10 to the working state that was on your computer before making changes.
Download to your computer a file that contains the application of changes in the registry of the operating system to add missing values.
restore windows photoviewer reg download
Then run this file on your computer. To do this, double-click on the registry file (extension.reg) with the left mouse button, or after clicking with the right mouse button, select the "Merge" item in the context menu.
After applying the changes in the registry, on your computer, the Windows Photo Viewer will be available in the context menu "Open with" to select a program to open photos saved in a specific format.
This will open the "Choose an application" window, in which you will see Windows Photo View among other applications. Next, click on the application to match the supported file formats.

You can do all this yourself manually by adding file type parameters to the registry branch:
HKEY_LOCAL_MACHINE/SOFTWARE/Microsoft/Windows Photo Viewer/Capabilities/FileAssociations
I will not describe this method, since all this can be easily done using a ready-made registry file.
Bringing Back the Photo Viewer with Winaero Tweaker
You can restore Windows Photo View in Windows 10 using free program Winaero Tweaker. The program does not require installation on a computer, the application is launched from a folder.
Download Winaero Tweaker
After launching the Winaero Tweaker program on your computer, in the right part of the program window, find the item "Activate Windows Photo Viewer". First, select this item, and then on the left side of the utility window, click on "Activate Windows Photo Viewer" to restore the functions of the Windows Photo Viewer application in Windows 10.
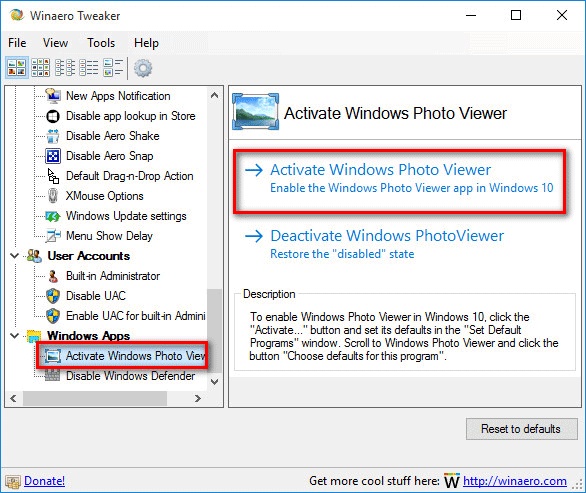
Then the "Choose default programs" window will open, in which you will need to highlight "Windows Viewer", and then click on "Set this program as default" to open all supported file types, or "Choose default values for this program" to open specific file types of your choice.
What separates a beginner from a real experienced Windows user, it is not only knowledge in the field of work and the capabilities of this system, but, above all, the way it is used. Skilled IT professionals use all the keyboard shortcuts, functions and user interfaces they know in their daily work. windows settings allowing them to optimize every aspect of that system's performance.
From the point of view of the average user - one of the main functions of the operating system is to provide access to the data stored on the disk with the ability to conveniently manage it - after all, Microsoft's first operating system is called the Disk Operating System for good reason.
Today, a graphical tool called Explorer is used to manage user data, which until recently was known as Windows Explorer.
Open File Explorer by pressing a keyboard shortcut
Most users launch File Explorer from the panel Windows tasks, which is of course the natural way to invoke this tool.
It is somewhat more time consuming in this case to perform subsequent launches of the Explorer, since it is required either to open the File menu of this tool, and select one of the options in the group Open a new window or use the so-called Explorer shortcut list.
So that we don't have to repeat this process every time we want open a new explorer window, it is worth developing the habit of launching Explorer using the keyboard shortcut Win + E, through which we can instantly open any number of instances of this manager, and from anywhere in the system.
Add Functions to the Quick Access Toolbar
Known from Applications Microsoft Office toolbar Fast access Starting from the version of the Windows 8 operating system, it is also present in Explorer.
This element allows you to quickly access the functions and options we have chosen by pinning them to the title part of the toolbar window.
To add a randomly selected feature available within any of the tabs on the Ribbon (including dynamic maps), right-click the button, then select Add to panel Quick access .
From now on, in order to use the selected function, you will not need to go to the selected tab of the Feed. All the most frequently used functions will be available in the visible part of the toolbar Fast access.

Change the location of the Quick Access Toolbar
The Quick Access toolbar, mentioned in the previous section, is by default located in the top, title part of the Explorer window. It costs nothing, however, to move it a little lower, so that it is directly under the Tape.
To do this, simply right-click anywhere on the Quick Access Toolbar, and then select Show the Quick Access Toolbar below the Ribbon.
If this position does not suit us, we can move this panel back to the Ribbon at any time by repeating the above process one more time.
Move through the file hierarchy using the keyboard
While File Explorer was designed with exploitation in mind, computer mouse, you can navigate through the file structure on the disk using the keyboard. We select or flag an element using the Spacebar, and move between individual elements using the /↓ and ← /→ arrows (if the current view allows).
Going up one level in the tree structure is done by pressing the keys Alt + , and Alt + ← + → correspond to buttons Back and Forward.
The Enter key normally launches or opens the selected element, and we can copy, cut and paste individual files using the well-known Ctrl keys+ C , Ctrl + X and Ctrl + V .
The function key F5 updates the contents of the window, and F6 switches us between the individual sections of the Explorer (address bar, navigation bar, content, main, status bar).
With all the keys listed above, you can move around the entire file system local computer. If necessary, press F4 to quickly jump to address bar, which indicates the current path in traditional textual form, instead of the breadcrumbs currently used. The Alt + F4 combination closes the active Explorer window.
Search for elements based on specific properties
We use the search field available in the Explorer, as a rule, in a very simplified way: search for files with the desired name(e.g. wallpaper) or expansion(for example, *.txt).
Its functionality, however, is very close to the area Favorites available in operating systems of the Windows 8 family, however, the panel Quick Access in relation to its predecessor, is not only much more widely integrated with other Explorer elements, but is also, by default, the default view for this tool, replacing the previous view This computer.
On the Quick Access panel, we can pin the places we visit frequently, which will allow us to quickly navigate to them in the future.
To do this, simply right-click on the location or folder you are interested in, then select the item from the context menu Pin to Quick Access Toolbar. We can unpin any of the pinned elements at any time by right-clicking on the Quick Access toolbar and selecting Unpin from Quick Access Toolbar.
Context menu for copying and creating shortcuts
Novice users who want to create a shortcut to a specified element almost always copy the element and then use the context menu at the destination to select the item. Insert Label.
A good and widely used method is also dragging an element onto the desktop, which, as a rule, ends up creating a shortcut for it in the same location. An object shortcut can also be created using a popup menu called on a specific element using the option Send→ Desktop (create shortcut).
Most users often forget, however, about one more and very convenient way creating shortcuts, copying or moving original elements, such as pop-up menus, called up during the process of dragging elements from one place to another.

To call it, just drag the element with the right, not the left mouse button. After releasing the button immediately after dragging the object to its destination, we can decide what we want to do with this element - copy it, move it, create a shortcut for it. These parameters are selected dynamically depending on the type and location of specific elements.
It is convenient to change the location of elements and the size of icons
On Windows 8 and Windows 10 systems, on the status bar (at the bottom of Explorer, we have the option fast switching between Detail view and Icon view.
If we want to define the system of elements more precisely, we do this, as a rule, using the tab View on the Ribbon, where in the section System You can select one of eight types of item display.
However, instead of switching between them using the Ribbon, you should use the handy shortcut Ctrl + mouse wheel. Scrolling the wheel up or down while holding down the Ctrl key is in a standard way to increase items on Windows systems.
It is worth noting that with the help of this function we can change the scale of the size of icons more smoothly than it is implemented based on the mentioned Ribbon parameter.
Select without using the keyboard
When wishing to select more than one file or folder, we usually use the combination Shift keys and Ctrl , which allow us, respectively, to perform a solid and selective selection of elements.
However, it is worth remembering that using Explorer you can also select individual elements without using a keyboard. Everyone knows selection via mouse click and using a transparent rectangle, but not all users know that selective selection can also be made using the mouse.
In order for such selection to be possible, it is necessary to enable the corresponding Explorer option, due to which each element, when clicked on with the mouse cursor, will display a connected checkbox. Each time you click this field, an additional element will be added to the selection.

To enable this option, it is enough on the tab View tick the box on the Ribbon Item flags.
Automatically repair Explorer windows
If you have a habit of logging out every day after you finish your work, and need to open all the places you need to work in Explorer again the next day, you might consider using the option to restore your open Explorer windows the next time you log in.
Thus, after logging in the next day, all the windows opened before the exit will be automatically restored, and you will be able to continue your work exactly where you left off.

To activate this function, it is enough in the menu File Explorer select item Change folder and search options, in the dialog box that opens, go to the tab View and in the list Extra options check the box restore previous folder windows on login.
Snapping the Explorer window to the edge of the screen
"Old" users probably remember the MS-DOS operating system add-on called Norton Commander, which, thanks to two windows on the screen, made it possible to effectively manage the files stored on the disk.
With the spread of the Windows operating system, this product was implemented as a kind of graphical clone called Total Commander(Windows Commander).
After the release of Windows 7, which was the first to allow snapping program windows to the edges of the screen, many users have this product "left on the shelf."

In Windows 10, we have a similar solution, which, however, allows you to place on the screen not two, but as many as four windows simultaneously. The windows of the system and applications that interest us can be snapped not only to the edges, but also to the corners of the screen.
At your service there are also useful combinations keys. Win + ← /→ allows us to snap the window to the edges, and after docking the window to the left or right side of the screen, we can additionally use the Win + /↓ context menu to change the format of the window snap to the edges of the screen, freeing up space on the desktop.
Control how files are deleted
With system default configuration Windows removal any file moves it to shopping cart for possible recovery. It is worth noting that in Windows 10 the file deletion confirmation function is disabled by default, so that immediately after selecting the option Delete the file went directly to the Recycle Bin without any warning.
If you want to enable additional confirmation, simply expand the additional options in the Ribbon under the icon Delete and then check the box Show recovery confirmation. At this point, we also have two explicit deletion options available: Recovery, at which the item is removed to the Trash, and Delete permanently, which permanently removes the selected item.
Both of these options have corresponding keyboard shortcuts - this is, respectively, the Del key (delete to the Trash) and Shift + Del (complete deletion).
Change filenames quickly
When changing the name of an element, novice users usually use the appropriate right-click context menu option, or worse, go directly to the corresponding Ribbon option.
Slightly more advanced users who often have their second hand on the keyboard, which allows them to complete tasks faster using keyboard shortcuts, change the name for the selected item using the F2 key.
However, those who like to perform all actions with the mouse will certainly be pleased with the fact that you can change the name of the selected file or folder simply by double-clicking on the name of this element, after its preliminary selection. It is only important that the clicks are executed with a pause.
Browse Windows 7 Familiar Libraries
Libraries introduced in Windows 7, that is, folders that collect elements located in several different places, are disabled and hidden by default in Windows 8 and Windows 10 operating systems.
In order to access them, just right-click on the free space Navigation bars Explorer and select an item Show Libraries.
All four standard libraries(Documents, Music, Images and Videos) are displayed directly below the area a computer mentioned in the navigation bar.
Show preview area
Systems Windows Vista and Windows 7 taught us that when a particular file was selected in Explorer, the most important properties were presented at the bottom of the manager window given file, which are selected depending on the specific element type.
On Windows 8 and Windows 10 systems, the panel Details and preview Hidden by default, and when enabled, they appear on the right side of the Explorer window, making efficient use of the available desktop space.
Preview Panel, as the name itself indicates, is used to display a preview of the contents of the user-selected file.
The contents of this file will be displayed provided that the appropriate extensions are installed on the system, which will be able to check and extract its contents from the file.

In turn, information about a particular file, such as data type, modified date, size, creation date, or availability in offline, are presented within Detail areas, which is displayed alternately with Preview window.
Thanks to him, we can learn a little more about the element of interest to us, without the need to display properties. It is worth noting that some of the information presented in this panel, such as the number of selected items and their disk space, is also duplicated at the bottom of the window in the status bar.

Sort files by selected properties
If we want to quickly find a specific file in a directory, we can use one of the many functions implemented in Explorer. For example, we can sort files alphabetically, and then, after pressing a certain letter on the keyboard, move to the first (and then the next) file that starts with a certain letter.
We can not only sort files and folders by various properties (using the context menu or by clicking on the corresponding column headings), but also, using the available fields, group them accordingly.
For example, after selecting the item Group by → Name in the pop-up menu, all our files will be divided into several alphabetic groups (for example, A-K, L-T, Y-Z), depending on the number of elements that start with a given letter.
Groups of elements created in this way, we can conveniently expand, collapse and select with a single click, allowing us to focus only on the group of elements of interest.
With this function, we can, for example, merge the disks we have depending on their type, size or free space, but also somewhat more complex properties such as network location, and even the installed file system.
Easy to create new folders
With the increase in the amount of data we store, there is an increasing need for their constant ordering and segregation. For this purpose, just folders serve us, which collect files with similar topics and simplify their management.
If we want to create a new folder for a new private gallery or, for example, a new advertising project, each time we must either use the buttons on the Ribbon or expand context menu, from which to choose New → Folder.
It is much easier to create a new folder using the keyboard shortcut Ctrl + Shift + N , which was introduced in Windows Vista at the specific request of users, and is still present in Windows today. After pressing it, enter only the name for created folder(default new folder) and confirm it by pressing the Enter key.
Display file name extensions
Immediately after installing Windows, file extensions will be hidden by default, which with normal, everyday use computer makes it easier for us to work with documents. However, almost every day there is a need to create new items, such as text documents, web pages, images or compressed folders.
Regardless of what we use such elements for, we have two ways to create them: by running the application allocated to them, and then saving the file to disk under given name or first creating an empty file on disk and then filling it with content.
In the second case, we usually use the context menu, within which we can use, for example, the item New → Text document (*.txt) or Word Document(*.docx). The list of files available in this menu, unfortunately, is quite limited, so if you want to create, for example, a new HTML page we won't be able to use this function directly.
However, given that the .html file is a normal Text Document, you can safely create a regular .txt document and then change its extension to .html. And here comes the problem, because with the default settings, we cannot change the file extension, since the standard file extension in Windows is not visible. So even if we change New document.txt on New page.html, the output file will still be normal text file with actual name New page.html.txt.
In order to be able to change the extension along with the rest of the file name, it is enough to simply enable the display of file extensions in Explorer, which we can do at least using the tab View on the Ribbon via a checkbox Show extensions for registered files.
Show hidden and hide visible files
From time to time it becomes necessary to go to one of the system folders or personal folders of the application, at least in order to delete some temporary file or data received through the application. The second example applies at least to the Microsoft Skype communicator, through which our contacts are transferred, and the files are recorded in a little accessible and hidden localization (the AppData folder in the logged-in user's folder).
Although we can go to this folder by manually entering the path in the address bar, we do not always remember the exact name of the folder (for example, we can forget the name of this folder - App Data, AppData or maybe ApplicationData).
In this case, it will be useful to enable the display of hidden items in Explorer and system files and folders. We can do this with a dialog folder properties available in the menu File Explorer. On the tab visible in this window View we can enable both file and folder browsing with the attribute Hidden, as well as system files and folders that are hidden by default.
Both of these features are available under two separate checkboxed options Hide files and folders and Hide protected operating system files. Hiding or showing hidden elements we can optionally toggle from the tab View on the Ribbon in the section Show/hide.
Default explorer view setting
Windows 7 and Windows 8 systems taught us that immediately after opening the Explorer window (Windows Explorer in Windows 7 and older), our eyes opened by default the area This computer.
In Windows 10, by default, File Explorer opens the panel Quick Access. Changing the default configuration in Microsoft Explorer gives us a choice, thanks to which we can decide for ourselves whether opening a new Explorer window will open This computer or panel introduced in Windows 10 Quick Access.
To set this parameter, it is enough in the menu View select , then on the tab Are common In chapter Open explorer for: Select the default Explorer area.
Hide the Quick Access Toolbar for Recently Used Files
The Quick Access Toolbar, which in Windows 10 has become standard view File Explorer, presents not only our favorite and pinned local places, such as personal folders, but also a list of recently used files, and recently visited folders. This feature may not be to everyone's liking, as the display of recent items in the Explorer window violates our privacy to some extent.
If you want to hide this kind of information, you can disable this option. To do this, just open the dialog box folder properties(menu View → Change folder display and search settings) and then on the tab Are common uncheck Show Recently Used Files in the Quick Access Toolbar and Show frequently used folders in the Quick Access panel. Here we can clear the history of Explorer.

Show full path in File Explorer title bar
Since the introduction in Windows Vista, so-called breadcrumbs have been used in navigation, which divide the current path into a number of separate components that make it easier to navigate through the file structure on disk, only the name is displayed in the title bar of each Explorer window current location.
To facilitate orientation in the location of the displayed folder, in addition to activating the highlight function in the tree Navigation bars position of the current folder in the hierarchy, we can also display the full path in the title bar.
To change the way the path is displayed, it is enough in the menu View choose Change folder display and search options and then on the tab View dialog box folder properties check the box Display full path in title bar.
Expand the Ribbon permanently
The Ribbon introduced into the Explorer was previously known only from the office Microsoft package office. In the default configuration, Explorer minimizes it. In this regard, if we want to use one of the available options, the Ribbon must be expanded each time. However, we can turn on the full display of the Ribbon on a permanent basis, which, of course, will lead to a partial loss of a certain Explorer workspace.
To do this, simply right-click on any tab or free space of the Ribbon, and then uncheck the Collapse Ribbon box. If, however, we find the unrolled Tape to be a major hindrance, we can similarly bring it back to a minimum.
File Explorer can show image thumbnails and file and folder icons in Windows 10. In this tutorial, we will show you how to enable or disable thumbnail previews in File Explorer for everyone or a specific user account in Windows 10.
- Method 1. Turn thumbnails on and off in File Explorer Options
- Method 2. Turn thumbnail view on or off in visual effects settings
- Method 3. Enabling and disabling thumbnail viewing using a BAT file
- Method 4. Enable or disable thumbnails in group policy
- Method 5. Enable or disable thumbnail preview using REG file
EXAMPLE: Thumbnail preview enabled and disabled in file explorer

Enable or disable thumbnail previews in File Explorer Windows files 10.
Method 1: Turn thumbnails on and off in File Explorer Options.
Note: This setting only affects your user account, as well as the second and third methods.
1. Open "Explorer Options". Click menu "File" and select .

2. In the opened window "Folders settings" go to tab "View".
Note: default value.
3.1 On the tab "View" find the option and uncheck the box and click on the button OK.

4.1 Go to the tab "View", check the box "Always show icons, not thumbnails" and press "OK".

Method 2: Enable or disable thumbnail previews in Windows 10 File Explorer using the Visual Effects setting.
1. Open settings " Visual effects". Press the Win + R keyboard shortcut, type or copy and paste into the Run dialog box: SystemPropertiesPerformance.exe and press the Enter key.

3. Enable Thumbnail Preview in File Explorer
Note: default value.
3.1 Check the box next to the item and click the button OK.
4. Disable Thumbnail Preview in File Explorer
4.1 Uncheck "Show thumbnails instead of icons" click OK.

Method 3: Turn thumbnail view on and off using a BAT file.
The .bat files below will change the DWORD value in the registry key:
HKEY_CURRENT_USER\SOFTWARE\Microsoft\Windows\CurrentVersion\Explorer\AdvancedIconsOnly DWORD
- 0 = Off - show icons
- 1 = On - show thumbnails
2. Enable Thumbnail Preview in File Explorer
Note: default value.
2. In the left pane of the Local Group Policy Editor, navigate to - . (see screenshot below)

3. In the right pane of the policy, open the section "Conductor" and change the policy setting

5. To enable thumbnail preview in file explorer
5.1 Select "Not set" or "Disabled" and button OK.
5.2 Users can now turn on / off thumbnail preview using Ways 1, 2, 3 .
6. Disable thumbnail previews in file explorer.
6.1 Select "Included" and press OK.

Method 5: Enable or disable thumbnail previews in File Explorer in Windows 10 using a REG file
Note: You must have Administrator rights.
This option does the same as Method 4, but only applies to the current user.
This Method will override the previous settings in the Methods. 1, 2, 3 .
Using the reg file below, DWORD values are added and modified in the registry keys:
HKEY_CURRENT_USER\SOFTWARE\Microsoft\Windows\CurrentVersion\Policies\Explorer HKEY_LOCAL_MACHINE\SOFTWARE\Microsoft\Windows\CurrentVersion\Policies\Explorer
DisableThumbnails DWORD
- 0 or delete = Enabled
- 1 = Disabled
2. Enable thumbnail preview in file explorer for all users.
Note: This is the default value.
3. Disable thumbnail preview in file explorer for all users.4,5 /5 - 402 votes


