What is IPMI? Advantages and disadvantages? IPMI, KVM-over-LAN, virtual media in Supermicro servers - remote control and monitoring Ipmi protocol
Not so long ago, I managed to work with new servers for me Supermicro remote control which is carried out using the interface IPMI... In this article, I will try to reveal the main points in setting up IPMI on Supermciro servers, show the main menu items of the IPMI interface, and also talk about additional utilities, commands and methods for monitoring the server using ipmi.
IPMI(Intelligent Platform Management Interface) is an intelligent platform management interface designed for autonomous monitoring and control of functions built directly into the hardware and firmware of server platforms. (information taken from an official source). IPMI is implemented as a separate server controller that does not depend on operating system, BIOS, CPU North and allows you to remotely control physical hardware.
Initial configuration of the IPMI console and familiarity with the interface
Setting up IPMI begins with setting the IP address of the interface, which must be specified in the BIOS. If the server is installed in an office, it may be a gray IP-address, but if your equipment is located in the DataCenter, then you are probably using a white static IP-address.
On Supermicro servers, the BIOS can be accessed by pressing the “ Del”When loading the server, I will not focus on this and will go straight to the interface of the BIOS itself.
As you can see in the screenshot, I entered the IPMI menu item and activated the Lan configuration option for the interface (Update IPMI Lan Configuration = Yes, Configuration Address Source = Static), specified the IP address, subnet mask and default gateway.
You can apply the settings by clicking the button F4, after which the server will restart.
If you did everything correctly, then by entering the IP specified for the IPMI interface in the browser, you will get an authorization:

Now let's go through the main points.
When buying a new server, a user has already been created in IPMI ADMIN with password ADMIN, it is with this data that we log in. I always recommend creating a new user, and deleting or changing the default password, so leaving such a username and password is extremely unsafe. You can create a new user or change passwords / privileges for the current ones in the menu Configuration -> Users.

Restart of the IPMI interface can be done from the menu Maintenance -> Unit Reset.
Mounting iso image and the OS for installation on the server is performed in the menu Virtual Media -> CD-ROM Image.
 My iso OS images are stored on the Samba server on the same subnet as the IPMI server interfaces. I specify the address of the Samba server, the path to the installation ISO image with the OS, after which I mount the ISO image and proceed with the installation of the operating system.
Remote graphical Java server console ( KVM-over-IP) can be opened via Remote Control -> Console Redirection.
The console is generally convenient, but after installing the OS, I usually use ssh clients to work with the server. Sometimes there are times when this is impossible, for example, if your network is not working or has not yet been configured on the server, or there are some problems with access. That's when the Remote Console comes in.

You don't need to make any separate settings in the console itself, I just want to add that it has a built-in keyboard that can be called from the menu Virtual Media -> Virtual Keyboard.

Advice. After working with SUpermicro servers for a long time, I found one nasty bug. After installing the operating system Centos 7 and installing KVM on it, the ability to use the Remote Console is lost. While the server is in the boot process, the console responds and you can go to the Bios or see the OS kernel load. But as soon as the operating system is loaded, the video in the console disappears. Through experimentation, I managed to defeat this bug. It is necessary to add the nomodeset boot parameter to the kernel boot. To do this, after installing the OS, you need to run the command:
grubby --args "nomodeset" --update-kernel / boot / vmlinuz-`uname -r`
After that, the Remote Console works fine.
Server management via SuperMicro's IPMICFG utility
To manage servers via IPMI, SuperMicro develops its own utility IPMICFG.
You can download the IPMICFG file using the command:
wget ftp://ftp.supermicro.com/utility/IPMICFG/IPMICFG_1.30.0_build.190710.zip
At the time of publication, the file had this name, I recommend going to the SuperMicro repository using the link ftp://ftp.supermicro.com/utility/IPMICFG/ and copy the url of the current file.
Unpack the downloaded file into the directory where we are:
ln -s /root/IPMI*/Linux/64bit/IPMICFG-Linux.x86_64 / usr / local / sbin / ipmicfg
We can now run the utility using the ipmicfg (symbolic link) command. Let's take a look at the basic features of the ipmicfg utility.
If we run the command ipmicfg -help, we will get a list of all possible parameters of the utility.

Let's analyze the main commands:
- ipmicfg -help - complete help on the utility;
- ipmicfg -m - view the current IP and mac-address for IPMI;
- ipmicfg -k - view the subnet mask;
- ipmicfg -g - view the specified gateway;
- ipmicfg -fd - reset IPMI to factory settings;
- ipmicfg -user list - view created users and their privileges.
You can change the IP address, mask and gateway of the IPMI interface:
- ipmicfg -m 192.168.1.200
- ipmicfg -k 255.255.255.0
- ipmicfg -g 192.168.1.1
Create a new IPMI user and his password:
ipmicfg -user add Using the utility, we do the following: ipmicfg -user add 6 test 123456 4 Thus, we have created a user test with a password of 123456 and administrator privileges. The list of IPMI users and their privileges in the system can be displayed with the commands: As you can see in the screenshot, the test user has been created. To change (reset) the IPMI user's password, use the command: ipmicfg -user setpwd And I will give a couple more examples of using this utility: Monitoring the temperature and operation of the SuperMicro server hardware is quite simple through IPMI. Full information about the server hardware is contained in the System -> Hardware Information item. Information on the state of the processor, RAM and fans can be viewed by going to the Server Health -> Sensor Readings tab. For ease of viewing, you can change the categories of displaying sensors, for example, temperature: Or voltage sensors: Since at the moment there are no problems on our server, neither with temperature nor with voltage, all sensors are in the green zone. If the server temperature rises or there is a voltage problem, the green rectangles will turn red, which will serve as a signal to check your server. Checking the status of power supplies: # ipmicfg -pminfo Item | Value ---- | ----- Status | (00h) Input Voltage | 217.5 V Input Current | 1.06 A Main Output Voltage | 12.28 V Main Output Current | 17.93 A Temperature 1 | 23C / 73F Temperature 2 | 21C / 70F Fan 1 | 2064 RPM Fan 2 | 2032 RPM Main Output Power | 220 W Input Power | 228 W PMBus Revision | 0x22 PWS Serial Number | P2K4FCH02LT0125 PWS Module Number | PWS-2K04F-1R PWS Revision | REV1.0 Current Sharing Control | PEC error Item | Value ---- | ----- Status | (00h) Input Voltage | 217.5 V Input Current | 1.09 A Main Output Voltage | 12.30 V Main Output Current | 18.09 A Temperature 1 | 24C / 75F Temperature 2 | 22C / 72F Fan 1 | 2064 RPM Fan 2 | 2064 RPM Main Output Power | 223 W Input Power | 234 W PMBus Revision | 0x22 PWS Serial Number | P2K4FCH02LT0126 PWS Module Number | PWS-2K04F-1R PWS Revision | REV1.0 Current Sharing Control | PEC error You can view the processor temperature with the command: ipmicfg -nm oemgettemp You can also check in which mode the fans are operating and change the mode, if necessary. Checking Fan Status and Configuration # ipmicfg -fan Current Fan Speed Mode is [PUE2 Optimal Mode] Supported Fan modes: 0: Standard 1: Full 3: PUE2 Optimal 4: Heavy IO Changing the cooler operating mode: ipmicfg -fan IPMI version and firmware information: # ipmicfg -nm deviceid Device ID = 50h Firmware Version = 4.1.4.54 IPMI Version = 2.000000 Manufacturer ID = 57 01 00 Product ID Minor Ver = Greenlow platform Implemented DCMI version = DCMI not implemented / enabled Firmware implemented version = NM Revision 4.0 Image Flag = operational image 1 raw = 50 01 04 14 02 21 57 01 00 09 0b 04 05 40 01 And you can see all the sensors with the command ipmicfg -sdr When displaying, we see that there are additional columns in which information about the limits of the lower and upper limits is displayed. There are also not a small number of utilities that can be used to monitor and automate this process, for example, with nagios. At the moment, we will not focus on this, since the purpose of the article is to tell the main points in working with IPMI. If you are interested in the topic of monitoring, you can leave your wishes and perhaps in the future we will cover this topic as well. Hope you find this article helpful! Frequently asked questions about IPMI in Supermicro motherboards: why you need it, features, visual demonstration, pitfalls. All the work is done by the BMC (Baseboard management controller) processor - it has its own memory and a specialized OS (usually Linux-based). BMC uses USB to connect virtual keyboard, mouse and CD / DVD / FDD drives. Other buses are used to collect readings from the sensors of fan rotation, temperature, power management, access to the COM port (for remote access to the serial console). BMC is also engaged in capturing and redirecting the contents of the video buffer - modern BMCs already have a video core integrated, once, in the first implementations, BMC was engaged in digitizing an analog signal from a separate VGA controller. Communication with the "outside world" occurs via ethernet (a dedicated port or one of the ports on an ethernet controller located on the motherboard). For diagnostic purposes, you can log in via SSH, where busybox will be waiting for you. 3) How much is it? The network settings can be changed, if necessary, on the BMC Setting tab (remember that you may lose remote access to the server by mistake). By the way, about remote access: the following ports are used (they will need to be forwarded through NAT or provide a way to access the management network, for example, through a VPN): In the tab KVM Console you can see the most useful thing - the graphical server console. There are also buttons for taking a screenshot, managing virtual media (Virtual Media), going to full screen mode and an additional soft keyboard. Why is it needed if there is a hardware room? For various key combinations that for some reason cannot be sent to the server from the hardware keyboard, for example, the classic Ctrl + Alt + Delete. You can either redirect the local drive or mount the image, which is much more convenient. For the corresponding device to appear in the boot BIOS menu a reboot may be required. Go to the tab Remote control, click Launch Console and get in a separate window Redirection Viewer, similar in functionality to the console in IPMIView.
It should be added that the web interface does not facilitate the task of accessing the console from the external network - Redirection Viewer is not a Java applet, but a separate one Java application and uses the same ports for video traffic, HID and virtual drives: 5900, 5901, 5120, 5123. Implementation of remote control and monitoring computer systems large equipment manufacturers came to grips with it at the end of the last century. With the rapid growth of computerization and the emergence of distributed networks of large enterprises and organizations, technology was required that would allow centralized management of the most important nodes without direct local access to the computer. First of all, large manufacturers of server platforms have implemented the ability to perform remote access on a server, which may be located in a nearby building or on the other side of the planet, allowing maintenance personnel to perform the following operations: Turn the power on or off. Hard reset your computer. View or change BIOS settings. Install an operating system using virtual media. Control the operating system remotely using standard I / O devices. Track the technical condition of the most important pieces of equipment. Perform operations for maintaining the hardware platform (flashing the BIOS of the motherboard or certain controllers) and providing authorized access to it. As a result of the joint efforts of major manufacturers of server equipment (Intel, Dell, NEC and Hewlett-Packard), the specification was developed Intelligent Platform Management Interface (IPMI), which has become the standard for implementing remote access to computer equipment on server platforms. IPMI(Intelligent Platform Management Interface) is an intelligent platform management interface designed for autonomous monitoring and management of functions built directly into the hardware and firmware of server platforms. In other words, IPMI is a management tool that is implemented independently of the main server hardware and enables it to turn on, turn off, reset, remotely connect virtual monitors, keyboards and mice, monitor hardware performance, and alert you to important server health events. The IPMI specification version 1.0 was published back in 1998. and was based on connecting to the IPMI module via the RS-232 serial interface. Subsequent IPMI 1.5 b 2.0 specifications are based on the use of a standard network interface. The core of the server platform management system is a specialized device - Baseboard Management Controller (BMC), which is practically a specialized computer embedded in the server platform, with its own processor, memory, peripherals and operating system. The BMC module is powered from the standby voltage of the power supply (+ 5V Standby) and, accordingly, starts working as soon as the primary voltage of 220V is applied to the input of the power supply, regardless of whether the computer is turned on or not. The IPMI specification does not set rigid standards for the implementation of IPMI devices. They can be made as a separate adapter, can be soldered directly on the motherboard, or made as a separate microcontroller. Currently, the most common are BMCs integrated into server motherboards based on System-on-Chip (SoC) technology, which allow both effective interaction with a managed platform and a huge number of remote monitoring functions. notification of important events via e-mail or SNMP, logging, etc. BMCs for server motherboards connect to them via system interface named IPMB(Intelligent Platform Management Bus / Bridge) or other BMCs via interface IPMC(Intelligent Platform Management Chassis). For remote control of equipment through the BMC controller, a special application-level protocol can be used. Remote Management Control Protocol (RMCP), providing work via a regular local network. Typically, modern BMCs provide web-based management of server platforms, as well as remote CD / DVD device connectivity and keyboard-video-mouse over a network (IP KVM), making it easy to perform, for example, changing BIOS settings or perform an operating system installation without having physical access to the server hardware. Let's consider the possibilities of server management through the IPMI interface using the example of a Supermicro X8DTT-IBQF motherboard with an integrated Nuvoton WPCM450 Baseboard Management Controller with IPMI 2.0 support. Controller Nuvoton WPCM450 Supports PCI graphics core, Virtual Media devices (virtual CD / DVD) and keyboard-video-mouse redirection (Keyboard / Video / Mouse, KVM). To connect to local network an external Ethernet controller soldered on the motherboard is used. Platform control buses are used to interact with the components of the managed system. Platform Environment Control Interface (PECI)... The motherboard has a jumper to disable the BMC controller if the need arises. Also, it has a BMC LED (BMC Heartbeat LED) to indicate the health of the controller - a green blinking indicator indicates that the BMC is operating normally. LAN connection is made via the RJ-45 port marked as IPMI_LAN Initial configuration of the IPMI interface is performed in the section Adnanced - IPMI Configuration main BIOS. Status of BMC BMC status View BMC System Event Log- View the system event log (SEL) maintained by the BMC. Clear BMC System Event Log- clearing the event log Set LAN Confi guration- Set up the network configuration of the adapter used by the BMC. You can configure to obtain IP address, mask and gateway address automatically via DHCP, or set them manually. Set PEF Confi guration- configuring the filter of events registered by the Platform Event Filter (PEF) controller. In this menu item, you can configure the controller's reaction to certain events, such as turning off the power when the temperature rises, or when the fan speed decreases. By default, event filtering is disabled. BMC Watch Dog Timer Action- you can configure polling of the state of the managed system and its reset, reboot or power off when it hangs. Disabled by default. The main capabilities for managing and monitoring the state of the platform are available through the web interface. To connect to the BMC module, any browser with java support is used, in the address bar of which the IP-address of the IPMI device is entered and, after connecting, authorization is performed using the username and password specified in the documentation or specified by user settings. The default username and password for Supermicro IPMI devices is ADMIN / ADMIN... After successful authorization, the main platform control window will open with the “System Information” tab activated: The "Server Health" tab allows you to monitor the state of the server hardware: Sensor Reading- viewing data from monitored sensors Sensor Reading with Thresholds- viewing data from monitored sensors and threshold values Event Log- viewing the event log The displayed information of the sensors includes their names, status and read value. There are buttons at the bottom of the screen Refresh- update the sensor data and Show Thresholds- show threshold values. Using the submenu Select a sensor type category you can select the type of sensors (temperature, voltage, etc.). Example of displayed information: Viewing the event log allows you to determine the time of occurrence of the detected state of the sensor, get its brief description and assess the level of danger for the operation of the equipment. Example of displayed information: Tab Configuration allows you to configure notifications about the state of the equipment, change network parameters, configure the access policy to the IPMI device. Alerts- setting up notifications. You can create up to 15 entries with different alert rules. It is possible to set the category of events for which notification is performed - information, warning, critical event, unrecoverable state. Notification is possible by e-mail or by sending SNMP trap. In the first case, you need to specify the e-mail to which the letter will be sent when an event of the specified category occurs, in the second - the IP address of the server that collects SNMP notifications. When using email notification, you must specify the IP address and port of the SMTP server and the sender address in the section SMTP Sections LDAP, Active Directory, RADIUS,Users and SSL sertificate are configured depending on the security requirements for access to IPMI devices. In chapter Network you can change the network settings IP-address, mask, gateway. In chapter Ports- port numbers that are used to emulate virtual boot devices, video monitor, keyboard and mouse. You can also change the port number for web access to the IPMI device. Tab Remote control allows you to remotely connect to the server console using a java applet. It should be borne in mind that when you first connect, the console may not work for a long time, since the applet needs to be launched to run virtual machine Java. In addition to the usual terminal emulation, in this program it is possible to record a session of work through the menu Video - Capture Screen, using the software keyboard ( Keyboard - Soft Keyboard) and connecting virtual media ( Media - Virtual Media Wizard) Tab Remote control used to turn on, turn off and reset the server. Tab Maintenance- to update the firmware and force reset the IPMI device. In addition to manual control of equipment, the IPMI interface allows you to configure the notification system using Email important events related to the operation of the equipment - changes in temperature, voltages, fan speed, the occurrence of correctable memory errors (ECC), etc. It is also possible to monitor using SNMP (Simple Network Management Protocol). IPMI implementation may differ depending on the hardware manufacturer and motherboard model. So, for example, for many Intel server platforms, IPMI connection via a web browser is provided by a special remote management module - Remote Management Module ( RMM), which is not included in the standard package and must be purchased separately. Moreover, there are several editions of these modules that are completely incompatible with each other, the RMM3 module cannot be installed on a platform that supports RMM4 and vice versa. When installing or replacing an RMM, refer to your motherboard documentation. In addition, for example, on many Supermicro platforms, when the IPMI equipment is turned on, a link must be present at the input of the Ethernet port, otherwise, access to the IPMI interface over the network will not work. To manage platforms through the IPMI interface, not only a browser can be used, but also software developed by hardware manufacturers, such as a GUI utility from Supermicro IPMI View
There are also utilities command line IPMICFG and SMCIIPMITOOL. The vast majority of modern servers have an IPMI / BMC interface for managing the server remotely. This tool represents access to virtual keyboard and a server screen via TCP / IP. Today we will touch on the history of IPMI security research, consider vectors for carrying out attacks and their further development using IPMI. IPMI is a set of specifications governing how to communicate and what to provide. CONTROL There are several management interfaces: Everything is clear with the web interface. Each vendor decides for himself how it looks and how to implement it. The second and third interfaces are similar, but the transmission medium is different. In the case of IPMI over LAN, as you might guess, commands are transmitted over the network to UDP port 623. From the installed system, commands for IPMI are transmitted through a device file, usually / dev / ipm iO, which appears after installing the driver. The standard utility for interacting with IPMI is IPMltool for GNU / Linux, as it is the easiest to use. WHAT TO PENTESTER IPMl / BMC Despite the fact that the IPMl / BMC vulnerability report was published back in the summer of 2013, there are currently a lot of vulnerable systems. Very often IPMl / BMC of any suit can be found through a search engine. Naturally, you shouldn't keep such systems outside. They are mainly found during internal penetration tests. One of the simplest vectors for the development of an attack using such systems is the "hijacking" of the server using IPMI / BMC. Having gained administrative access to IPMl / BMC (as will be shown below, this is not difficult at all), you can connect via VirtualConsole (aka KVM) and, for example, reset the root password or use the LiveCD to dump the hash and local users if it is Windows. With a pumped-up skill of luck, you can even catch the console from which root forgot to log out (very often this happens on virtual machines). In turn, IPMI can be used as an opportunity to regain access to the server after a complete reinstallation of the system. PUBLIC RESEARCH For the first time, Dan Farmer (DanFarmer) drew attention to the security of IPMI and the Navy. From his full report, bearing the self-explanatory name "Freight Train to Hell". We will consider the most interesting moments from the point of view of hacking. · Custom bugs from manufacturers (for example, web interface vulnerabilities); In fact, Dan dug up a lot of interesting things, more on that below. NULL authentication Description Vendors Conditions Ipmtiool -А NONE -Н targetIP bmc guid IPMI Authentication Bypass via Cipher 0 Description Vendors Conditions Open port UDP 623, IPMI 2.0, login of an existing user. Metasploit - auxiliary / scanner / ipmi / ipmi_cipher_zero ipmitool -I lanplus -C 0 -H targetIP -u Administrator -P anypasswordhere user list IPMI 2.0 RAKP Authentication Remote Password Hash Retrieval Description Vendors CONDITIONS Open UDP port 623, IPMI 2.0 and valid user-logins. Metasploit - auxiliary / scanner / ipmi / ipmi_dumphashes http://fish2.com/ipmi/tools/rak-the-ripper.pl IPMI Anonymous Authentication / Null user Description Vendors: HP Conditions Open UDP port 623. Metasploit - auxiliary / scanner / ipmi / ipmi_dumphashes ipmitool -I lanplus -Н targetIP -U "" -Р "" user list Supermicro IPMI UPnP Vulnerabllity Description Vendors Conditions Metasploit exploit / multi / upnp / libupnp _ssdp_overflow metasploit auxiliary / scanner / upnp / ssdp_msearch Supermicro IPMI Clear-text Passwords Description Vendors Conditions Cat / nv / PSBlock echo (GET / PSBlock "1 nc targetIP 49152 Regarding the vulnerabilities "NULL authentication / IPMI Authentication Bypass via Cipher О", "IPMI 2.0 RAKP Authentication Remote Password Hash Retrieval", "IPMI Anonymous Authentication" - all this is written in the IPMI specification. HANDS-ON LAB Let's take a look at a typical IPMI vulnerability exploitation scheme. Using the Metasploit'a module ipmi_dumphashes we have the ability to collect user hashes. Important: without knowing the user's login, it will not be possible to get his hash. In options ipmi_dumphashes you can specify the path to the file with logins, for example, if the admins have created accounts for themselves. The default file contains the default logins of all vendors. Brutus hashes are supported as oclHashcat and John the Ripper with jumbo-patches (community edition). John should be taken from the github, since the official website has an outdated version without support for the format we need. Latest version oclHashcat, currently 1.30, supports everything out of the box. If you've got a hash from HP ilO4 in your hands, you're in luck. The fact is that when configuring at the factory, the default password for the Administrator account is set to a length of eight characters - uppercase + numeric. At my modest capacities, the search for such a value takes about half an hour. In case of vulnerability cipher oh you can do without brute-force hashes and reset the password. For this we need the IPMitool utility. Building for GNU / Linux raises no questions. But under Windows you will have to arrange dancing with a tambourine in Cygwin... The sequence of actions for adding an administrator is as follows: 1. See which users are present and use the next free ID. Ipmitool -I lanplus -c 0 -H 1.1.1.1 -U Administrator -P anypasswordhere user list 2. Set the login of our user. Ipmitool -I lanplus -C 0 -H 1.1.1.1 -U Administrator -P anypasswordhere user set name 3. Set a password for it. Ipmitool -I lanplus -C 0 -H 1.1.1.1 -U Administrator -P anypasswordhere user set password 4. We make it an administrator. Ipmitool -I lanplus -C 0 -H 1.1.1.1 -U Administrator -P anypasswordhere user priv 5. We activate only the newly created account. Ipmitool -I lanplus -C 0 -H 1.1.1.1 -U Administrator -P anypasswordhere user enable After the hashes are cracked, the passwords are reset, or a new administrator is added, you have the opportunity to log in through the web interface, via SSH to SMASH, or connect to a remote desktop, aka KVM. One thing worth mentioning is the HP BladeSystem Onboard Administrator. The HP BladeSystem is the chassis that the server blades connect to. So, this chassis allows you to centrally manage the blade servers using IPMI. In this case, authorization to the "Slave" IPMI occurs using the SSO mechanism. All you need is to get a hash of a user with administrative privileges and use the web interface to connect to the server you are interested in. Another interesting feature found in HP il04 is the ability to connect to the server via KVM directly from SMASH (read: SSH) using the TEXTCONS command. This is very useful when ports 80, 443, 17990 are closed. You will need administrator rights to do this, but what difference does it make? The utility is available on GitHub. Very easy to use: 1. The -p parameter is used when it is necessary to scan a specific range. By combining different parameters, you can influence the behavior of the program. For example, when the -d and -p options are used together, the program will try to get hashes only from those systems that respond to IPML pings. When using only the -d option, it will try to get hashes from all addresses, which is usually unrealistically slow. If something is in doubt, then you can use the -v 5 option - the program will display the received messages in a convenient format. To compile on Linux, you only need GCC - gcc ipmicd.c -static -o ipmicd... If used on Windows, compile with MinGW gcc ipmicd.c -mno-ms-bitfields -lws2_32 -DMINGW. CONCLUSION A few words about the high: the study of the capabilities and implementations of different IPMl / BMC vendors is just beginning. This can include not only the web interfaces or SMASH, but also drivers for operating systems that allow you to interact with IPMI / BMC remote server management technologies from the installed system. Internal services that implement information exchange in IPMl / BMC. Even the "iron" implementation of the BMC itself and how exactly it controls the main server can be targeted. I recommend administrators to check all their systems for the presence of public vulnerabilities and, if possible, eliminate these vulnerabilities. The most important recommendation that I would like to give the reader is to pay maximum attention to the settings of the equipment you control. Most Firstdedic servers are equipped with an IPMI module, but many users do not pay attention to this option. IPMI is an abbreviation that stands for Intelligent Platform Management Interface and is translated into Russian as “intelligent platform management interface”. What is this device... This is a module that is located directly inside the server and an additional Ethernet connector is available outside. In case of loss of control over the server, it is possible to go to the specified address and, having logged in, perform actions to fix problems or obtain information about the problem. Basically, this module is used to monitor and control some of the functions built into the server hardware, such as: monitoring temperature sensors, voltage sensors, power supply status, fan speed, logging, image connection, etc. Note that these features are available regardless of processor, operating system, or BIOS. Management is available even when the server is turned off. Unfortunately, it has not yet been possible to automate the provision of access to IPMI, so access can be obtained upon request to technical support. Upon request, an IP address is issued where the interface is located, as well as authorization data. Access is not full, limited account Operator level. IPMI can be accessed either through a browser or using the IPMIView application. In the first case, you will need pre-installed Java and a plug-in for the browser, in the second - Windows or MacOS, or provided Java for the multi-platform version of IPMI View. Browser access After authorization, the main page opens, where you can access the IP-KVM (a kind of virtual monitor that transmits a video image from the server to the connected client. It is very useful in case of an error in the network configuration, OS installation, or when blocking IP addresses on data center level), as well as see the current state of the server, turn on, turn off and hardware restart the server (Power On, Power Down and Reset buttons, respectively, in the Power Control via IPMI area). When you click on the "Refresh Preview Image" button, the preview virtual monitor. And when you click on the black screen itself, the IP-KVM JAVA client will open and you will get access to the interface of your operating system directly using the keyboard and mouse. But for it to work, you need installed JAVA and a browser plugin In the Server Health tab of the main menu, you can view the server status, get information about the fan speed, temperature and voltage In addition to the browser version, there is also a desktop version - IPMI View, which exists in versions for Windows, MacOS and Java. The latter is multiplatform. Everything latest versions IPMI View, as well as documentation, are available on the official ftp server of the manufacturer - ftp://ftp.supermicro.com/utility/IPMIView/. Unlike the browser version, which is downloaded and launched only upon use, IPMI View is installed on a PC and, during operation, simply connects to the required server. Initially, you need to add all your servers to the application settings using the “Add a new system” button (File → New → System) Where in the IPMI address field: you need to add the IP that you received when requesting access to IPMI from technical support. To connect to the IPMI interface, after adding it to the IPMI Domain, simply double-click on the saved system. After clicking on the “Login” button and successful authorization, the login window to the platform management interface will change slightly: Information about the version of the IPMI used will appear, and at the very bottom of the tab with available operations. When switching to some tabs, it will be noticeable how the application requests information from IPMI and displays it in a more readable form. For example, the Sensors tab will display the data in a graphical form, which is somewhat more visual than just numbers, as in the browser version. The IPM Device tab will provide access to obtaining information about the state of the server, and managing it: turning it off, turning it on, restarting and resetting (Power Down, Power Up, Power Cycle, Reset, respectively). To close the current session and disconnect from IPMI, select the Session → Close menu item 
Monitoring of hardware on the SuperMicro server via IPMI and the IPMICFG utility
SuperMicro Server Monitoring via IPMI


Monitoring with the ipmicfg utility


1) The most popular myth about KVM-over-LAN is that it is "not needed"... For some reason, many people confuse it with the usual remote access to the text / graphical console of the OS, i.e. "Why do we need KVM-over-LAN if we have SSH, VNC, RDP and Radmin?"
The difference is fundamental: KVM-over-LAN is not just access to the OS console, it does not depend on the OS in any way, it is access to the console directly from the server itself (and not only to the console, the details will be below), i.e. we can, for example: go into the BIOS of the motherboard or add. controller, install the OS, configure sensor monitoring (which, again, very important - independent of the OS) via SNMP, etc.
2) How it works? It works quite simply, here is the block diagram (Supermicro has recently been using, as a rule, Winbond or Nuvoton WPCM450:
Actually, the WPCM450 in Supermicro products is a system based on an ARM 926EJ-S processor running Linux on a 2.6 kernel. 
Supermicro is currently integrating IPMI BMC directly onto mainboards. Previously, additional modules were used (for example - AOC-SIMSO +). The presence of an IPMI BMC on a Supermicro board is designated by the letter F, for example: X8DTi and X8DTi-F, and the price difference does not exceed $ 50, which is already an obvious answer to the question "is it necessary or not", because an external IP-KVM will cost you much more. Installing a regular KVM and every time you need to reinstall something or reflash to go to the server room is also not an option, this is a waste of time, because your server can be located tens and hundreds of kilometers away, and, in the end, it is simply inconvenient.
4) How does it look in practice?
IPMI can be accessed either through IPMIView (a specialized utility in Java, there are assemblies for Windows and Linux) or through a regular browser (when connected to the graphical console, an additional java application will be launched).
Consider IPMIView. To begin with, you can configure the IPMI ethernet port in the BIOS: DHCP is on by default, but you can manually set the required IP / mask / gateway, VLAN tag (it is better to allocate all the stung management into a separate subnet for security and convenience reasons).
We launch IPMIView and find the required server (you can scan the address range for the presence of IPMI), the default login / password is ADMIN / ADMIN. 

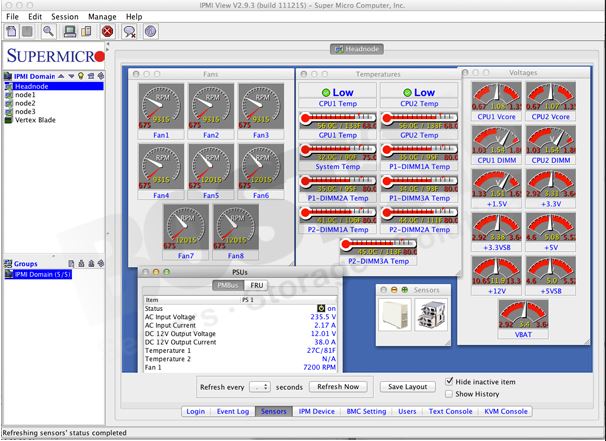
The health of the server can be monitored on the tab Sensors(you will see the readings of temperature and fan sensors only when the server is turned on): 
TCP:
UDP: 

Here are some of the features:
And the final paragraph is the use of virtual media.
Layout switching does not work in WinPE 3.0. So build WinPE with English layout, for this you need to add the following command to the build script after mounting the Wim image:
Dism / image: C: \ winpe64 \ mount / Set-InputLocale: 1033: 00000409 "C: \ winpe64 \ mount" is the mount point for the image.
If you wish, you can change the locale and interface language at the same time - see the WinPE documentation.
P.S. How do I reset the IPMI password? Only using the console utility ipmicfg. Available in DOS, Windows and Linux versions. Running ipmicfg -fd resets all settings and sets the login / password of a user with administrator rights to the standard ADMIN / ADMIN.
Update 04/18/2010... At some point, after another Java update, an attempt to mount an iso image in IPMIView started to crash it (Windows 7 64bit with the latest updates). A new release of IPMIView was released (build 110412 from April 12). I have not yet checked whether this bug has been fixed there, since you can use the launch of the console through the web interface. 
P.S. dated 01.12.2011... Additional article: FreeIPMI.
P.S. dated 06.10.2013. Similar.
P.S. from 10.11.2013.
P.S. from 20.06.2014. Again .Purpose and implementation of the IPMI interface.
Main features of motherboard management via IPMI interface.


All vendors try to adhere to these specifications.
Navy is a hardware wrapper for IPMI. It is a single-board computer (system on a chip) with tentacles in the sensors of the main one. Each vendor chooses what kind of hardware to use and how to combine it, which is natural. All of our examples will be viewed on lntegrated Lights Out (iLO) from Hewlett-Packard (HP). HP iLO is just a bunch of BMC / IPMI. Other vendors have their own names, hardware and software implementations. But, as a rule, this is a single board computer with an ARM and Linux processor on board.
Main function similar devices- to make the life of admins simpler and more convenient: there is no need to run to the server and press Reset button/ put new system/ see why it doesn't load. Now you can connect to IPMl / BMC and do it all remotely. In addition, it becomes possible to receive information from all kinds of temperature sensors,
voltage and so on, which is also quite convenient.
- web interface (depends on the vendor);
- IPMI over LAN (UDP 623);
- from the installed system on the server (provided that the drivers from the manufacturer are installed). Used software: WMI under Windows, OpenlPMI, IPMltool under Linux.
Access to IPMI / BMC by means of the operating system with maximum privileges is possible without using a password, that is, authorization is not required at all. In this case, the attacker simply creates the IPMl / BMC administrative accounts. If he loses access to the server, he goes to IPMl / BMC and returns the honestly earned good. In general, the connection between the IPMl / BMC and the main computer has not yet been thoroughly studied. This is an unparalleled field for finding bugs and features. Considering the number of vendors who implement this in their servers, we can talk about a "rich inner world".
Based on Dan's research, IPMl / BMC vulnerabilities can be divided into two broad categories:
· Vulnerabilities of the IPMI protocol.
The vulnerability allows authentication bypass. Present only in IPMI 1.5. Operation allows you to control the device simply by activating the option to disable authentication. Privileges vary from vendor to vendor, but are usually maximum.
- HP
- Dell
- Supermicro.
Open port UDP 623, IPMI 1.5, login of an existing user.
The vulnerability allows to bypass authentication. The bug appeared with IPM I version
2.0. In this revision, we decided to add encryption. For operation it is necessary
know the login of a valid account, but it is not necessary to know the password -
you can specify any.
- HP
- Dell
- Supermicro.
The vulnerability allows an unauthorized user to obtain hashed user passwords for subsequent brute-force attacks. The bug appeared in the IPMI specification version 2.0
- HP
- Dell;
- Supermicro.
Someone calls it null user, someone calls it anonymous authentication. Someone shares these two vulnerabilities, some do not. By default there is null user / anonymous - "" (empty string). If they say null user, then his password is also empty. If they say anonymous authentication, then the pass is admin and IPMI Chips with ATEN-Software is to blame for everything.
Dan in his research considers these to be two different vulnerabilities. And in the dock from Rapid7, there is not a word about null user.
Dell
Supermicro (using IPMI Chips with ATEN-Software).
Supermicro has a UPnP SSDP service on UDP port 1900. It is vulnerable to buffer overflows.
Supermicro.
Open port 1900.
The IPMI 2.0 specification implies that clear text passwords must be stored somewhere. In Supermicro, they are located in / nv / PSBlock or / nv / PSStore, depending on the firmware.
In addition, in the implementations of the BMC on Nuvoton WPCM450, a service hangs on TCP port 49152 that allows you to read the contents of files in the / nv directory, for example PSBlock, server.pem, and so on.
Supermicro.
Shell access
Researchers have thoroughly studied it, with an emphasis on authentication and encryption mechanisms. An arbitrary code execution vulnerability in a UPnP service in Supermicro firmware (Supermicro IPMI UPnP Vulnerability) is related to CVE-2012-5958 (BoF in libupnp). The rest of the vulnerabilities we touched upon were found by analyzing the Supermicro firmware for Supermicro X9 motherboards, and the emphasis was placed on the analysis of the code responsible for the web.
Using the ipmi_version module, available in the well-known Metasploit framework, you can scan the network perimeter. If you are already in the internal segment and there is no way to install / use Metasploit, then you can get by with a simple ipmiping or rmcpping utility.
As soon as it was possible to find open IPMIs, first of all, you should check them for the "Authentication Bypass via Cipher О" vulnerability (see above). If it is present, then you can do without dumping user hashes and just reset the password for the administrator or add your own. Important: to exploit this vulnerability, you need to know the logs on the account; in our case, the account must have administrative privileges. To begin with, consider the case with a user hash dump and a brute force sending it.
The KVM switch is of particular value, since it provides access directly to the console itself, thereby allowing access to the BIOS, install the operating system, and the like. Each vendor is responsible for implementing the KVM switch. For example, in HP
ilO4 uses TCP ports 17988 and 17990 for this. Dell iDRAC7 has TCP 5900 port. Cisco ICM TCP port 2068.
Becoming an administrator is not that difficult. For you personally, reader, I have prepared the ipmicd program in C under Windows / Linux. It allows you to scan a range of addresses for the presence of IPMl / BMC, as well as dump hashes (analogous to ipmi_dumphashes from Metasploit'a). The programs are designed for the case when using Metasploit is not a good idea, for example, IPMl / BMC are somewhere far away where Metasploit cannot be forwarded.
2. The -d parameter specifies whether to retrieve the hashed password.
3. The -v N parameter indicates the degree of logging during operation 0..5. If N = 1, the program issues fingerprints.Introduction
Access via a desktop application


