How to connect and set up a monopod for an android smartphone
What is a monopod (selfie stick)
To be specific, the monopod is a retractable long device, the handle of which is made according to the principle of a telescope - that is, it lengthens if necessary and compactly slides back. At the end of the handle is a holder for a smartphone. The handle itself may also have a leather or braided loop for easy holding.
The stick is usually held in one hand by a person who wants to photograph himself from a greater distance than the length of the arms allows. By adjusting the size of the extension of the handle, you can take pictures of various distances from the subject. With a well-chosen angle, a photo from a monopod cannot be distinguished from a picture taken by another person from a distance. This does not require the help of third parties and the waste of time for preliminary training of their skill in handling your camera. The folded stick has a small size and weight, which allows it to be convenient for various hikes and trips.
The smartphone is attached to the handle and allows you to take pictures from a distance
Monopods are divided into two types: wired and wireless.
- Wireless connect to your smartphone via Bluetooth. The photographing distance in this case will be limited by the length of the monopod handle.
- Wired selfie sticks have a connector where the wires connecting the stick and the smartphone are connected. The phone usually uses headphone jacks to connect the wire. This method of photography allows you to take a photo without additional recharging.
Some monopods, for example, z07 5 Kjstar, are additionally equipped with a mirror that allows you to take pictures not on the front camera, which often has less good quality, but on the back.
How to connect and set up a monopod for a smartphone on Android
Before purchasing a selfie stick, you should make sure that it is the right one for your phone. Despite the seeming simplicity of this device, not all of them are compatible with Android devices and not all of them are suitable for the style of shooting that the amateur photographer is used to. For example, someone may find it inconvenient to take pictures without pressing a button on the monopod, but through the option of holding the shutter and pre-setting the timer every time you need to take a photo. It is necessary to try the convenience of the stick and its expansion in the store by contacting a qualified sales assistant for help.
Video: about the features of various types of monopods
When the process of choosing the most suitable monopod model from the many offered by stores is finally completed, you need to carefully read the instructions for connecting and configuring it. This must be done in order to accurately understand all the details of the functioning of the monopod, as well as the alleged difficulties in its use. Otherwise, a pleasant and easy trip with the intention of photographing yourself and your company may turn into unnecessary inconvenience with a shooting device.
Connecting a monopod consists of three main stages: assembly, configuration, connection.
Assembling the monopod
For the convenience of further handling of this device and obtaining good pictures, time should be spent on the initial stage of assembling the monopod. This stage will ensure the immobility of the smartphone and prevent it from falling out of the mount.
- Choose the mount size that best suits your smartphone.
- Position the mount at the end of the monopod.
- Place the phone inside the mount and fix it well. Carefully move the monopod in different directions with an inclination to check the quality of the attachment. Do not neglect this method if your smartphone is dear to you, because when photographing in a crowd you can be accidentally pushed or hurt, and then a strong fixation will protect your phone from falling.
Setting up a selfie stick
After choosing a good mounting position, it's time to set up your smartphone to interact with the monopod.
- Turn on your smartphone camera and go to its settings.
- In the settings, find the option for the volume key, then assign the camera function to this key.
Connecting a monopod to a phone
Now the most important part is to “make friends” of the monopod with a smartphone.
To connect a wireless selfie stick, you need to activate Bluetooth on your smartphone and start searching for nearby devices. In the search, you need to select the detected model of the selfie stick and set the interaction. After that, you can take pictures by pressing the button on the monopod.
Wired monopods are connected a little differently. You need to connect the wire that came with the monopod to the headphone jack of your smartphone. Insert the other end of the wire into the corresponding hole in the selfie stick. This will ensure that the phone is recognized by the monopod.
Possible shooting problems: their causes and solutions
Even after the most careful selection of a device and testing it in different situations, unforeseen problems can be encountered during operation. It is better to understand in advance how to deal with them quickly so that a pleasant photographic moment does not turn into dissatisfaction with the producers and a ruined trip without pictures.
The button does not work: connecting a smartphone via wire or via bluetooth
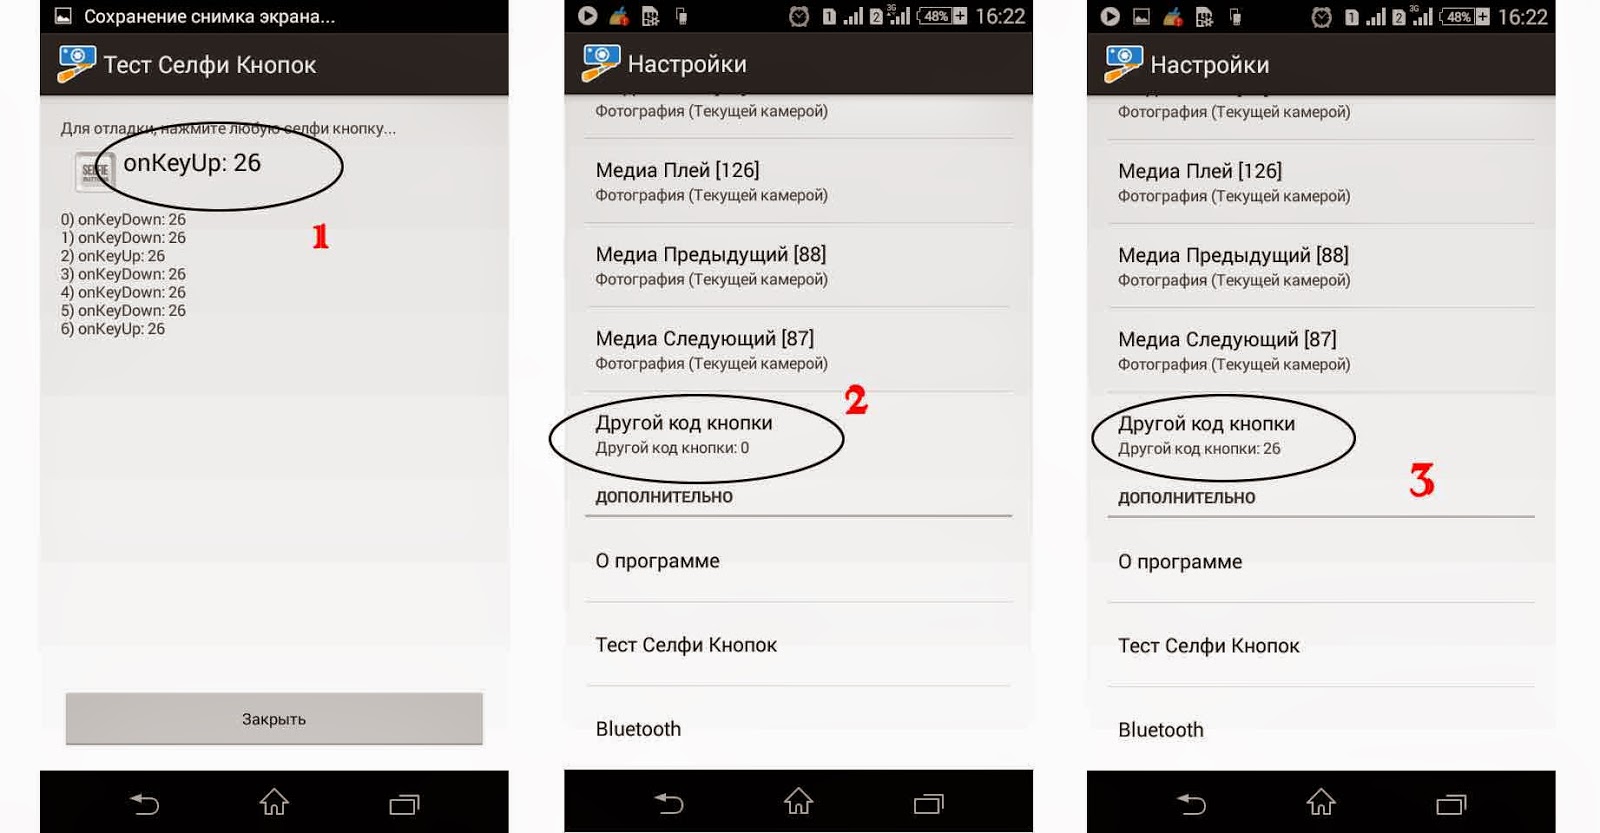
So, you are ready to shoot, stand in a beautiful pose and try to press the button on the monopod, but nothing happens. A very embarrassing situation. This can happen if you are not serious enough about choosing a stick, or maybe you just got it as a gift. The reason is that there are a great many devices based on the Android OS, as well as the number of monopod models. There are incompatible combinations - that is, the smartphone incorrectly receives the signal sent by the monopod. Often this problem can be solved by installing a special application called SelfieShop Camera, available in the Play Market app store.
To correct the situation:
Does not take pictures, but adds sound / There is a photo signal, but the device does not take pictures
The next common problem is changing the volume instead of taking a photo.
- We go into the camera settings in the smartphone (through the standard camera application).
- We find the item “Action on the volume key” (Volume Key), then change its function to “Shooting”.
- Testing the monopod
Other common problems and what to do about them
Why the monopod does not work with a smartphone: software incompatibility
There are other difficulties when using a monopod. For example, it is simply incompatible with your smartphone model. Most often, incompatibility can occur with Alcatel, Sony phones and wired monopods.
Such a problem is a consequence of an inappropriate headphone jack in a smartphone. To be precise, the connector is combined and is intended for a headset, that is, for headphones with a microphone, so there should be four pins in the plug of this connector, not three. And manufacturers of selfie sticks often save on plugs by using three-pin ones.
There can be two solutions here:
- For incompatible phones (except for the Sony brand), a regular three-pin to four-pin adapter will do.
- Owners of Sony smartphones will have to work hard, as phone manufacturers have resorted to a trick designed to encourage buyers to purchase only "native" headsets of the same brand. They changed the order of the wires in the gadget connector, that is, a regular adapter will not solve the problem, you need to look for another one. Thus, if your monopod is equipped with a high-quality four-pin plug, and the phone does not see it, then the wires are in order. Try to be sure to connect the monopod to a smartphone of another brand, if the shooting is done normally, then the matter is in the order of the wires. In this case, you will have to buy a 4 to 4 pin adapter with a different pinout (pin order).
Failure of the monopod photographing button
Yes, this can also be a common reason for the monopod not responding to pressing the button to shoot. Poor quality buttons break quickly. You can take the monopod in for repair, but it will take time. In this case, the problem can be completely solved in a faster way, which, however, is not convenient for everyone and can only be considered as a temporary solution.
Both options are available through the settings of the regular smartphone camera app.
- Timer shooting is a delayed release function, when the timer on the smartphone is set for a time sufficient to move the monopod to a distance and take a beautiful pose.
- Continuous shooting - the smartphone automatically takes several shots in a row, without having to press the button before each one.
What are the apps for the selfie stick
If the standard camera options are not enough, you can install additional applications on your smartphone available in the Play Market app store.
SelfieShop Camera
The application is not only convenient for photography, but also helps to troubleshoot some problems, such as monopod and smartphone not communicating. Through this application, you can take pictures using both a wired and a bluetooth monopod. The application is very simple, easy to understand, but this is also its main drawback. There is no video shooting, no photo editor, but the weight of the application is only about two megabytes.
To take a photo, connect your smartphone to the monopod via a cable or set up interaction via Bluetooth, launch the application, point at the subject and press the button on your monopod responsible for taking a photo. If necessary, you can change the photo settings in the left side menu - such as brightness/contrast, frame size, exposure value, and others.
The SelfieShop Camera app is very simple and convenient for monopod owners
How to use Retrica
One of the most popular applications, loved by many owners of a monopod and just a smartphone thanks to an extensive collection of filters (more than 100 pieces) that can be applied in real time even before pressing the shutter button on the camera. In the application, in addition to the ability to add effects to a photo, there is a photo editor in which you can change the parameters of the resulting image in more detail.
Before connecting a monopod to a smartphone, it is worth understanding the application settings and its capabilities.
Click on the gear icon in the upper left corner of the screen after launching the application. This will take you to its settings.
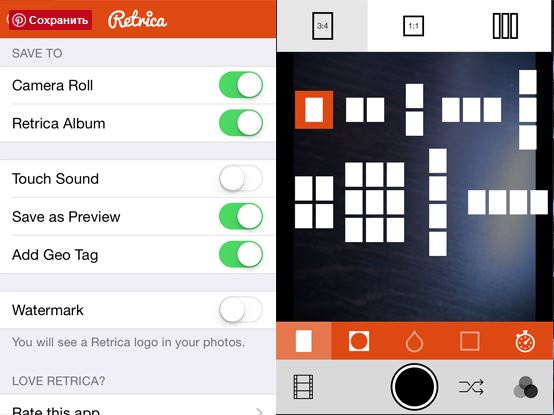
Application Settings
The first block of settings "Save to" is responsible for the place where the taken photos will be saved. "Camera Roll" - saving to the phone's image gallery. "Retrica Album" - an album of Retrica images that will be created automatically.
More useful options:
- "Touch Sound" - turn off the touch sound;
- "Add Geo Tag" - adding a geotag to the photo;
- "Watermark" - erasing Retrika's watermark from a photo.
After launching the application, the object being filmed is displayed, to which the selected filter is instantly applied, even before the process of pressing the capture button.
Of the tools located on the orange stripe, there are:
- Changing the frame size (you can take more than one photo, but a collage at once, the function is implemented very conveniently - after releasing the camera shutter, the camera will take the number of shots equal to the number of squares in the collage);
- The button with a circle in a square adds a vignette to the photo (makes the edges darker);
- The drop icon activates the blur mode for the entire area except for the area selected by touching the desired place in the photo;
- The image of the square on the next button is responsible for selecting a frame for the photo;
- The timer icon adjusts the automatic shutter release time and allows you to set the interval between photos.
A number of tools are also on the gray bar at the very bottom of the application.
- The film icon allows you to view the taken photos in the album and proceed to edit the picture;
- Crossed arrows - this is a sequential filter selection (that is, the filter changes after each click on the arrow icon).
- Three circles - manual selection of the effect.
The basic functions of the application are free, but you will have to pay for the ability to edit photos after shooting, that is, upgrade the application to the PRO version. Moreover, you can find out that the function is paid, completely by accident - the editor itself allows you to process a photo, but you can save the resulting processed photo only in the PRO version.
After you try all the features of the application, you can safely connect the monopod to your smartphone and take pictures by pressing the button on its handle.
"Incorrect PIN or password entered" error when connecting a monopod
Another problem that a monopod owner may encounter is the appearance of a pin or password error. This most often occurs with monopods connected via bluetooth.
Here are some ways to solve the problem:
- If such an error occurs, disconnect the monopod from the smartphone, turn off bluetooth and restart the smartphone. In most cases this solves the problem.
- Also, an error may occur if the latest operating system updates are not installed on the phone. Check your smartphone for updates, then reconnect the monopod to it.
Now, when you go on a trip with a monopod, you will be sure that all the best moments will be captured. No problems and system errors can prevent your friends from sharing the joy of taking pictures with you.


