Setting up the camera on android
Nowadays, it is difficult to imagine a smartphone in which a camera would not be installed. The shooting module has become an integral part of a mobile device, like Wi-Fi or a second SIM card slot. And of course, every user tries to take a good picture using a mobile camera.
Looking at the pictures posted on social networks or blogs, you can see that even with a high-quality camera it is not always possible to take such a high-quality photo. Sometimes the human factor is to blame - well, in principle, a person is not capable of capturing a beautiful frame - but most often the point is that the user ignores or incorrectly sets the camera settings.
There are three ways to significantly improve the quality of photos and videos:
- Using your own camera settings;
- Through the engineering menu;
- With a dedicated application.
In our article, we will give basic tips for improving pictures, as well as describe in detail how the camera is set up on Android.
Before you start setting up the camera, you should understand the basic rules for shooting on a smartphone. By following these recommendations, you will already be half way to high-quality photography.
- Keep your lens clean. Before shooting, wipe the lens with a soft cloth so that the picture is not spoiled by smudges and dust particles that inevitably fall on the lens;
- Consider light. It is extremely important that the subject is well lit. If you are shooting a person or object in a room, do not place it in front of a window so that the picture does not turn out to be one solid white spot. We will talk about how to adjust the camera for lighting below;
- Don't overuse zoom. Smartphone cameras are usually equipped with a digital magnifier, which greatly distorts the photo. If possible, it is better to get closer to the subject so that a similar picture does not turn out:
- Use the flash only for its intended purpose. If photography takes place at dusk, sometimes you can’t do without a flash. In this case, set it to "Auto". The smartphone itself will “figure out” when it needs to be used. In the afternoon, it is better to completely refuse the flash:

In order to achieve a good picture, the user needs to set a competent combination of camera settings that correspond to the shooting conditions.
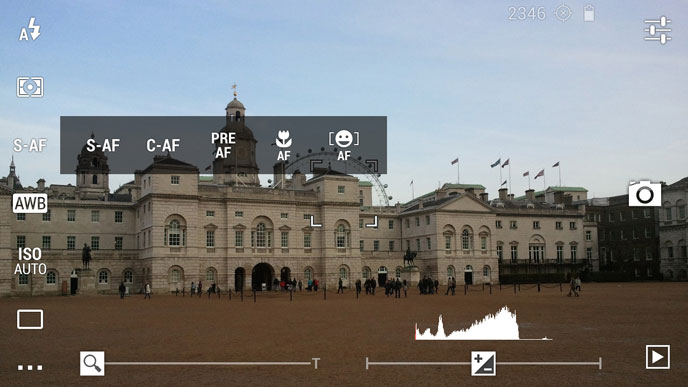
Let's analyze the main menu items of the camera in order:
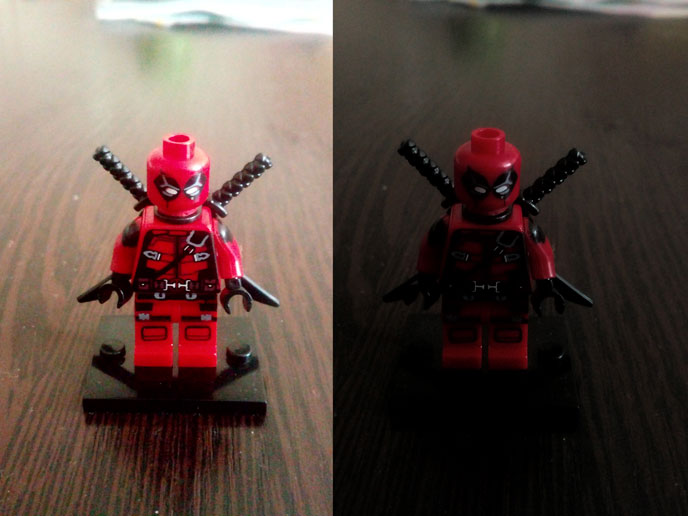
Exposure. This function determines the amount of light that will hit the camera sensor. As a rule, the exposure varies from -3 to +3. If you shoot in the evening, set the exposure to plus. On a bright sunny day, accordingly, it is better to reduce the exposure. The picture below shows examples of how the picture turns out if, under even lighting, the frame is overexposed or underexposed:
color effect. As a rule, 6 main effects are available in the color settings:
- Monochrome;
- Sepia;
- Negative;
- Under the water;
- Chalk on a black board;
- White board.
These effects come in handy if you want to add styling to your snapshot. For example, for a more atmospheric and dramatic photo, you can turn on monochrome, and sepia will help if you want to take a picture in retro style:

shooting mode. Here, the setting depends on the time and place of shooting. Use the appropriate modes if you are shooting on the beach, in the snow, in the city during a fireworks display, photographing a car race, or taking a night portrait.
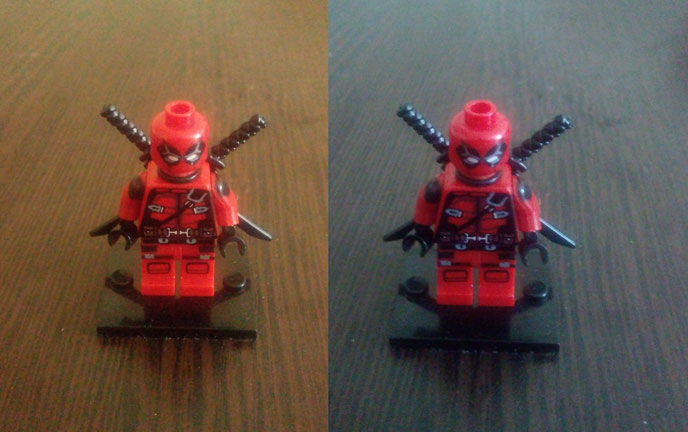
White balance. This feature adds warm or cool tones to the picture. The white balance setting depends on the lighting. The photo below shows an example of two shots. The left one was made in the "Shadow" mode, the right one - in the "Incandescent lamp" mode:
If you are not exactly sure which mode to set, it is better to switch to auto balance.
In the image settings, you can adjust the sharpness, hue, saturation, brightness, and contrast of the image. By default, all parameters are set to "Normal".
Frequency. This parameter determines the flicker frequency of the light source in hertz. In order not to puzzle over this value, leave the parameter in the Auto mode.
The image size is set in megapixels. If the smartphone has a sufficient amount of internal or external memory, it is better not to skimp on the size and set the maximum setting for this parameter as far as the camera allows.
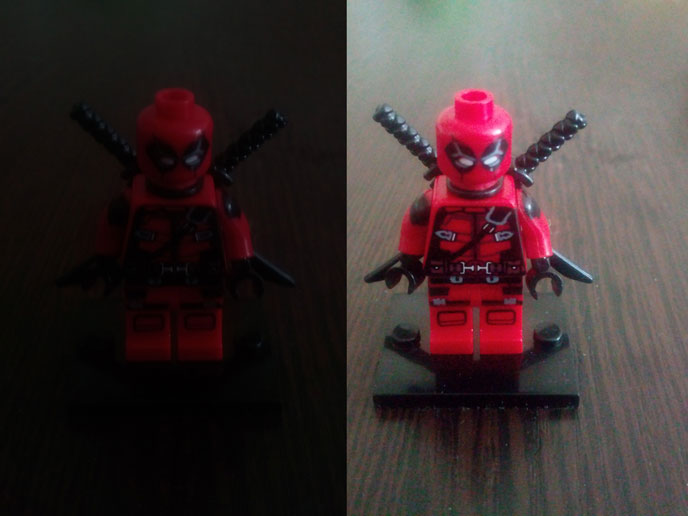
The ISO parameter determines the light sensitivity of the camera matrix. The higher this value, the more light will hit the sensor. Therefore, lighting conditions should be taken into account when setting this parameter. In a dark room, the ISO should be set higher, and in bright sunlight, it is better to lower the sensitivity to a value of 100 or 200.
The photo below shows two shots that show extreme ISO values. Left snapshot - value 100, right - 1600.
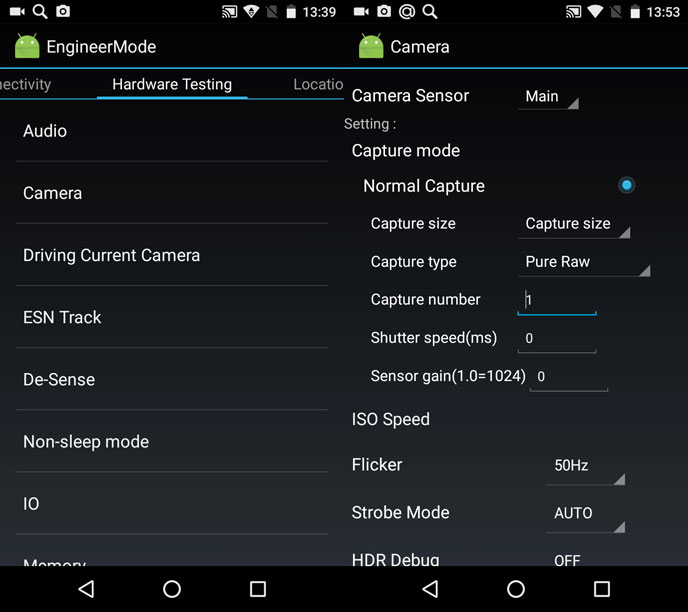
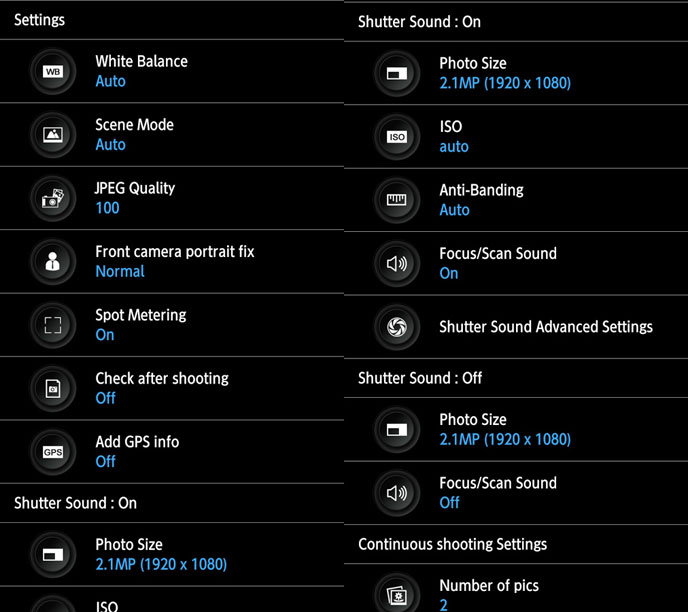
Setting up the camera in the Android engineering menu
Access to the engineering menu is provided only on smartphones with a MediaTek processor and Android version not older than the second. To get into the engineering settings of the camera, you must enter a special combination on the numeric keypad. As a rule, this code is *#*#3646633#*#*. The camera settings are located in the Hardware Testing section. Here you can find a fairly extensive list of fine-tuning:
- Camera sensor selection;
- Capture and shutter speed;
- shade chart;
- Flash calibration;
- Focus settings;
- HDR mode options and others.
Please note that setting up the camera through the Android engineering menu is a rather complicated and responsible task. If you are in doubt or do not know which parameter is responsible for what, it is better not to touch the root settings of the camera and try to improve the picture through the parameters in the main menu.
Applications to expand the functionality of the camera
Some programs that are downloaded from the Google Play store significantly expand the settings of the smartphone's camera. Having mastered such applications, the user can improve the quality of the picture. We recommend paying attention to several paid utilities. They are inexpensive, but your shooting will not be disturbed by constantly pop-up ads.
Cost: 129 rubles.
An application that adds a huge number of settings to the photo module on a smartphone, turning it into a real professional camera. With the help of the utility, you can fine-tune camera stabilization, align exposure, focus, flash brightness, set the shooting interval, colors and scene illumination. A special scale shows the angle of the camera, so that it can be used to maintain an even horizon.
Cost: 179 rubles
A handy application designed for high-quality camera settings before shooting. It is worth noting a very thoughtful program interface, thanks to which most of the tools are available in one click on the screen.
The main functions of the application:
- two states of the shutter button - press to focus, release to take a picture; movable reticle to set the focus area;
- visual histogram; exposure compensation; exposure metering mode - matrix, center-weighted, spot;
- autofocus mode - single-frame, continuous, face recognition, etc.;
- white balance;
- shutter mode;
- Scene setting;
- color effects;
- grids: rule of thirds, golden ratio, etc.;
- volume keys as shutter buttons.
If you seriously decide to improve the quality of photos, in addition to camera settings, pay attention to additional tools. When taking a photoset on the street or in nature, we recommend using special tripods for your smartphone.
If you're shooting small items indoors, get an inexpensive lightbox - a special box that is, in fact, a mini photo studio. The lightbox gives a soft diffused light and allows you to avoid unnecessary noise and shadows in the photo. Also, do not neglect graphics programs. With the help of simple manipulations with their help, you can significantly improve the quality of the image. For example, this photo was taken using a lightbox and underwent a little post-processing in Photoshop (color correction and sharpening):
Which smartphone to choose for high-quality photos
Many users believe that the quality of the camera is determined by the price of the smartphone. That is, according to this logic, the more expensive the gadget, the better the photo will come out. However, as practice shows, you can achieve excellent pictures using an affordable mobile device that will cost less than 10 thousand rubles.
An ideal example in this sense is the British company Fly, which since 2003 has been providing users with powerful, productive and affordable smartphones. One of the latest models with which you can safely go on a photo hunt is the novelty of spring 2017 - a smartphone. The 13-megapixel main photo module will help you create an impressive shot even in difficult lighting conditions, and the 5-megapixel front camera will provide clear video communication and will appeal to lovers of spectacular selfies.
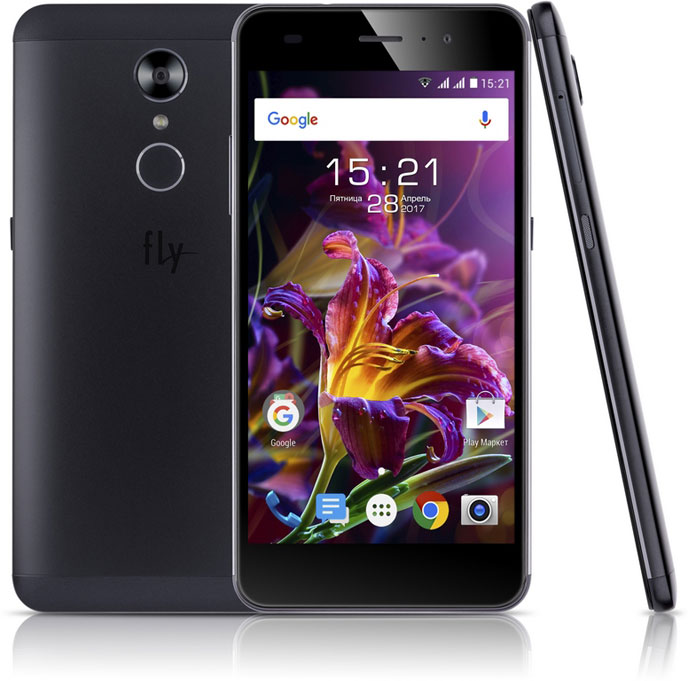
It is worth noting that the camera contains the most basic settings that will help create the perfect photo. Here you can set ISO, white balance, color effect, tone, and more.
The smartphone is equipped with a powerful 1.5 GHz quad-core processor, which can easily handle the most voluminous photo post-processing application or camera spot adjustment utility. The size of the pictures can be easily set to the maximum - the amount of internal memory of 16 GB will allow you to save more than one thousand memorable photos. And if this volume is not enough, the smartphone’s memory can be increased up to 64 GB using an SD card.
All captured photos are realistically displayed on a bright and high-contrast 5-inch IPS screen with FullHD resolution. On such a display, it is simply impossible to miss even the smallest detail of the picture.
Now you know how to set up the camera on Android. Arm yourself with a powerful and high-quality smartphone, follow our recommendations, and you will not be left without great photos.


