Setting up a VPN connection using Windows OS
A private virtual network (VPN) is good in that it provides the user with a secure or trusted channel with another PC without the need to provide a dedicated communication channel. It is created over another network - the Internet, for example.
Windows has built-in tools for establishing a VPN connection between computers located over long distances. Let's set up a VPN tunnel between two PCs that are controlled by the Windows environment.
Let's create the server part
The connection of remote clients to the VPN network is organized through a special access server. It may require an incoming connection to go through identification and authentication procedures. It knows which users have access to the virtual network. Also, it has data about allowed IP addresses.
To set up a VPN access server in the Network and Sharing Center, you need to open the applet for changing adapter settings. If the applet's main menu is not displayed, press the "Alt" button. At the top of the applet, the main menu should appear, in which you should find the item "File", and then select "New incoming connection". Let's consider in more detail.
In the control panel, go to "Network and Internet".
In the next step, we will open the network center.


Let's create a new incoming connection.

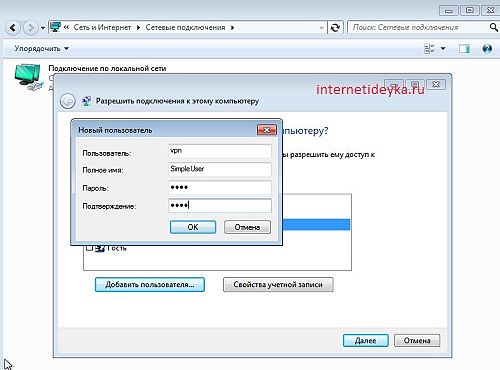
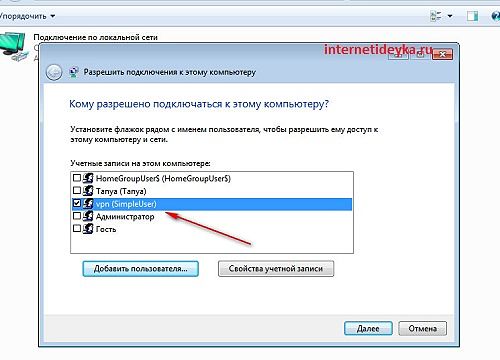
The window that appears will prompt you to select from existing users or define a new one who will be allowed to connect to this PC.

When adding a new “user”, you need to specify the name and password with which he will be allowed to connect to the VPN access server.
In the next step, the Private Network Setup Wizard will ask how users will connect.
It is necessary to indicate that they will do this over the Internet, so we check the required option.

The next step is to set up network applications that should accept incoming connections. Among them is the "Internet Protocol version 4 (TCP/IPv4)" component. You will need to open its properties and manually enter the range of IP addresses that are allowed to access the server.
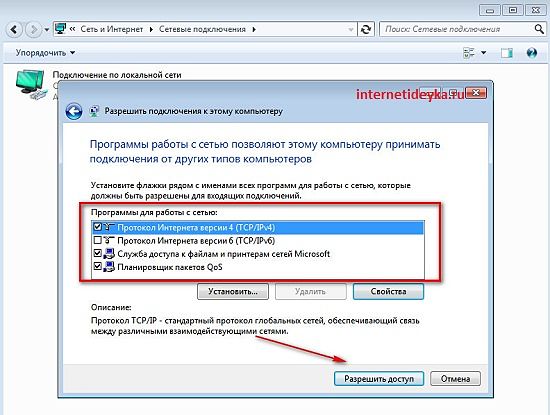
Otherwise, leave this matter to the DHCP server to automatically determine IP addresses. In our case, we had to manually define them.

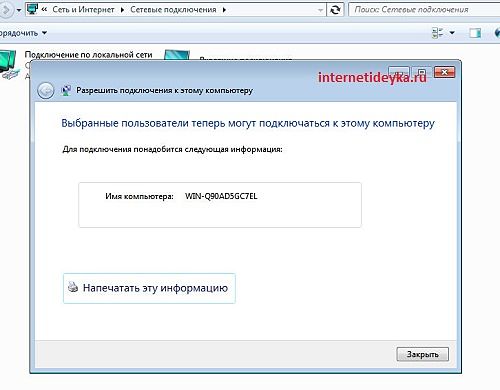
After processing the entered data, the access server will receive the required information to grant the necessary permissions to authorized users. At the same time, the system will prompt the computer name that will be needed in the future.
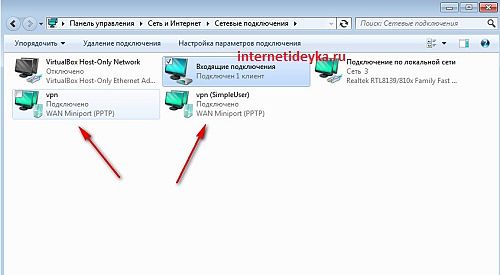
As a result, we will get such a result. There are no connected clients yet.

Let's set up the client
Modern networks are most often built on a client-server architecture. It allows you to highlight the main computer in a networked environment. Clients initiate requests to the server and are the first to attempt to connect to the server.
We have already configured the server part of this architecture. Now it remains to establish the work of the client part. The client must be another computer.
In the network center of another PC (client), we will establish a new connection.

We need to connect directly to the workplace.
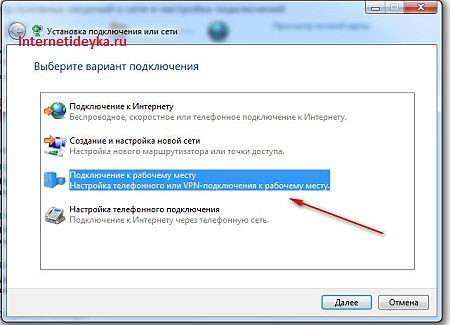
Again, we turn to the Windows Network Center only now another PC. Select the option to set up a new connection. The applet that appears will offer several options to choose from, but we need the option to connect to the workplace. The wizard will ask you how to connect. We also need to opt for setting up an Internet connection (VPN).

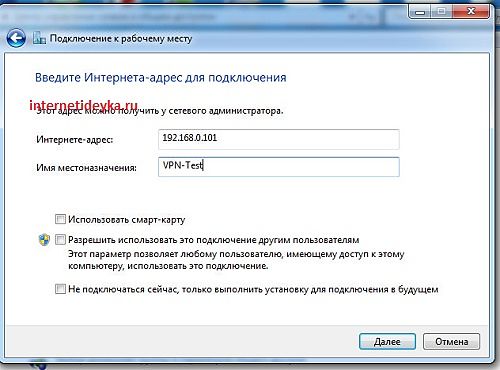
The wizard will ask you in the next step to specify the IP address of the VPN access server and assign a destination name. The IP address of the access server can be found on our first computer by entering the ipconfig command at the command line. The IP address of the Ethernet network will be the address you are looking for.

Then, the system will apply all the entered settings.

Let's connect
The X time for our experiment is to perform a client connection to the server side of our network. In the network center, select the "Connect to the network" option. In the window that appears, click VPN-Test (we indicated the destination with this name) and click the connect button.


So, we will open the VPN-Test connection applet. In the text fields, specify the name and password of the "user" for authorization on the access server. If everything goes well and our user not only registers on the network, but is also able to fully connect to the access server, then the designation of the connected “user” will appear on the opposite side.
But sometimes, this kind of error can happen. The VPN server is not responding.
![]()
Click the tab for incoming connections.

On the marked tab, open the properties of the IP protocol.
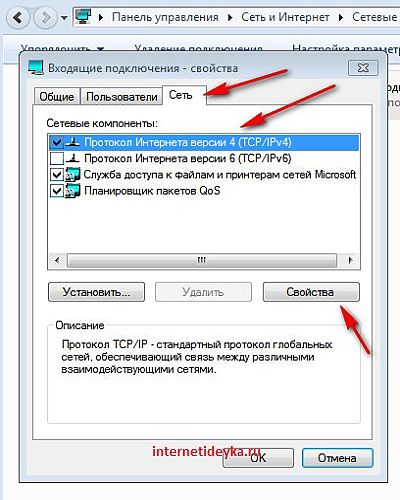
Let's set the option to specify IP addresses explicitly and write down which IP addresses should be served.

When we reconnect, we will see such a picture. The system shows us that one client is connected and this vpn(SimpleUser) client.
Summary
So, in order to establish a VPN network between two PCs, you will need to decide which one should become the “master” and play the role of a server. Other PCs must connect to it through the authorization system. Windows has tools to create the back end for our network. It is configured by creating a new incoming connection, specifying the user, as well as applications that should accept the connection. The client is configured by establishing a connection to the workplace, specifying the user and data of the server to which this user should connect.


